Keeping It Level
A grab bar in the wrong spot is just a towel rack. Before you drill anything, map the three moments that actually require support — entry, transit, and the sit-to-stand transition. Get those zones right first, then worry about the finish. Use the personalized height calculator further down this page to find exactly how high before you buy anything.
If you’re thinking about grab bar placement, the biggest question isn’t which bar to buy — it’s where exactly should it go?
I’ve worked inside hundreds of bathrooms, and I see the same mistake constantly. Bars get installed where they “fit” the tile pattern or look symmetrical, rather than where a human body actually needs them. I once walked into a home where a homeowner had installed a 36-inch bar on the far back wall of a soaking tub. It looked great, but you couldn’t actually reach it until you were already standing in the wet tub. That’s exactly when you’re most likely to slip. Grab bars are one of the single biggest improvements you can make for aging in place renovations, but it’s important to get it right.
A well-placed grab bar can make a bathroom dramatically safer; one installed in the wrong spot is just a high-end towel rack.
This guide focuses on the strategy of placement for optimal senior safety. For a bird’s-eye view of your entire remodel, start with my Pillar Guide to Senior Bathroom Safety.
The “Natural Reach” Rule: How to Map Your Space
Before you drill a single hole, you need to perform a “dry run.” The most helpful grab bar is the one you can grab before you lose your balance, not after.
The Human Element
Placement isn’t one-size-fits-all. When I’m on a job site, I ask the homeowner to walk through their routine.
- The “Weak Side” Factor: If a user has a weaker left side, due to a stroke or hip surgery for example, a bar on the left wall might be harder to use. We always prioritize the dominant or strongest side for the primary “pull” bar.
- The Seated Pivot: If the user is using a wheelchair, the bars must be placed to allow for a “pivot transfer.” This requires clear space for the chair to pull up alongside the toilet or shower bench.
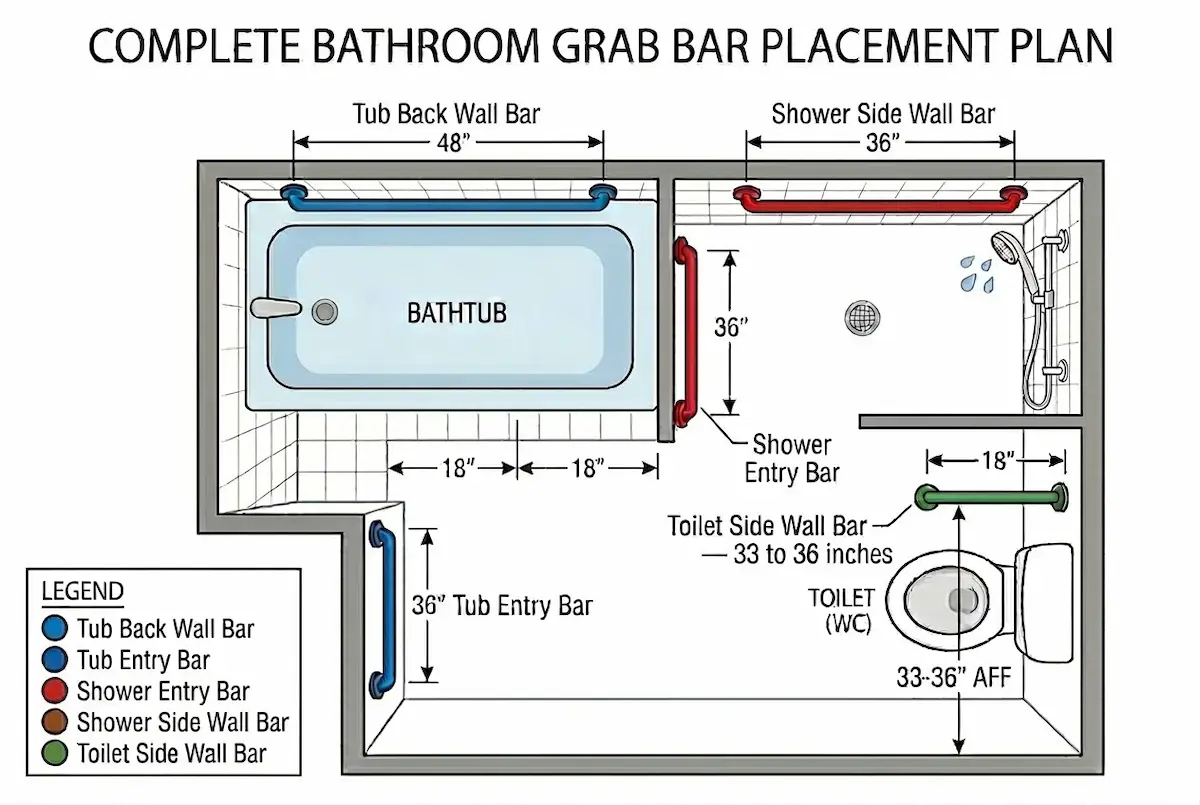
Grab Bar Placement in the Shower: Entry, Transit, and Rest
In a shower, safety happens in three distinct phases. You need support for each.
- The Entry/Exit (The Vertical Bar): Vertical grab bar placement at the ‘jamb’ or entrance of the shower is the most underrated installation I do. It gives you a solid handhold while lifting a leg over a threshold or stepping onto a potentially slick floor.
- The Transit (The Side Wall Bar): Once inside, you need a horizontal or angled bar along the long side wall. This provides a “sliding” handhold as you move toward the faucet or the bench.
- The Rest Zone (The Bench Bar): If you use a shower seat, you need a bar positioned specifically to help you transition from sitting to standing. Getting that bar position right depends partly on bench height—my guide to shower bench height for seniors covers exactly how these two elements work together.
For a complete zone by zone breakdown of exactly where each bar goes in the shower my Shower Zone Grab Bar Placement Guide covers entry, transit, and rest zone placement in detail — including the specific measurements for each position.
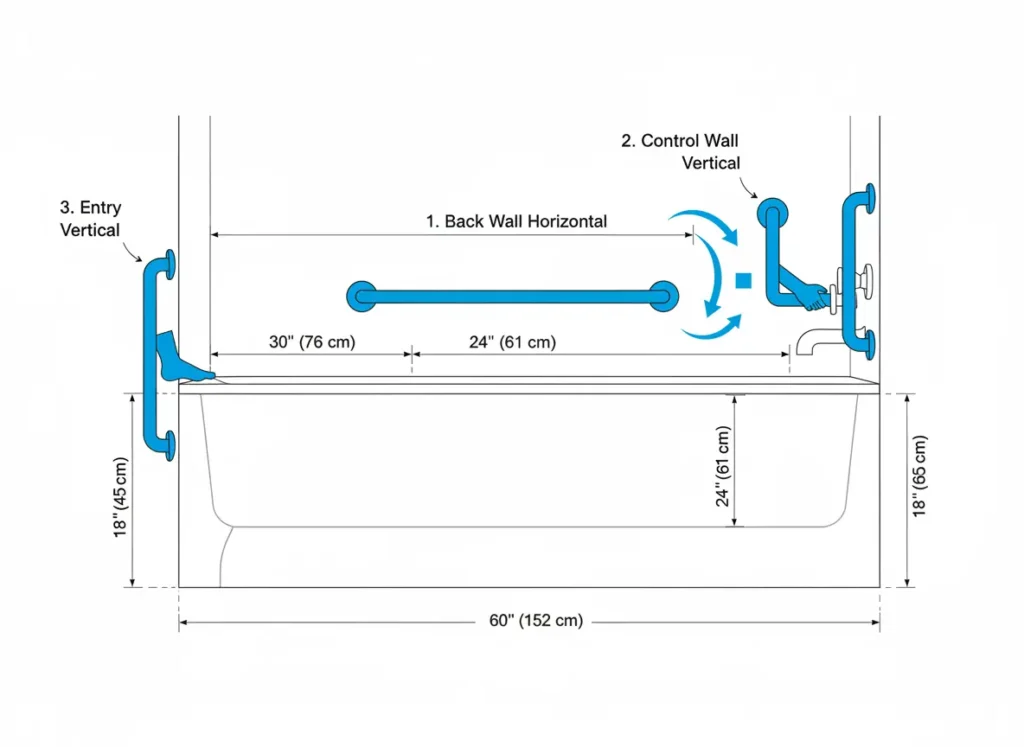
The Bathtub Challenge: The “Step-Over” Pivot
Bathtubs are the highest-risk areas because they require a “single-leg stance” while stepping over a 14–18 inch wall. If you lose your grip mid-step, there is no “middle ground”—you are either in or out.
- The Back Wall Bar: A long horizontal bar on the back wall is standard, but it’s often too far away to help during the actual step-over.
- The Control Wall: I often suggest a shorter vertical or “L-shaped” bar on the wall where the faucet is. This allows the user to hold on with one hand while adjusting the water temperature with the other—a moment where many people lose their balance while leaning forward.
- The Entry Vertical: Don’t overlook the wall outside the tub. A vertical bar mounted on the leading edge of the tub wall provides the leverage needed to stabilize your core before you ever lift a foot.
Grab Bar Placement Around the Toilet: Planning for Leverage
Standing up from a seated position requires significant leverage.
- The Side Wall: If the toilet is tucked into a corner, the side wall is your best friend. A horizontal bar here allows the user to push upward using their arm strength.
- The “Floating” Toilet Problem: If your toilet is out in the middle of a wall with no side wall nearby, a standard horizontal bar won’t work. In these cases, we look at Stander Poles. These are floor-to-ceiling tension bars that provide a vertical handhold anywhere in the room without needing a nearby wall.
- Contractor Strategy: If you are planning an aging in place renovation, this is why we install 2×10 wood blocking behind the drywall across the entire toilet area. It gives us the freedom to place the bar exactly where the user needs it, regardless of where the studs are.
For toilet specific placement including ADA measurements, which side gets the bar, and the two mark stud finding method for locating framing through tile my Toilet Grab Bar Placement Guide covers that zone in depth.
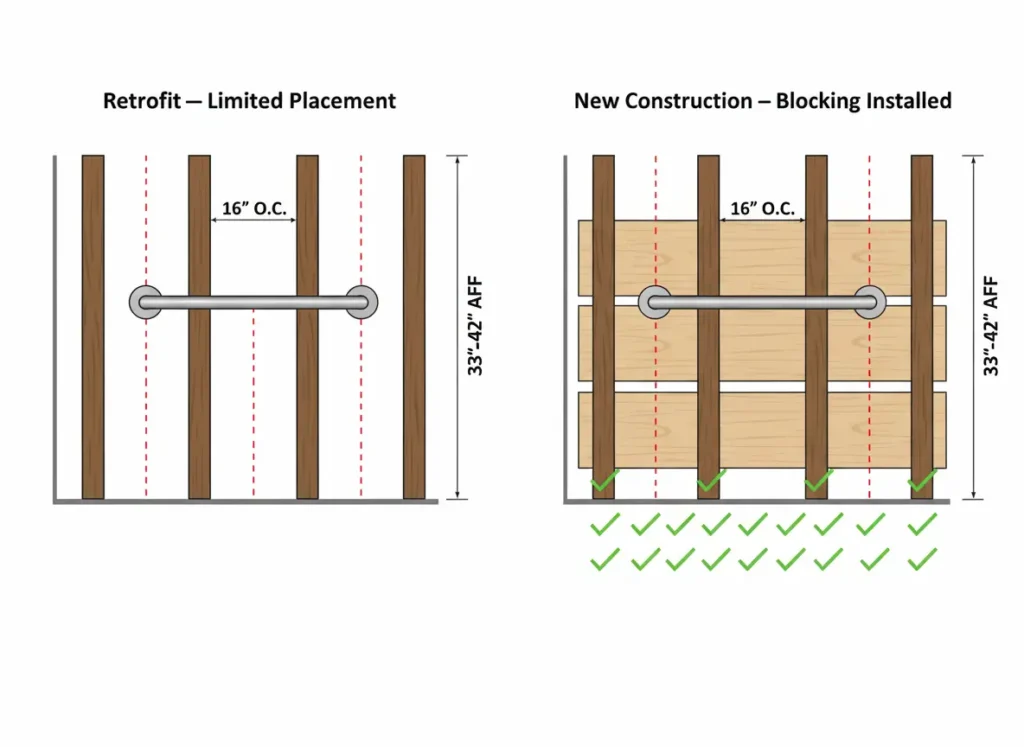
Retrofitting vs. New Construction: The Contractor’s Distinction
Retrofitting (Adding to an existing bathroom): Retrofitting grab bar placement into an existing bathroom means working around existing studs. If there isn’t a stud exactly where you need it, we have to use specialized heavy-duty anchors or open the wall from the backside. If you’re working with an existing bathroom and want to improve safety without major renovation, my guide to aging in place bathroom safety without a full remodel covers the practical options.
New Construction / Full Remodel: This is your golden opportunity. During the “rough-in” phase, we install “blocking”—extra wood supports between the studs. This allows us to place grab bars at any height or any angle. I always tell my clients: “Put wood everywhere.” Even if you don’t need a bar today, having the wood behind the tile means you can add one in 10 minutes five years from now.
FAQ: Placement Strategies
Where should grab bars go in a walk-in shower specifically? A vertical bar at the entry for balance, and a long horizontal or angled bar on the side wall for support while washing. If you have a bench, a third bar should be within reach of the seat.
How high should grab bars be near a toilet? Typically 33 to 36 inches from the floor per ADA guidelines. However, if the user is particularly tall or short, we adjust this so their arm is at a comfortable 90-degree angle when gripping the bar while seated.
What is the correct vertical grab bar placement height? For vertical grab bar placement at a shower entry I mount the bar so the top is between 65 and 70 inches from the floor and the bottom sits around 45 inches. This gives users of varying heights a full grip range — tall users grab near the top, shorter users grab lower — without repositioning their hand during the transition step.
Can grab bars be installed at an angle? Yes. Angled bars are often more ergonomic for people with wrist pain or arthritis, as they allow for a more natural grip angle compared to a strictly horizontal bar.
More Grab Bar Placement Questions
How many grab bars does a bathroom need total? I recommend a minimum of three: one at the shower/tub entry, one inside the bathing area, and one near the toilet.
What’s the difference between placement for a senior vs. someone recovering from surgery? Seniors generally need “balance assist” (horizontal bars), while surgery patients often need “weight-bearing assist” (vertical or angled bars) to help lift their body weight without using a specific leg or hip.
What is the most common placement mistake? Installing the bar too far away. If you have to “reach” for it, your center of gravity is already compromised. The bar should be right where your hand naturally falls.
How does placement differ for a wheelchair user? A wheelchair user needs bars at a height that allows them to use their arms to “lift” their weight during a transfer—often slightly lower than standard height to accommodate the chair’s seat level.
Find Your Grab Bar Height
Placement strategy tells you where the bar goes. Your specific height and bar type determine how high. Use the calculator below to get a personalized recommendation before you buy anything.
Grab Bar Height Calculator
Get your personalized mounting height based on your measurements and needs.
Where will the grab bar be installed?
What type of grab bar?
Primary mobility consideration?
User's height
Your personalized spec is ready
Enter your email and we'll send your recommended heights, mounting notes, and a printable spec summary — free.
Please check your email address and try again.
No spam. Unsubscribe anytime. Your info is never sold or shared.
Check your spam folder if you don't see it within a few minutes.
Final Thoughts on Grab Bar Placement
Grab bar placement is the difference between a bar that saves you and one that’s just decoration. Get the placement right first — then worry about the finish. If you’re ready to move from placement strategy to the technical installation details, my Grab Bar Installation Guide covers studs, drill bits, and hardware.
Not sure where to start in your own bathroom? My Free Home Safety Checklist walks you through the same audit framework I use on job sites.