
When families start planning a bathroom renovation for elderly loved ones the conversation usually starts with tile, grab bars, or a curbless shower entry. Senior bathroom backerboard is rarely the first thing on their mind — but it should be.
I got a call a few years ago from a family who couldn’t figure out why their mother’s brand new shower was already falling apart.
They’d hired the cheapest contractor they could find to build her an accessible bathroom. The tile looked fine at first. Within a year, tiles started buckling and falling off the wall. They assumed it was a tile problem.
It wasn’t.
When I got in there and started pulling tile, I found regular drywall behind it. No cement board. No waterproofing membrane. Just standard drywall — the same stuff that’s behind your living room paint — sitting in a wet shower.
By the time we were done tearing it out, we weren’t just replacing tile. We pulled drywall out of the adjacent rooms and replaced part of the subfloor — water damage had been silently spreading for months behind a bathroom that was supposed to make someone safer.
The cheap contractor ended up costing that family significantly more than doing it right the first time would have.
This guide is for families and homeowners who want to understand what should be happening behind their shower walls during an aging-in-place renovation — so they can ask the right questions before they hire someone, not after they’re tearing everything out.
If you’re still figuring out the bigger picture of what a senior bathroom renovation should include, my Ultimate Guide to Senior Bathroom Safety maps out every element from floor to fixtures — backerboard and waterproofing included. But let’s start with what goes behind the tile, because this is where most renovations go wrong.
- Why Regular Drywall Is Never an Option Behind Tile
- What Is Backerboard and Why Does It Matter?
- Senior Bathroom Backerboard Options: HardieBacker, Durock, and Kerdi Board
- Why Dimensions Matter More Than You Think
- Waterproofing: Your Three Options
- Floors, Walls, and Special Situations
- Common Mistakes I See on the Job
- Codes, Permits, and Questions to Ask Your Contractor
- Contractor FAQ: Senior Bathroom Backerboard and Waterproofing
- Does cement board need to be waterproofed?
- Can you tile directly over green board?
- What is the difference between HardieBacker and Durock?
- Do I need backerboard on a shower floor?
- What screws do I use for cement board?
- How long does RedGard or Mapei need to dry before tiling?
- Does replacing a tub with a shower require a permit?
- What is Ditra and do I need it?
- How do I know if my contractor waterproofed the shower correctly?
- Is Kerdi board worth the extra cost?
- The Bottom Line
Why Regular Drywall Is Never an Option Behind Tile
Before we talk about what to use, let’s talk about what never belongs behind shower tile.
Regular drywall has no place behind tile in a wet shower. Green board — moisture-resistant drywall — is acceptable behind prefab shower inserts like stud-to-stud or glue-up units, but it is never appropriate behind tile. If tile is going on the wall, cement board is the minimum. No exceptions.
Standard drywall will absorb water, swell, grow mold, and eventually fail. The tile above it will buckle, crack, and fall. And by the time you see any of that happening on the surface, the damage behind the wall is usually already significant — and expensive.
I’ve seen it more than once. It never ends well.
One more thing worth noting while we’re on the subject of drywall: any drywall adjacent to the tile work — the ceiling directly above the shower and any wall area above where the tile stops — should be moisture-resistant drywall at minimum. That’s not the same as greenboard behind tile, which we already covered. This is about the drywall that’s near the wet zone but not being tiled over. Standard drywall in those areas will absorb steam and humidity over time and eventually fail. It’s a small upgrade that most contractors should be doing automatically in a bathroom remodel — if yours isn’t mentioning it, bring it up.
What Is Backerboard and Why Does It Matter?
Backerboard is the layer that goes directly over your wall studs before tile goes up. Its job is to provide a stable, water-stable surface that won’t deteriorate in a wet environment the way drywall does.
The key phrase there is water-stable — not waterproof. This is one of the most common misconceptions I run into during aging-in-place renovations and we’ll come back to it in a minute.
For most tile showers, you’re choosing between three main products.
Senior Bathroom Backerboard Options: HardieBacker, Durock, and Kerdi Board
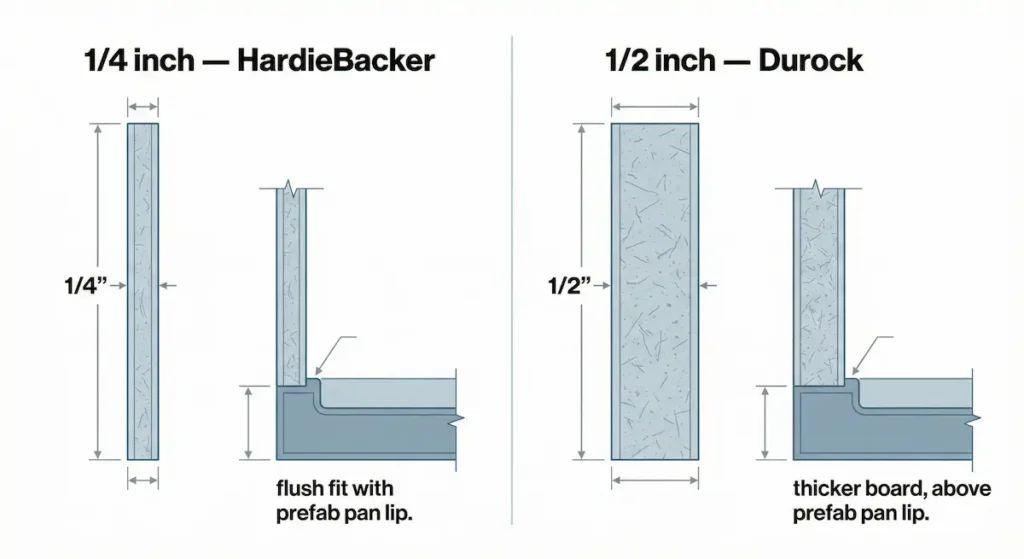
HardieBacker HardieBacker is a fiber-cement board and my personal preference for many jobs. In aging-in-place builds, senior bathroom backerboard thickness matters more than most contractors explain upfront. It comes in 1/4-inch or 1/2-inch thickness. It’s slicker and lighter than traditional cement board, and that 1/4-inch dimension lines up perfectly with the lip on most prefab shower pans, which makes transitions significantly cleaner. In senior bathroom renovations where every inch of shower space matters for mobility and maneuvering, that dimensional advantage is worth noting.
Durock Durock is the old reliable — a true cement board that’s been around forever. It originally only cam in 1/2-inch thickness, which means it’s heavier, grittier, and eats up a little more of your finished shower space. It is now also offered in 1/4-inch thickness, though i have never personally used this one. It’s tough as nails and does exactly what it’s supposed to do. Neither product is wrong — they both perform well when installed correctly.
Kerdi Board Kerdi is a completely different animal. It’s a foam-based board made by Schluter that replaces cement board entirely rather than supplementing it. It’s lighter, easier to cut, and significantly easier to mold around custom shapes like benches and niches — which makes it a particularly strong option for aging-in-place builds where custom bench seating and grab bar niches are common. The seams still need to be taped and sealed with Schluter’s own Kerdi-band product to create a fully waterproof system. It costs more than standard cement board but the ease of working with it on complex custom builds can offset some of that in labor. If you’re still deciding between a built-in bench and a portable chair my Shower Bench vs Shower Chair Guide covers which option works best for your specific space and budget.
Why Dimensions Matter More Than You Think
Here’s something most homeowners don’t realize until it’s too late.
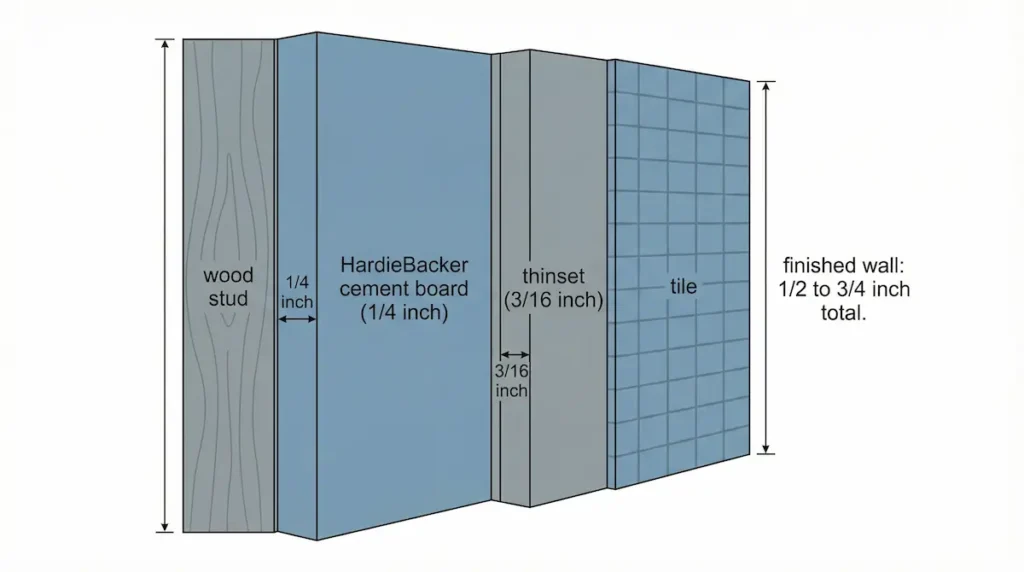
When you frame a 32×60 inch shower, your finished shower will not be 32×60 inches. Every layer you add to the walls eats into that space:
- HardieBacker: approximately 1/4 inch per wall
- Durock: approximately 1/2 inch per wall
- Thinset: approximately 3/16 inch
- Tile: varies by product
By the time everything is installed, you’re typically losing between 1/2 inch and 3/4 inch of space on every tiled wall. For most showers that’s not a dealbreaker, but it matters significantly in aging-in-place builds where shower dimensions are often carefully planned around wheelchair access, walker clearance, or transfer space from a shower bench.
If you’re still figuring out your shower entry, Can Your Bathroom Floor Support a Curbless Shower? covers the subfloor decisions that happen even before backerboard goes up
In tile work, the math is the difference between a good job and a bad one. Every layer has a thickness, every thickness affects your layout, and every layout decision needs to be made before the first board goes up — not after the tile is already on the wall. A contractor who isn’t doing that math upfront is going to be making corrections on your dime later.
The Biggest Senior Bathroom Backerboard Misconception: Cement Board Is Not Waterproof”
This is the most important thing to understand about senior bathroom backerboard — and the most commonly skipped step I see on renovation jobs.
I need to say this clearly because it surprises almost every homeowner I work with.
Cement board will not rot, swell, or fall apart like drywall when it gets wet. That’s why it’s used in wet areas. But it is porous — water moves right through it to your wooden studs behind it.
Cement board alone is not a waterproof system. It is the first layer of one.
To actually waterproof your shower you need a membrane applied over the cement board. This is where I see contractors cut corners more than anywhere else in a bathroom build — and where the most expensive failures come from. In a senior bathroom where a waterproofing failure means tearing out a carefully planned accessible shower and starting over, getting this right the first time is non-negotiable.
This is the step that separates a bathroom that holds up for twenty years from one that gets torn out in five. If you’re weighing the full scope of what a proper aging-in-place renovation involves beyond just waterproofing, Aging in Place Bathroom Modifications: What Your Contractor Won’t Tell You Unless You Ask is worth reading before you hire anyone.
🔍 Quick Home Safety Tip
Shortcuts behind the tile, grab bars mounted into drywall instead of studs, and floors that look safe but aren’t — these things tend to show up together. And most homeowners have no idea until something fails or someone gets hurt.
That’s why I put together a Free Home Safety Checklist it covers the most common home hazards to look for.
Waterproofing: Your Three Options
Option 1 — Paint-On Membrane (Most Common)
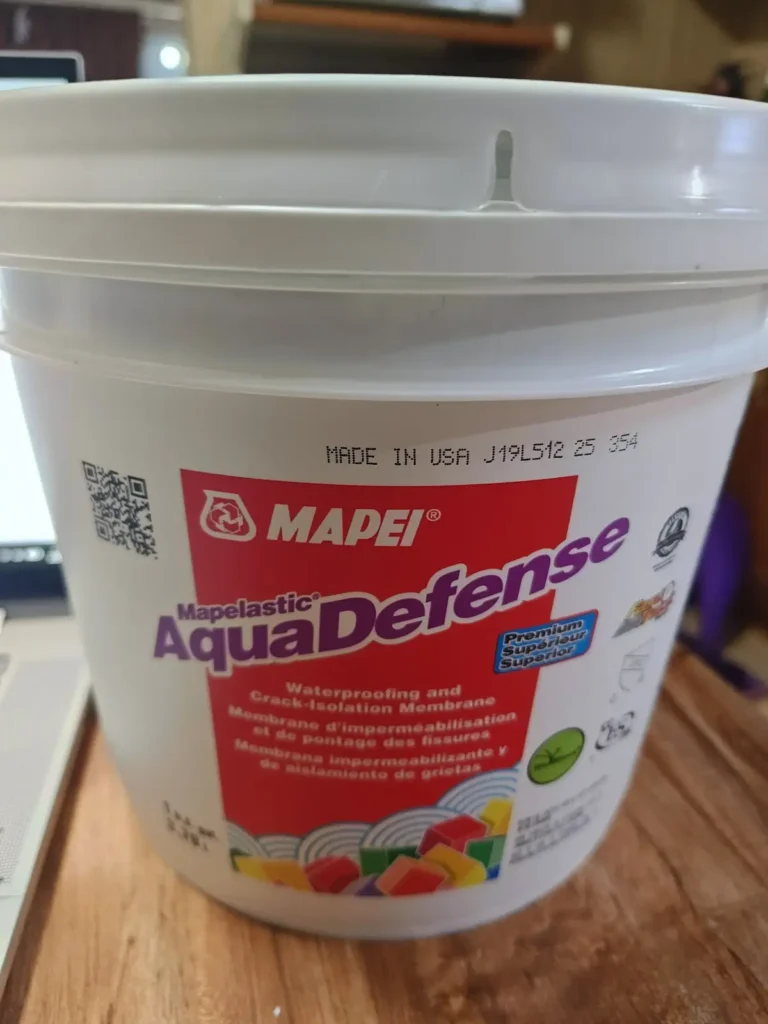
This is the method I use on most jobs and what the majority of professional tile installers specify. After the cement board is up, you apply a liquid waterproofing membrane — products like Mapei AquaDefense or RedGard are the most common — directly over the surface.
The process works like mudding drywall. You embed waterproofing tape into every seam and corner — anywhere two surfaces meet — and paint the membrane over the entire shower surface. What you’re creating is essentially a waterproof bowl inside your shower. Water hits the tile, gets through the grout, hits the membrane, and has nowhere to go except down the drain.
Once it’s dry — typically within an hour or two depending on conditions — you’re ready to tile the same day.
Always check the coverage rate and application instructions on the specific product you’re buying. Manufacturers update formulations and coverage rates can change between product generations. What the label said two years ago may not be accurate today.
Rough material cost estimate for an average 32×60 shower:
- HardieBacker or Durock: $80-120 depending on shower height
- Cement board fasteners: $15-20
- Mapei AquaDefense or RedGard: approximately $70 per bucket covering roughly 60 square feet — budget for 2 buckets on an average shower, roughly $140
- Waterproofing tape: $15-25
- Estimated total materials: $250-350
Option 2 — Ditra (Uncoupling Membrane)
Schluter Ditra is a polyethylene mat that serves as both a waterproofing layer and an uncoupling membrane. Uncoupling means it allows the tile layer and the substrate to move independently — which helps prevent cracking if the house shifts or settles over time.
Instead of painting the membrane on, you embed the Ditra mat into a layer of thinset over the cement board, let it cure, and then tile over it.
The tradeoff is time and cost. Ditra requires a 24-hour cure time before you can tile, which means a job that could be tiled same-day with a paint-on membrane now carries over into a second day. In labor terms, budget for roughly double the cost of the paint-on method. On an aging-in-place renovation where someone may be without their primary shower during the work, that extra day matters for scheduling.
Rough material cost estimate:
- Cement board: same as above
- Ditra mat: about $150 a roll
- Additional thinset for mat installation: $20-30
- Estimated total materials: $400-550, plus significantly higher labor
Option 3 — Kerdi Board System
With Kerdi board you’re replacing the cement board entirely. The board itself acts as the substrate and the waterproofing layer in one, with Kerdi-band tape sealing the seams and corners.
It costs more per sheet than standard cement board but on complex custom showers with multiple angles, benches, and niches — the kind of builds that come up constantly in aging-in-place renovations — the ease of cutting and shaping it can make the premium worthwhile. On a straightforward standard shower the cost difference is harder to justify.
Rough material cost estimate:
- Kerdi board runs roughly 2-3x the cost of standard cement board per sheet
- Kerdi-band seam tape and Kerdi-fix sealant add to the material cost
- Estimated total materials: $500-700+ depending on shower size and complexity
As with all products — always verify current pricing and coverage rates on the spec sheet before your contractor orders materials.
Floors, Walls, and Special Situations
Shower Floors: Why Backerboard Doesn’t Belong Here
Shower floors are a different situation than walls. Rather than backerboard, a shower floor typically gets a mud base — a hand-packed mortar bed that’s sloped toward the drain at a minimum of 1/4 inch per foot. The slope has to be built into the mud base before anything else goes down. If the slope isn’t right, water pools, the membrane fails faster, and grout deteriorates. In an aging-in-place shower where a wet floor is already a fall risk, a poorly sloped floor that holds standing water makes everything worse. If you’re watching a contractor build a shower floor, ask them how they’re establishing the slope — it’s one of those details that’s easy to get right and catastrophic when it isn’t.
Prefab Shower Pans: What Changes
Prefab shower pans change the equation on floors. If you’re using a prefab pan and tiling only the walls, the backerboard goes on the walls only — not under the pan. The pan itself handles the floor waterproofing. This is where HardieBacker’s 1/4-inch thickness shines — it sits flush against the pan’s lip for a clean transition.
Benches, Niches, and Grab Bar Blocking
Shower benches and niches need the same substrate and waterproofing treatment as the rest of the shower. The bench gets framed out, covered in backerboard, and waterproofed the same as the walls. One tip before framing begins: have your tile picked out first. You want the tile to break on full grout lines across the bench face — not end up with a sliver of tile at the edge because nobody accounted for the layout before framing. In an aging-in-place bathroom where the bench is a primary safety feature, the last thing you want is a compromised tile edge. For everything you need to know about bench height and positioning, my Shower Bench Height for Seniors guide covers it in detail.
Grab bar blocking goes behind the cement board, between the studs. The backerboard and membrane go right over it the same as any other wall area — the blocking doesn’t change the waterproofing process at all. If you’re planning grab bars as part of the renovation, which you should be in any aging-in-place build, make sure the blocking is in before the cement board goes up. Adding it after means opening the wall. My Grab Bar Installation Guide covers exactly where that blocking needs to go and why placement matters before a single board is hung. For a zone-by-zone breakdown of exactly where those bars need to go once the blocking is in place my Shower Zone Grab Bar Placement Guide covers entry, transit, and bench zone placement in detail.
Common Mistakes I See on the Job
These are the senior bathroom backerboard mistakes I see most often on aging-in-place renovation jobs (well, all bathroom renovation jobs)
Skipping the Waterproofing Membrane
Skipping the membrane entirely. It happens more than it should. Some contractors tile right over cement board and call it done. That shower will fail. It’s not a question of if — it’s when. Budget for the membrane and make sure it’s on the spec sheet before work begins.
Tiling Over Regular Drywall
Tiling over regular drywall. I’ve seen it. It always fails. Sometimes within a year. See the opening of this post.
Missing the Seams and Corners
Missing the seams. The membrane painted on the flat surface means nothing if the corners and seams aren’t taped first. Water finds every gap. Every corner and joint needs to be taped before the membrane goes on — the same concept as mudding drywall. A contractor who skips this step is leaving gaps in a system that’s supposed to have none.
Not Doing the Math Before the Work Starts
Not accounting for wall thickness in fixture and layout planning. Every layer has a thickness. Order fixtures or finalize layout before calculating the finished wall thickness and you’ll end up with valves that don’t sit flush and tile cuts that don’t line up. In tile work, the math has to happen before the work starts.
Using the Wrong Fasteners
Using the wrong fasteners. Cement board requires specific pan-head fasteners. The brand is Rock-On and the fasteners are called Backer-On — that’s what I reach for. Standard drywall screws will pull right through the board. It’s a small detail that causes real problems when it’s gotten wrong.
Ignoring Manufacturer Specifications
Not following manufacturer specs. Every waterproofing product has specific application instructions — coverage rate, number of coats, dry time, temperature requirements. Those specs exist for a reason. When a membrane fails it’s often because someone eyeballed the coverage or skipped a coat to save time. Always verify the current spec sheet for whatever product is being used — formulations change and what applied two years ago may not apply today.
Codes, Permits, and Questions to Ask Your Contractor
Building codes for shower waterproofing vary by state and municipality — always verify requirements with your local building department before starting work.
On permits: a permit is required when you’re changing plumbing — meaning moving pipes. Swapping out a tub for a walk-in shower doesn’t automatically require a permit as long as the drain and supply lines stay in the same location. The moment pipes are being relocated, a permit and inspection are required. Same goes for any electrical work being altered. A licensed contractor should know exactly what triggers a permit requirement in your area without hesitation.
Here are the questions worth asking any contractor before they start on a senior bathroom renovation:
- What backerboard product are you using and why?
- What waterproofing membrane are you specifying?
- How are you handling the seams and corners?
- Does this project require permits — and if so, which ones and why?
- What’s the manufacturer’s recommended cure time before you tile?
- Can I see the spec sheet for the waterproofing product you’re using?
- How are you establishing the slope on the shower floor?
- Where is the grab bar blocking going and at what height?
A contractor who knows what they’re doing will answer every one of those questions without hesitation. Vague answers or pushback on any of them — especially the permit question — are worth paying attention to before the work starts.
Contractor FAQ: Senior Bathroom Backerboard and Waterproofing
Does cement board need to be waterproofed?
Yes — and this is the most important thing to understand before any tile shower gets built. Cement board is water-stable, meaning it won’t rot or fall apart like drywall when it gets wet. But it is porous. Water moves right through it to the wood studs behind it. Cement board alone is not a waterproof system. It needs a membrane applied over it — either a paint-on product like Mapei AquaDefense or RedGard, or a mat system like Ditra. Skipping this step is one of the most expensive mistakes I see on renovation jobs.
Can you tile directly over green board?
No — not in a tile shower. Green board is moisture-resistant drywall and it’s acceptable behind prefab shower inserts like stud-to-stud or glue-up units. The moment tile is going on the wall, green board is not an appropriate substrate. Cement board is the minimum. I’ve seen tile jobs done over green board. They fail. It’s only a matter of time.
Do I need backerboard on a shower floor?
No — shower floors are handled differently than walls. Instead of backerboard, a shower floor typically gets a mud base — a hand-packed mortar bed that’s sloped toward the drain at a minimum of 1/4 inch per foot. That slope is critical. A shower floor that doesn’t drain properly holds standing water, breaks down the waterproofing membrane faster, and creates a slip hazard — which is the last thing you want in a bathroom being renovated for an elderly parent or someone with mobility concerns.
What screws do I use for cement board?
You need cement board fasteners specifically — not drywall screws. The brand is Rock-On and the fasteners are called Backer-On. They have a larger pan head and specialized teeth designed to bite into cement board without cracking it or pulling through. Standard drywall screws will go right through the board. It’s a small detail but it matters — loose backerboard means movement behind your tile, and movement behind your tile means cracked grout and eventual failure.
How long does RedGard or Mapei need to dry before tiling?
Typically one to two hours under normal conditions — but always check the spec sheet for the specific product you’re using. Temperature, humidity, and how thickly the membrane was applied all affect dry time. This is one of those things where following the manufacturer’s instructions matters. A membrane that isn’t fully cured before tile goes up isn’t doing its job.
Does replacing a tub with a shower require a permit?
It depends on whether you’re moving pipes. Swapping a tub for a prefab shower or a tile shower without relocating the drain or supply lines typically doesn’t require a permit. The moment pipes are being moved — even slightly — a permit and inspection are required. Same goes for any electrical work being altered in the bathroom. A licensed contractor should know exactly what triggers a permit requirement in your municipality. If yours can’t answer that question clearly, that’s worth paying attention to. If you’re still deciding between a walk-in tub and a walk-in shower my Walk-In Tub vs Walk-In Shower Guide covers the practical differences from a contractor’s perspective
What is Ditra and do I need it?
Ditra is a polyethylene mat made by Schluter that acts as both a waterproofing layer and a membrane. Uncoupling allows the tile layer and the substrate to move independently, which helps prevent grout cracking if the house settles. It’s a legitimate product and works well. That said, most residential aging-in-place showers don’t require it — a properly applied paint-on membrane does the job at a smaller cost and lets you tile the same day. Ditra adds significant labor cost and a mandatory 24-hour cure time before tiling can begin. Whether it’s worth the premium depends on your specific situation. Ask your contractor why they’re specifying it if it shows up on your quote.
How do I know if my contractor waterproofed the shower correctly?
Honestly, the best time to verify this is before the tile goes up — not after. A properly waterproofed shower will have visible membrane coverage across every wall surface with no bare spots, and waterproofing tape embedded into every corner and seam where walls meet each other and where walls meet the floor. The membrane should have a uniform color with no thin or missed areas. If your contractor is resistant to letting you see the work before tile covers it, that’s a red flag. Once the tile is up, what’s behind it is invisible — and that’s exactly where problems hide until they become expensive.
Is Kerdi board worth the extra cost?
It depends on the complexity of your shower. For a standard rectangular shower with no custom features, the cost premium over cement board is hard to justify. For a custom aging-in-place build with a bench, niches, multiple angles, or non-standard dimensions — which comes up constantly in senior bathroom renovations — Kerdi board is significantly easier to cut, shape, and fit. On those jobs the labor savings can offset some of the material premium. It’s a contractor preference call more than a homeowner decision, but if your contractor is specifying it on a straightforward shower, it’s worth asking why.
The Bottom Line
The tile is what you see. The backerboard and membrane are what make it last.
In an aging-in-place bathroom, the stakes are higher than a standard remodel. A waterproofing failure doesn’t just mean tearing out tile — it can mean tearing out an entire carefully planned accessible shower and starting over, potentially leaving an elderly parent without a safe bathing option for weeks.
The family whose shower I gutted to the studs didn’t save anything by hiring the cheap contractor. They paid for a full shower build twice, plus water damage remediation in rooms that had nothing to do with the bathroom. The contractor who skipped the membrane cost them far more than doing it right the first time would have.
Whether you’re choosing senior bathroom backerboard for a custom build or a straightforward shower swap, don’t let anyone skip the waterproofing membrane
Get the substrate right. Get the membrane right. Follow the manufacturer specs. Ask the questions above before anyone picks up a drill.
Everything else is just tile.
My Non-Slip Bathroom Flooring for Seniors guide covers what goes on top of the system we just built — because the substrate and the surface have to work together. If you’re considering luxury vinyl instead of tile my Non-Slip LVT Flooring for Seniors Guide covers waterproof core requirements, thickness, and subfloor prep — including the MDF problem that shows up most often in older homes and mobile homes.