Keeping It Level
The most common mistake isn’t placement — it’s trusting the drywall. A grab bar screwed into drywall is a liability dressed up as a safety feature. Know what’s behind your wall before you commit to a location and never skip the silicone. Use the personalized height calculator further down this page to find exactly how high before you buy anything.
Proper grab bar installation is one of the most effective aging in place upgrades you can make. After installing them in hundreds of bathrooms, the single most common mistake I see isn’t the placement—it’s the assumption of strength. I’ve walked into homes where homeowners have “installed” bars into fiberglass inserts or thin drywall using butterfly toggles. To a contractor, that isn’t a safety feature; it’s a handle attached to a trap door.
This grab bar installation guide focuses on the technical side of installation—choosing the right hardware, finding the studs through difficult materials, and the field-tested realities of bathroom mechanics. If you’re looking for a room-by-room map of exactly where these bars should be located for maximum ergonomics, that is covered separately in our Comprehensive Grab Bar Placement Guide. For a complete overview of bathroom safety planning for seniors, beyond grab bars, see our Senior Bathroom Safety Guide.
The Contractor’s Standard: Beyond the “Minimum”
The Americans with Disabilities Act (ADA) provides the baseline, but for a private aging in place renovation, we often aim higher.
- Weight Rating: While the ADA requires a 250lb capacity, I prefer to install something rated 400–500 lbs. The price difference is negligible, but the safety margin is massive.
- The Finish Trap: Clients often want high-polish chrome because it looks “clean.” In reality, polished finishes become incredibly slick when soapy. I always steer my clients toward peened or knurled (textured) finishes for the actual gripping surface.
- Diameter: Stick to 1.25 to 1.5 inches. Anything thicker is hard for arthritic hands to wrap around; anything thinner feels like it’s cutting into the palm under pressure.
Choosing the Right Hardware: Field Observations
Not all “ADA-Compliant” bars are created equal. Here is what I’ve learned from years of maintenance and follow-up calls:
1. Moen 24-Inch Stainless (Peened Finish)
Contractor Observation: This is my “workhorse” bar. The stainless steel won’t corrode, but more importantly, Moen’s “SecureMount” system is the best in the business if you hit a stud slightly off-center.
- Field Note: Avoid the bright “mirror” finishes in the shower; they show every water spot and soap film.
- Available at: Amazon · Home Depot · Lowe’s
2. Franklin Brass 18-Inch (Concealed Mount)
Contractor Observation: This is a great budget-friendly bar for near the toilet.
- Field Note: The “concealed mount” covers can be a pain to snap on if your wall isn’t perfectly flat. If you have older, wavy plaster walls, expect to spend an extra 10 minutes fighting with the trim kit.
- Available at: Amazon · Home Depot · Lowe’s
3. Moen Flip-Up Grab Bar
Contractor Observation: Essential for tight spaces near the toilet where a fixed bar would block a walker.
- Field Note: These put massive leverage on the wall. If you aren’t mounting this into a double-stud or solid 2×10 blocking, don’t install it at all. It will pull right out of a single 2×4 over time.
- Available at: Amazon · Home Depot
Installation Safety: Why DIY is Harder Than It Looks
The “Tile Blindness” Problem
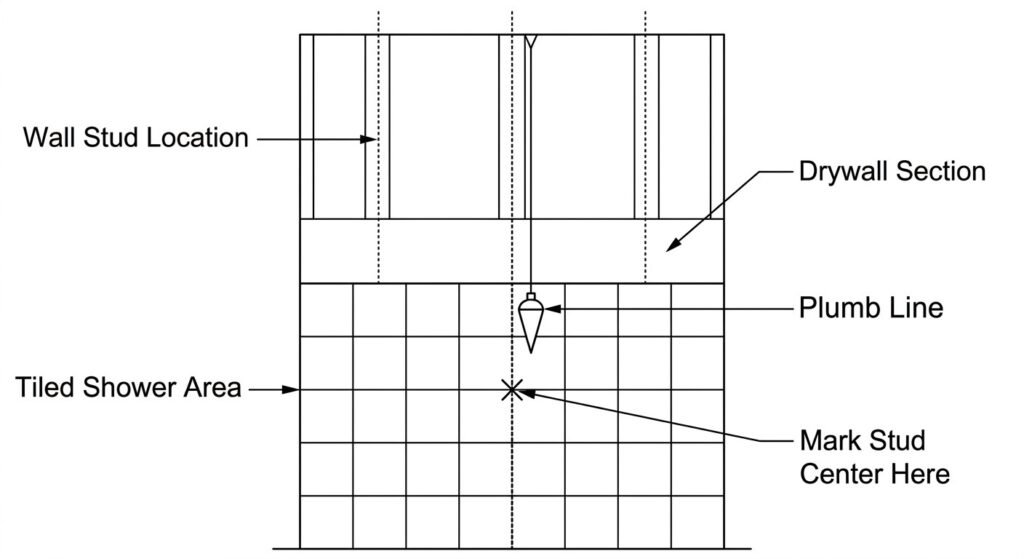
Standard stud finders are useless through mortar and thick porcelain tile.
- The Pro Move: I locate the studs above the shower (where it’s just drywall) and use a plumb line to mark the center of the stud down into the shower area.
- The Bit Matters: Don’t try to use a masonry bit on modern porcelain tile; you’ll just burn the bit and crack the tile. You need a diamond-tipped tile bit and a constant stream of water to keep it cool.
- A Note on Materials: Choosing the right tile for wet areas is a separate but equally important decision
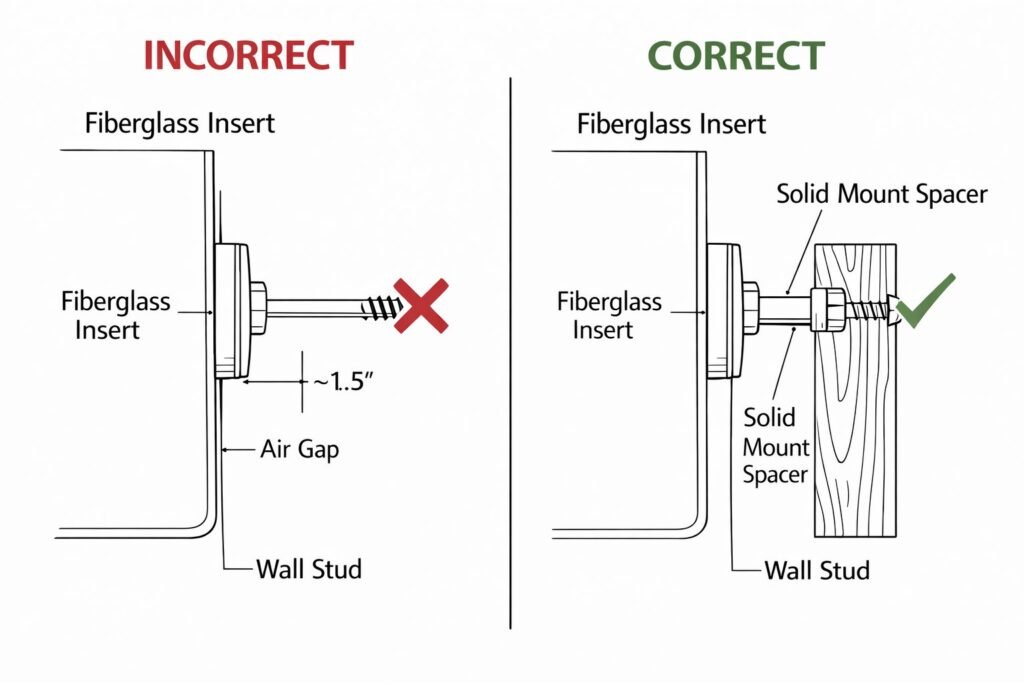
The Fiberglass Gap
Many 1990s-era homes have fiberglass shower inserts. There is often a 1-to-2-inch air gap between that flimsy plastic and the actual wooden stud. If you’re replacing a fiberglass surround my Shower Surrounds for Seniors Guide covers which replacement materials work best for grab bar installation and why the choice has to happen before blocking goes in.
- The Danger: If you screw a bar through the plastic and into the wood, the first time someone leans on it, the plastic will crack and cave in. You must use solid-mount spacers that bridge that gap to the stud.
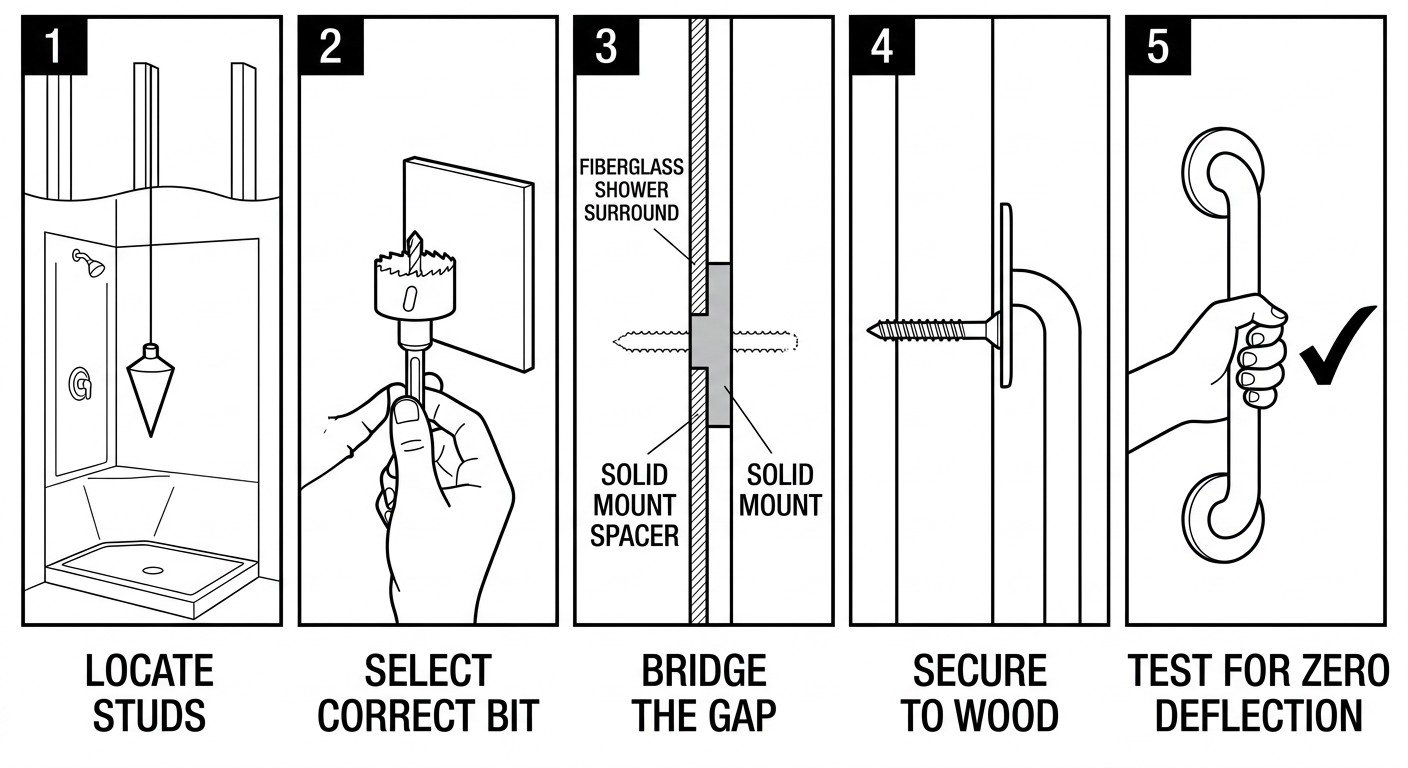
The Basic Grab Bar Installation Process
If you are attempting a DIY installation, follow these core technical steps to ensure structural success:
- Locate Studs: Use the “plumb line” method above the shower to find the center of each wooden stud.
- Select Hardware: Match your drill bit to your wall material (diamond-tipped for porcelain/stone).
- Bridge the Gap: Use specialized solid-mount spacers if you are installing into a fiberglass insert.
- Secure to Wood: Mount directly into the stud or 2×10 blocking—never rely on drywall anchors alone.
- Tug Test: Check for “zero deflection” (zero movement) before snapping your trim covers into place.
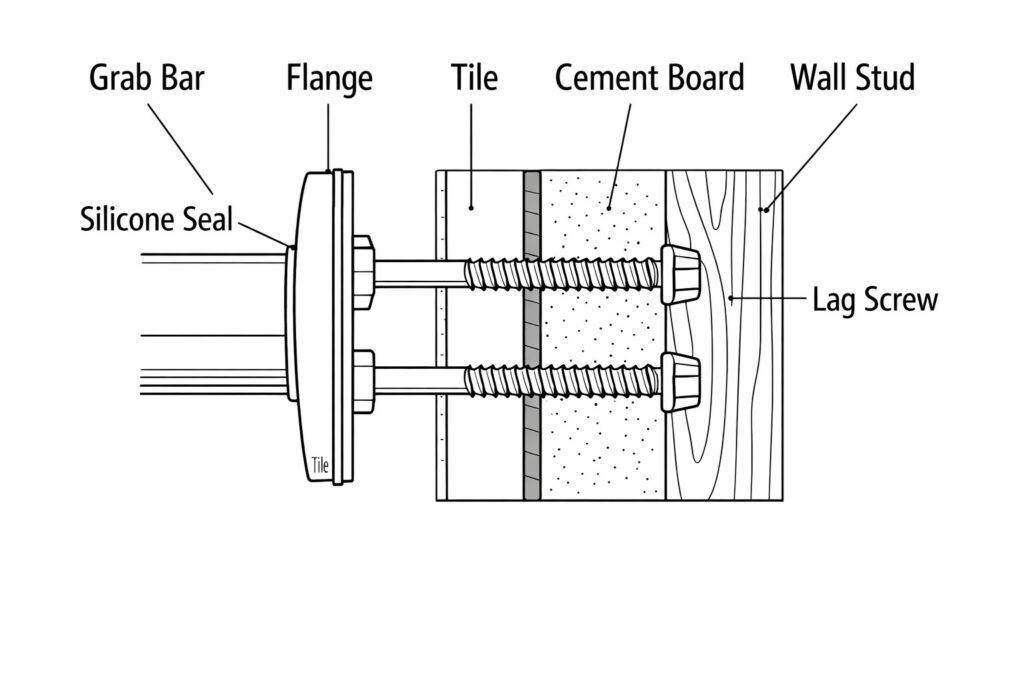
That blocking goes in before the cement board — if you want to understand the full wall system your grab bars are mounted into, my Senior Bathroom Backerboard Guide covers it

Grab Bar Installation Costs: Understanding the Variables
I can’t give you a fixed quote because every wall is a mystery until we get there. Here is what drives the price:
- Wall Material: Drilling into drywall takes 5 minutes. Drilling into Grade-A Porcelain or Natural Stone takes 45 minutes and $30 worth of specialty diamond bits.
- Access: If we have to open the wall from the backside (usually through a closet or hallway) to add wood blocking, the labor costs will increase, but the result is a bar you could hang a truck from.
- Hardware Quality: Expect to pay $40–$100 for a professional-grade bar. Avoid the $15 “discount” bars; the metal is thinner and they often rust at the weld points.
FAQ: Professional Insights
At what height should grab bars be installed? The ADA standard is 33 to 36 inches from the floor to the top of the bar.
Can I install grab bars myself? A DIY grab bar installation project is possible if you have a stud finder, a high-quality drill, and your shower is fiberglass or drywall. However, if you have tile or stone, the risk of cracking a $5,000 tile job is high. In those cases, the cost of a pro is cheaper than a repair.
How many grab bars do I actually need? At a minimum, especially for those planning on aging in place, I recommend the “Triangle of Stability”: one vertical at the entry, one horizontal along the side wall, and one near the toilet. For a zone-by-zone breakdown of exactly where each bar goes in the shower my Shower Zone Grab Bar Placement Guide covers entry, transit, and rest zone placement in detail. For toilet specific placement including ADA measurements and the two mark stud finding method my Toilet Grab Bar Placement Guide covers that zone in depth.
What’s the difference between a grab bar and a safety rail? A grab bar is permanently bolted to the structure. A “safety rail” usually clamps onto the side of a tub. I rarely recommend clamps; they can wiggle loose, and that “wiggle” is exactly what causes a person to panic and fall.
Will installing these damage my tile? Yes, we have to drill holes. However, a professional uses escutcheon plates (trim covers) and 100% silicone sealant to ensure the holes are water-tight and invisible once the bar is mounted.
How do I know if the bar is secure? The “Contractor Tug Test” isn’t enough. I check for zero deflection. If the wall moves even a fraction of an inch when you pull the bar, it’s not anchored correctly.
Find Your Grab Bar Height Before You Buy
Installation is only half the equation. Before you pick up a drill make sure you know exactly what height you’re aiming for based on who’s using the bar. Use the calculator below for a personalized recommendation.
Grab Bar Height Calculator
Get your personalized mounting height based on your measurements and needs.
Where will the grab bar be installed?
What type of grab bar?
Primary mobility consideration?
User's height
Your personalized spec is ready
Enter your email and we'll send your recommended heights, mounting notes, and a printable spec summary — free.
Please check your email address and try again.
No spam. Unsubscribe anytime. Your info is never sold or shared.
Check your spam folder if you don't see it within a few minutes.
When to Hire a Professional
Safety isn’t a place to “wing it.” You should consider hiring a pro if:
- You hit a “hollow” spot where you thought a stud was.
- Your shower walls are made of marble, granite, or porcelain.
- You are installing into a pre-fab shower insert with a large air gap.
- You want the peace of mind that comes with a structural guarantee.
A professional grab bar installation includes a structural assessment before drilling, proper anchoring or blocking if needed, waterproof sealing at every penetration point, and a full load test before leaving the job site.
Ready to evaluate the rest of your home for hidden safety risks? My Free Home Safety Checklist walks through the room-by-room framework — so you can find the risks before they find you.