The last bathroom I walked into before writing this had three separate safety problems hiding behind one ‘simple’ toilet replacement. The homeowner had called me because their toilet was rocking when they sat down. What I found when I pulled it up was a drain pipe that was way too short — whoever installed it never actually secured it to the flange. That’s not a mistake. That’s laziness. And underneath that? The subfloor was spongy from years of slow leaks from both the toilet and the shower working together to rot the wood from the inside out. One phone call turned into a full subfloor replacement, a new comfort height toilet, and a shower overhaul.
That’s how bathroom safety works in the real world. Problems don’t announce themselves. They hide behind tile and drywall until someone gets hurt — or until a contractor pulls up the floor. As a contractor with years of experience in residential remodeling, I’ve seen the same story play out too many times: a “standard” bathroom that worked fine at age 40 becomes a series of dangerous obstacles at age 70. Between slick surfaces, low seating, and poor lighting, the “Builder Grade” bathroom is practically designed for falls.
According to the CDC, falls are the leading cause of injury for elderly adults, and the majority happen in the bathroom. But here’s the professional truth: Many bathroom injuries are preventable. This guide isn’t just a list of products; it’s a blueprint. We use ADA (Americans with Disabilities Act) standards as our North Star—not because they are required in private homes, but because they are the gold standard for safety. Whether it’s just a few upgrades or planning a full remodel, this is the data you need to build a space that is beautiful and safe. For a deeper look at the contractor mistakes that turn a safe-looking bathroom into a liability, my guide to aging in place bathroom modifications covers what most contractors won’t tell you unless you ask.
At Aging Safe Home, we approach every recommendation from a contractor’s perspective — not a product reviewer’s.
1. Structural Integrity: Why “Studs or Nothing” is the Rule
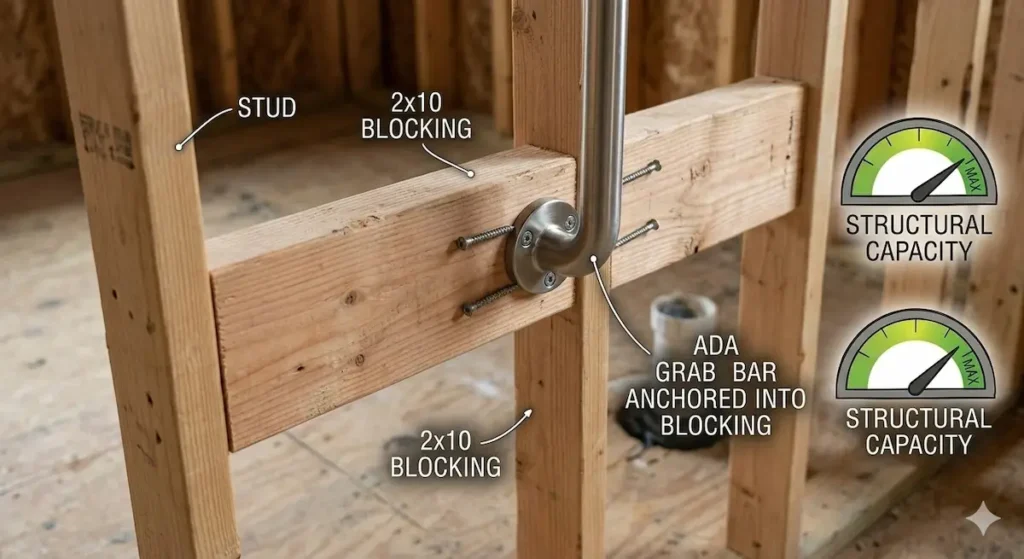
Before we talk about pretty tile or high-tech toilets, we have to talk about what’s behind the walls. In senior bathroom safety, structural integrity isn’t optional — it’s the foundation everything else builds on. I’ve walked into dozens of homes where someone installed a grab bar using plastic drywall anchors. That is a death trap. A grab bar is only as strong as the wood it’s screwed into. When a 200lb person loses their balance, they aren’t “leaning” on the bar; they are putting 2x or 3x their body weight of force on it in a split second.
The Blocking Rule
If you are stripping your walls to the studs, this is your golden opportunity. We install 2×10 blocking (horizontal wood planks) between the studs at the 33–36 inch height mark. This allows you to mount a grab bar anywhere along that wall, not just where the vertical studs happen to be.
Weight Capacity and Diameter
ADA standards require a bar to support 250 lbs, but in my projects, we aim for 400lb-rated bars. It costs an extra $10 and provides a lifetime of peace of mind. Additionally, the diameter matters: A bar that is too thick is hard to grip; one that is too thin feels flimsy. Stick to the 1.25 to 1.5-inch diameter range for the most secure handhold.
Once you understand the structural requirements, placement is the next critical decision. Our Grab Bar Placement Guide walks through exactly where bars should go in the shower, beside the toilet, and at the tub entry for maximum effectiveness.
Deep Dive: Read my full Guide to Grab Bar Installation & Stud Finder Secrets
2. Flooring & The “DCOF” Revolution: Beyond “Non-Slip” Labels
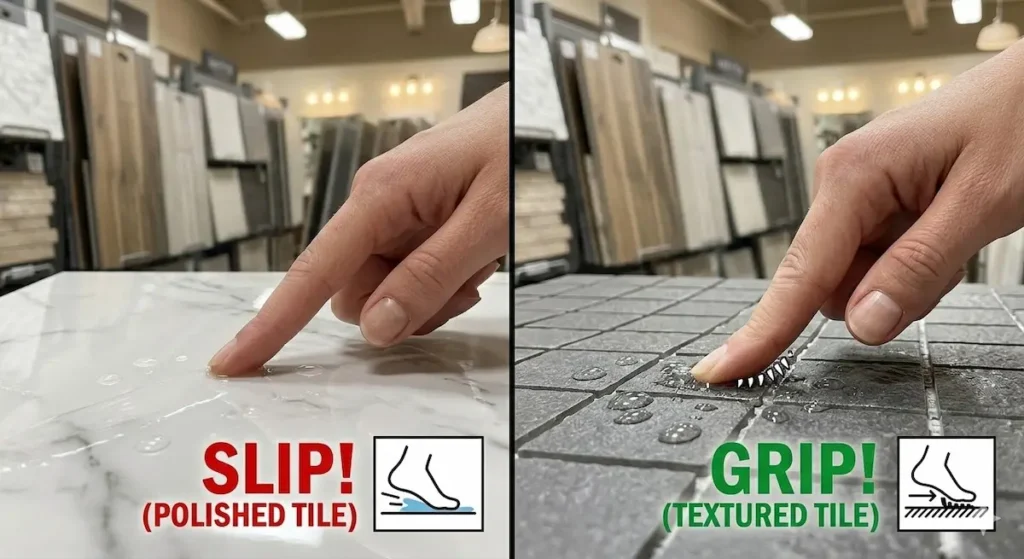
“Non-slip” is a marketing term, not a technical one. As a contractor, I look for a specific number: DCOF (Dynamic Coefficient of Friction). If a tile doesn’t have a spec sheet confirming this rating, it doesn’t go in my client’s bathroom.
The 0.60 Gold Standard
The industry standard for a flat floor is 0.42, but for a senior-safe shower, I push for 0.60 DCOF or higher. This helps avoid the “Matte Trap”—the common misconception that just because a tile isn’t shiny, it must be grippy. When soapy water is involved, a standard matte tile can become an ice rink.
Mosaics vs. Large Format
In the shower, I almost always recommend 2×2 inch mosaics because the extra grout lines act like a “tread” on a tire for mechanical traction. However, you can still use the popular large-format tiles if you ensure they have an aggressive surface texture or a specialized manufacturer anti-slip coating.
[INSERT IMAGE: Finger Slip Test Comparison – Slick vs. Safe]
Deep Dive: Understanding DCOF- Why 0.42 Isn’t Enough for Your Shower
3. The Throne: Comfort Height & Sit-to-Stand Physics
Toilet height is one of the most overlooked elements of senior bathroom safety. Standard toilets are 14–15 inches high. That forces the body into a “deep squat” position. For anyone with arthritis or limited hip mobility, getting out of that position requires a massive amount of upper-body strength and core balance.
The 17–19 Inch Rule
An ADA-compliant “Comfort Height” toilet brings the seat up to chair height. This keeps the hips at or above the knees, making it significantly easier to stand up without straining the joints.
Elongated vs. Round
Always go with an elongated bowl if your bathroom footprint allows it. The extra 2 inches of surface area provides better support and is generally considered more hygienic for those with mobility challenges.
4. Thresholds & Clearances: Designing for the “Future You”
The biggest mistake homeowners make is designing for how they move today. You have to design for the “Future You”—the one who might be using a walker or a wheelchair temporarily after a surgery.
Doorway Width
Most standard bathroom doors are 30 inches. A wheelchair needs a 32-inch clear opening. To achieve this, you usually need to frame for a 34-inch or 36-inch door. The framing process is more involved than most homeowners expect — our guide to widening your bathroom doorway covers exactly what’s inside that wall and why costs vary so dramatically from home to home.
- Pro-Tip: If you can’t move the framing, “Swing-Away” hinges can buy you an extra 2 inches of clearance for about $30, allowing the door to swing completely out of the frame.
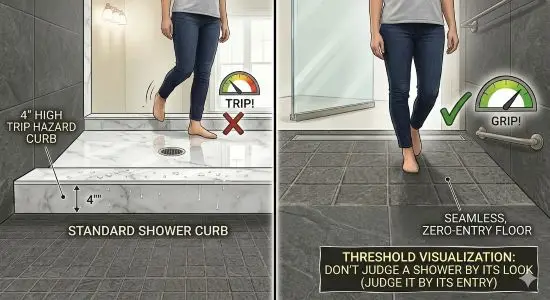
Zero-Entry (Curbless) Showers
The 4-inch “curb” at the bottom of a shower is the biggest tripping hazard in the room. A true curbless shower requires lowering the floor joists or using a specialized linear drain system. It’s a bigger investment, but it removes the barrier entirely. If you’re planning a built-in bench as part of that conversion, my Shower Bench Height Guide covers the exact finished floor measurements that determine whether the seat actually works for the person using it daily.
Deep Dive: Curbless Showers: The Ultimate Guide to Zero-Entry Design
5. Lighting: The “Invisible” Fall Prevention Strategy
Lighting is one of the most underestimated factors in senior bathroom safety. Research shows that a 65-year-old needs four times as much light as a 20-year-old to see the same level of detail. In a bathroom, where clear water sits on grey tile, poor lighting makes it impossible to tell where a puddle ends and the floor begins. Below are only some options, but you can truly get creative with lighting.
Layered Lighting and Color Temperature
- The Shower Can: We install IP65-rated (wet zone) recessed LED lights directly over the shower bench.
- 5000K Daylight LEDs: Unlike “warm” yellow light, daylight bulbs (5000K) provide high contrast, helping the eye distinguish between edges and surfaces.
- Motion-Sensor Night Lights: Mandatory for 3:00 AM bathroom trips. We install LED tape lights under the vanity “toe-kick” that glow automatically when they sense movement.
6. The Science of Drainage: Linear Drains & Slopes
If the water doesn’t move correctly, the floor becomes a hazard. In a senior-safe shower, we prefer Linear Drains over standard center drains.
One-Way Slopes
A linear drain allows the entire shower floor to slope in one single direction (like a ramp). This provides a perfectly flat, stable plane for a walker or a shower chair to sit on. Standard center drains create a “bowl” shape that can make shower chairs wobbly and unstable. If you’re deciding between a built-in bench and a portable seat for your shower, that stability difference matters more than most people realize — our guide to shower benches vs shower chairs breaks down which option works best depending on your layout and mobility needs.
7. Thermal Safety: Anti-Scald Technology
Thermal safety is a senior bathroom safety concern most contractors never mention. For seniors with neuropathy, they may not realize water is dangerously hot until they’ve already been burned. The natural reaction to scalding water is to jump back—leading to a catastrophic fall.
- Thermostatic Mixing Valves: These allow you to “set and forget” the temperature (typically 102°F), ensuring it never spikes even if a toilet is flushed elsewhere.
- Handheld Shower Wands: Essential for seated users. Mount them on a vertical slide bar so they can be adjusted for both standing and seated heights.
8. The Accessible Vanity: The “Lean” Danger
The vanity is the final piece of a complete senior bathroom safety plan. If you have to lean forward 12 inches just to reach the faucet, you are shifting your center of gravity over a slick floor. This is where a lot of “minor” slips happen.
The Knee Clearance Trap
I often see homeowners try to “DIY” an accessible vanity by just removing the cabinet doors. This is a mistake. To be truly safe for a seated user (on a stool or wheelchair), you need a minimum of 27 inches of vertical clearance and at least 8 to 11 inches of “toe kick” depth at the floor. Without this, the user’s knees hit the back of the wall before their hands can reach the faucet, forcing them to lean dangerously forward.
The “Offset Drain” Professional Secret
When we install a floating or open vanity, the biggest hurdle is the plumbing. A standard drain comes straight down in the middle—exactly where a wheelchair user’s legs need to go. We use an offset drain assembly to move the P-trap toward the back wall. This clears the center space, providing a safe, unobstructed “roll-in” area that prevents the user from banging their shins on hard PVC or hot copper pipes.
Tilting Mirrors
Standard mirrors show a seated user only the top of their head. We install mirrors on pivot brackets so the glass can be angled downward. This keeps the user in a stable, upright seated position while they groom.
9. Senior Bathroom Safety FAQ
Q: How much does a senior bathroom safety remodel cost?
A: A basic safety refresh for an elderly parent or senior homeowner (installing grab bars, a comfort-height toilet, and improved lighting) can cost between $1,500 and $3,000. A full ADA-compliant remodel featuring a curbless walk-in shower can range from $15,000 to $35,000. Every home is different, and a proper assessment before starting is essential—these are ranges, not quotes.
Q: Are walk-in tubs safer than walk-in showers?
A: Generally, no. While walk-in tubs offer a low threshold, they require the user to sit inside the tub while it fills and drains, which can lead to chilling. Most contractors recommend curbless walk-in showers with a built-in bench as they are more practical for daily use. For a full side-by-side breakdown of both options including costs and long-term considerations, see our walk-in tub vs walk-in shower comparison.
More Senior Bathroom Safety Questions
Q: Will these safety modifications hurt my home’s resale value?
A: In the past, “handicap” features were seen as clinical. Today, with the massive “Aging in Place” trend, high-end safety features like curbless showers and Comfort Height toilets are actually considered luxury upgrades. If you use designer finishes, you are making the home more modern and desirable to a massive demographic of buyers.
Q: Can I use a towel bar as a grab bar if I use better screws?
A: Absolutely not. This is one of the most dangerous mistakes I see. A towel bar is made of thin-walled tubing designed to hold 10 pounds of fabric; it is not engineered to hold a human being’s weight. Even with better screws, the bar itself will buckle or the brackets will snap under the sudden force of a fall. Only use bars clearly labeled as “ADA-Compliant Grab Bars.”
Q: Is a “no-drill” or suction-cup grab bar safe?
A: Suction-cup bars are okay for a temporary “balance assist” while traveling, but I never recommend them for permanent home safety. They can lose their seal without warning. For a primary residence, permanent, stud-mounted bars are the only way to ensure the bar won’t come off the wall when you need it most.
Q: What is the best way to clean slip-resistant, textured tile?
A: High-traction tile (0.60+ DCOF) has microscopic “peaks and valleys” that provide grip, but those same valleys can trap soap scum. I recommend using a neutral pH cleaner and a soft-bristled brush rather than a flat mop to keep the surface from becoming “filmy” and slick over time.
Senior Bathroom Safety Checklist
- [ ] Grab Bars: 33–36″ high, anchored into solid wood/blocking.
- [ ] Toilet: 17–19″ seat height (Comfort Height).
- [ ] Shower Entry: 0″ preferred (curbless), 1/2″ max threshold.
- [ ] Flooring: 0.60+ DCOF rating on all wet surfaces.
- [ ] Shower Wand: Handheld head installed on a vertical slide bar.
- [ ] Lighting: 5000K Daylight LEDs with motion-sensor night lights.
- [ ] Doorway: 32″ clear opening width (use swing-away hinges if needed).
- [ ] Vanity: 27″ vertical knee clearance with offset drainage.
Final Thoughts on Senior Bathroom Safety
Bathroom safety is about independence. Small technical changes—like the right drainage slope or the correct tile friction—ensure you can live in the home you love for as long as possible. Start with the floor and the bars, and work your way up. And before any tile goes up, make sure the substrate and waterproofing behind your walls is done correctly — my Shower Backerboard and Waterproofing Guide covers what should be happening behind your shower walls before a single tile is set.
Not ready for a full remodel yet? Many of the most impactful safety upgrades don’t require demolition or major renovation. Our guide to aging in place bathroom safety without a full remodel covers the practical improvements that make a real difference without tearing anything out.
If you want to walk through your own bathroom using the same criteria I use on job sites, you can download my free Home Safety Checklist here.