
I’ve seen a $30,000 master bathroom remodel that had been finished less than six months earlier. It was beautiful— marble, a rainfall showerhead, and a massive built-in bench. But when the homeowner sat down, she felt a slight “give” in the seat. When I opened the wall behind it, I found that the bench had been framed with standard wood but never properly waterproofed before the tile went up. The “expensive renovation” was literally rotting from the inside out because the contractor ignored a $50 waterproofing step. If you’re still deciding between a bench and a chair altogether my Shower Bench vs Shower Chair Guide can help you make that call before going deeper into either option — if you’ve already decided a bench is right for your situation keep reading.
But if you want a permanent or high-stability upgrade, you need to understand that the “best” shower bench isn’t about the price tag—it’s about the framing, the slope, and the height.
Shower Bench vs. Shower Chair: Which Do You Actually Need?
Many homeowners researching a shower bench for seniors use these terms interchangeably, but in my experience on the job site, the distinction is critical for safety.
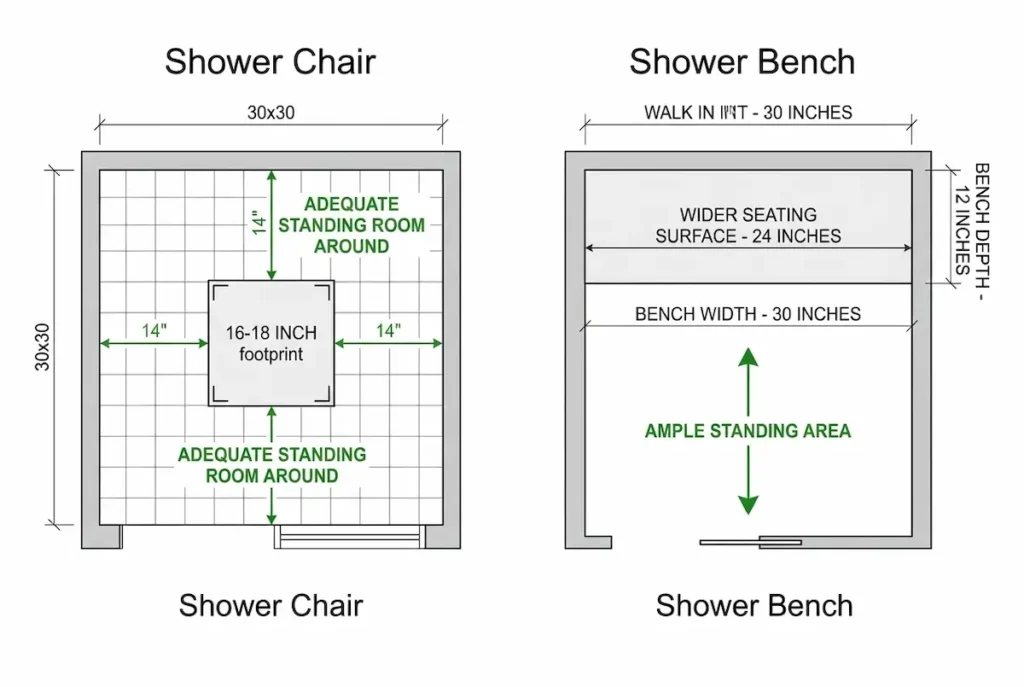
- A Shower Chair is a portable, medical-grade seat. It’s usually smaller (a 16 to 18-inch footprint) and is the best choice for compact 30×30 or 32×32 shower stalls where a bench would block the user’s movement.
- A Shower Bench is wider, often rectangular, and provides a much larger “target” for sitting down. Benches offer superior stability because they have a wider base of support. They are ideal for larger walk-in showers or for users who need extra room to shift their weight.
If you have the space, many people prefer a bench for aging in place. It feels like a solid piece of furniture rather than a “portable aid,” which provides a significant psychological boost to independence.
The 3 Main Types of Shower Benches
1. Built-In Benches (The Permanent Solution)
Constructed during a remodel and tiled to match the shower.
- The Contractor’s Warning: This is not a DIY area. A built-in bench must be slightly sloped (about 1/8 to 1/4 inch per foot) toward the drain so water doesn’t pool against the wall. If it’s perfectly level, you’ll have a permanent puddle that leads to mold and a slippery seat.
- The Weight Factor: These are part of the house, they can handle almost any weight capacity—if they are framed into the wall studs and floor.
2. Freestanding Benches (The Quick Upgrade)
These are portable benches made of teak, heavy-duty plastic, or aluminum.
- Field Observation: I see people buy “patio teak benches” for the shower all the time. Don’t do it. True shower-grade teak is treated differently to handle constant soap and steam.
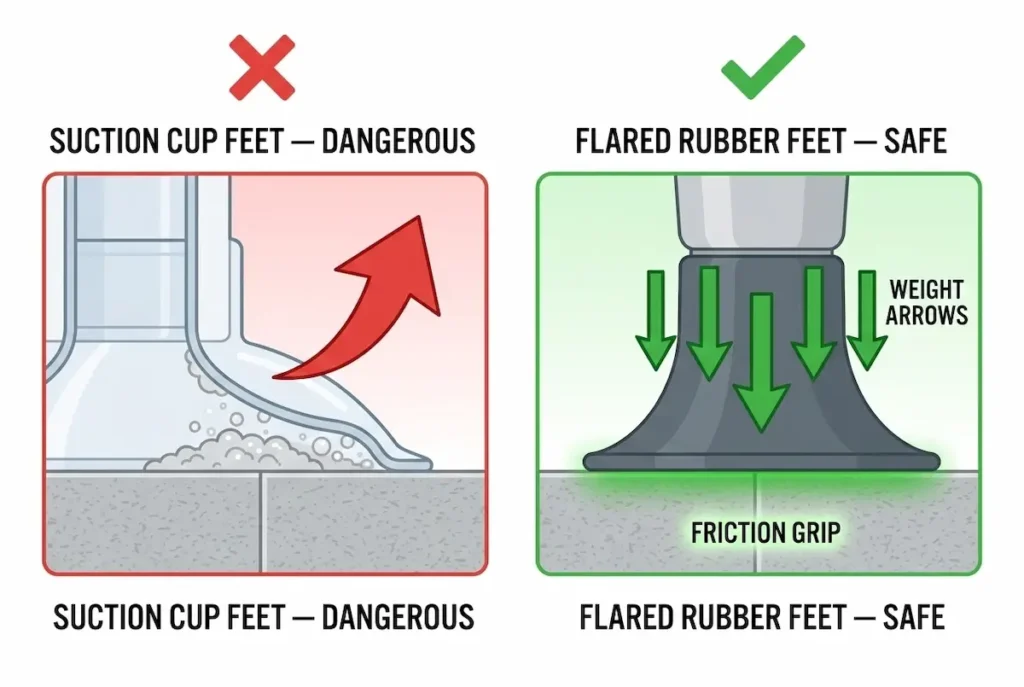
- The “Rubber Test”: When I inspect a freestanding bench, I look at the feet first. They should be wide, flared, and made of soft, non-marring rubber. If the feet are hard plastic, they will slide on wet tile like a hockey puck.
3. Tub Transfer Benches (The “Bridge”)
A specialized tool designed specifically for people who can no longer safely step over a high bathtub wall.
- How it Works: The bench straddles the tub. Two legs sit on the bathroom floor, and two legs sit inside the tub. You sit down in the “dry” area outside the tub and simply slide your legs over the wall while seated.
- Common Mistake: I often see these installed backward or without enough clearance for the bathroom door. You need at least 30 inches of clear floor space outside the tub to accommodate the bench’s “legs.”
Why Suction-Cup “Benches” Are a Danger
I need to be very direct: I refuse to install or recommend any bench that relies on suction cups for stability. On many cheap, “as-seen-on-TV” benches, you’ll see suction cups on the feet meant to “grip” the tile. In a contractor’s world, suction is a myth. Soap scum, grout lines, and even a slight texture on your tile will cause that suction to fail. When you sit down, the bench can “scoot” just an inch—but that inch is enough to throw off your center of gravity and cause a fall. Always look for high-friction, flared rubber feet that use the user’s weight to create grip.
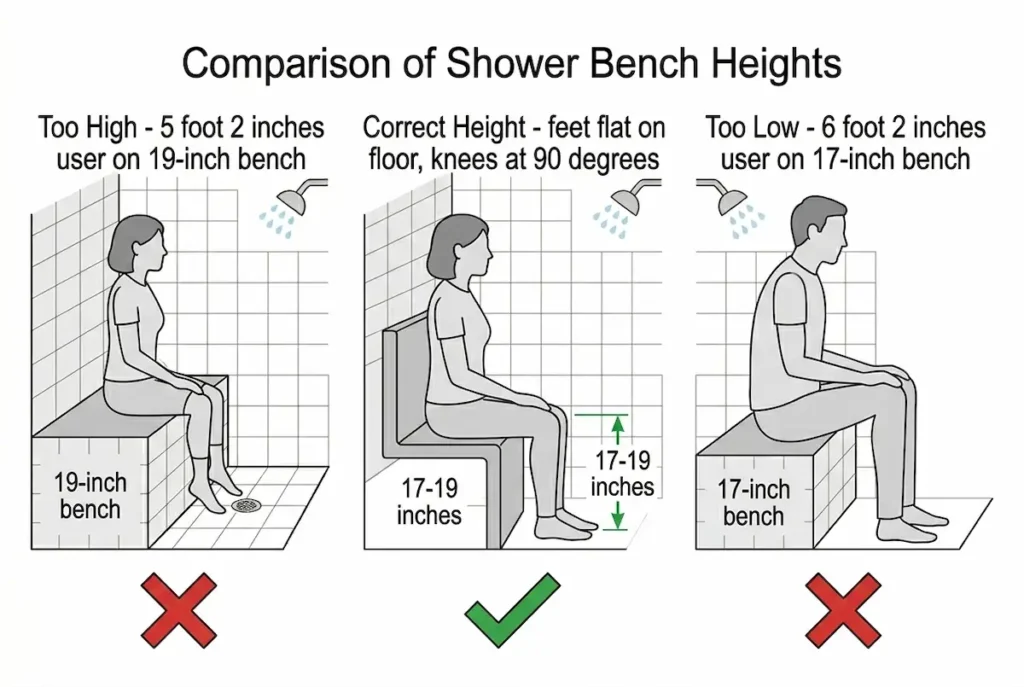
Shower Bench for Seniors: Getting the Height Right
Most standard benches come at a height of 17 to 19 inches. This aligns with ADA guidelines and works for most adults. However, if you are planning a built-in bench, “standard” isn’t always best.
- The Tall User: If you are 6’2″, a 17-inch bench will feel like a squat, making it incredibly hard on your knees to stand back up.
- The Short User: If you are 5’2″, a 19-inch bench might be too high, leaving your feet dangling. If your feet aren’t flat on the floor, you lose your “anchor,” making you feel unstable.
For a deeper dive into how to measure your specific “sweet spot,” see my Shower Bench Height Guide.
The “System” Approach: A Bench is Not a Grab Bar
The biggest safety mistake I see homeowners make is thinking a bench replaces the need for grab bars. A bench provides a place to sit; it does not provide the leverage needed to stand.
Every bench installation should be paired with:
- A Vertical Grab Bar: Placed at the entry point to assist with stepping in.
- A Horizontal or Angled Bar: Placed 33–36 inches from the floor near the bench so the user can “push” themselves up. My Shower Zone Grab Bar Placement Guide covers exactly where these bars need to go relative to your bench position.
- A Handheld Showerhead: A fixed showerhead is useless once you are seated. You need a wand on a slide bar that is reachable from the seated position.
For help coordinating these elements, my Bathroom Safety Guide walks through how these parts work together as a system.

Maintenance and Material Durability
Choosing the right shower bench for seniors also means thinking about long-term maintenance
- Plastic/Aluminum: These are the lowest maintenance but can look “medical.” Look for aluminum—never steel—to avoid rust stains on your grout.
- Teak/Wood: These look beautiful but require a monthly scrub to remove soap buildup. If the wood starts to feel “slimy,” mold is starting to grow.
- Cleaning Tip: Use a 10% bleach solution once a month on the rubber feet. This is where the most bacteria and mold accumulate, which can eventually break down the rubber and make it slippery.
FAQ: Questions from the Job Site
Is a shower bench safer than a shower chair? For many, a shower bench for seniors provides more stability than a chair. The larger surface area of a bench makes it easier to sit down without “missing” the seat, and the wider legs provide more stability. However, in very small showers, a chair is more practical.
Does Medicare cover shower benches? Generally, no. Original Medicare considers shower benches “convenience items” rather than “durable medical equipment.” However, some Medicare Advantage (Part C) plans have begun offering “aging-in-place” benefits that may cover them.
What weight capacity should I look for? Never buy a bench with a capacity of less than 250 lbs. If the user is over 225 lbs, I recommend a bariatric-rated bench with a 400–500 lb capacity to ensure the frame doesn’t “flex” over time.
How do I know if my freestanding bench is stable? Perform the “Wobble Test.” Empty the shower and place the bench in its usual spot. Push down hard on each of the four corners. If the bench rocks even 1/8 of an inch, the legs need to be adjusted or the floor slope is too aggressive for that model.
What is the best material for a shower bench? Anodized aluminum with a high-density plastic seat is the most durable and easiest to clean. If you prefer wood, ensure it is Grade-A Teak and maintain it regularly.
Can I use a shower bench in a bathtub? Only if it is a specialized Transfer Bench. A standard shower bench has legs that are too wide to sit flat on the curved bottom of most bathtubs.
Final Thoughts on Choosing a Shower Bench for Seniors
A shower bench is one of the most impactful upgrades you can make for bathroom safety, but it only works if you treat it as part of a larger plan. Focus on the height, ensure the feet are non-slip rubber (never suction), and always install a grab bar within reach.
Real safety comes from looking at the entire bathroom. To identify the specific risks in your current space, I recommend using my Free Home Safety Checklist. It’s the same framework I use when reviewing bathrooms for my clients.