A curbless shower for seniors is one of the most impactful upgrades in any aging-in-place bathroom plan — but it’s only one piece of a larger system. If you’re looking at the full picture, my Ultimate Guide to Senior Bathroom Safety maps out every element before we get into the subfloor details. Before you fall in love with a tile pattern or a Pinterest design, your subfloor has to pass three tests. For an elderly parent managing limited mobility, that 4-inch curb might as well be a mountain. It is a cornerstone of any serious aging in place bathroom safety plan.
However, after opening hundreds of bathroom floors, I can tell you that not every home is an immediate candidate for a flush-entry shower. Most “standard” bathrooms were built with the assumption of a curb; the plumbing and the framing were designed to sit on top of the subfloor. To go curbless, we have to move in the opposite direction—we have to go into the floor. This requires a surgical approach to your home’s structure.
Contractor Quick Check: The “Pass/Fail” Diagnostics
Before anyone commits to a curbless shower for seniors, we have to verify the structural bones of the bathroom. If your subfloor can’t handle the depth, the project cost can double overnight. I never give a firm quote until I’ve performed these three technical diagnostics:
- Joist Direction & Depth: We need to see if the “ribs” of your house allow for a recessed “bowl” or if they are blocking the path.
- Plumbing Clearance: We have to calculate the “drop” from the shower floor to the main waste line. If the drain is too high, the water won’t move.
- The Splash Zone Radius: We need to measure the total floor length to ensure we can achieve a safe 2% slope without creating a “cliff” at the bathroom door.
Not sure where to start with your overall bathroom safety plan? I put together a Free Home Safety Checklist. It covers the hazards I find most often in bathrooms, stairways, entryways, and hallways.
Subfloor Test 1: Joist Direction & Structural “Notching”
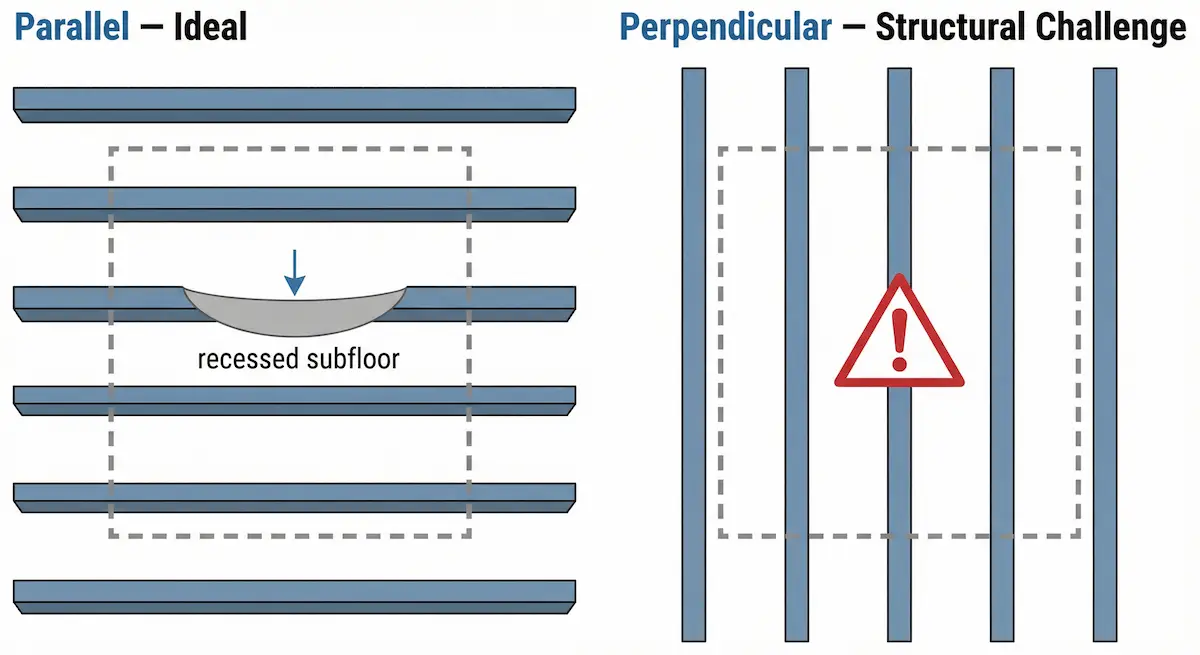
Floor joists carry the structural load of your entire bathroom. To build a curbless shower, we have to “drop” the shower floor slightly so it sits lower than the rest of the bathroom.
- The “Parallel” Dream: If the joists run parallel to the shower entry, the job is straightforward. We can “sister” additional lumber to the sides of the joists and recess the subfloor between them. This allows us to create the “bowl” required for drainage without cutting through the main structural members of your home. It provides the necessary 2 to 3 inches of depth while maintaining the floor’s weight-bearing capacity.
- The “Perpendicular” Red Flag: If the joists run across the shower entry, we have to cross multiple structural beams. Cutting or “notching” these beams is a major structural risk. In these cases, we often have to “drop” the entire floor of the bathroom or use a specialized ultra-thin, compression-grade shower pan system (like those from VIM Products) that sits on top of the existing subfloor and allows the rest of the room’s floor height to be “built up” to match. This is why I never give a firm quote on a curbless shower for seniors until these structural questions are answered.

Subfloor Test 2: Drain Pipe Depth & Slab Conversions
The second thing I check on any curbless shower for seniors project is drainpipe depth. Water only flows downhill. A standard shower requires a 2-inch drainpipe and a P-trap to block sewer gases from entering your home.
Wood Subfloors: The 10-Inch Rule
In a wood-framed home, we typically need 8 to 10 inches of vertical space below the subfloor. If you have 2×10 joists, you’re usually in the clear. If you have older 2×8 joists, the plumbing gets extremely tight. We often have to use “low-profile” P-traps or move the drain location to a spot closer to the main waste stack to ensure we have enough “fall” for the water to drain effectively.
The Concrete Slab Conversion: Structural Surgery
Converting a slab to curbless is a “Scenario B” project. Unlike wood, where we can move things around, concrete requires jackhammering.
- The Process: We have to cut a 3×3 foot square out of your foundation, jackhammer the concrete, and trench into the earth to lower the drain line.
- The Cost: Because we are cutting into the structural foundation and dealing with heavy debris disposal, this adds roughly $2,500–$4,500 in labor alone. It is a permanent, rock-solid solution, but it is a noisy, dusty, multi-day procedure.
- The Complexity: If we hit a “post-tension” cable or a main water line buried in the slab, the project stops immediately. This is why ground-penetrating radar (GPR) is often used before we ever touch a jackhammer.
Subfloor Test 3: The “Wet Room” Slope & Waterproofing
In a standard shower, the curb is the dam. In a curbless shower, the slope and the membrane are the dams. If the slope is off by even an eighth of an inch, you’ll have puddles in the middle of your bathroom.
The Critical Transition Zone
Water damage doesn’t usually happen in the middle of the shower; it happens at the “transition zone” where the shower meets the main bathroom floor. In a curbless design, there is no physical barrier to stop a “back-up” of water.
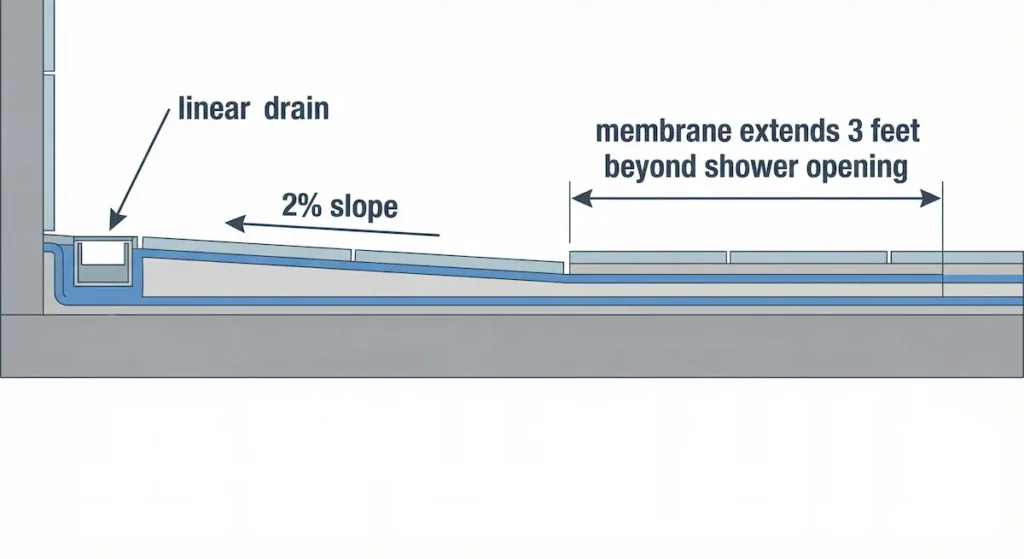
I exclusively use integrated bonded-membrane systems like Schluter-Kerdi or Laticrete Hydro Ban. These aren’t just “waterproof paints”; they are fabric-reinforced sheets that create a continuous, unbroken bathtub-like liner under your tile. We don’t just waterproof the shower; we run that membrane at least 2 to 3 feet outside the shower area to account for “splash-out.” This process is often called “tanking” the room. The slope and membrane system in a curbless shower for seniors does the job the curb used to do — and it has to be done right
The membrane system in a curbless shower is the same principle as any tile shower build — if you want to understand exactly what goes into a properly waterproofed shower from the studs out, my Senior Bathroom Backerboard Guide covers the full system.
Common Curbless Shower for Seniors Mistakes I See on the Job
After years of “rescue” missions where I’ve had to fix failing showers, three mistakes stand out as the most common:
- The “Hump Floor” Shortcut: Some installers try to save money by raising the rest of the bathroom floor with extra plywood to meet the shower height, rather than lowering the shower area. This simply moves the trip hazard to the bathroom doorway. You’ve traded a shower curb for a doorway curb, which makes the bathroom less accessible for someone using a walker.
- Improper Tile Selection: High-gloss tiles look great, but they become ice rinks in a curbless shower. Because there is no curb to catch a sliding foot, a slip can send an elderly user into a full fall onto the bathroom floor. Always verify the DCOF rating (0.42 or higher) before purchasing. Learn more about choosing the safest non-slip tiles. A properly built curbless shower almost always includes grab bars as part of the same project — the blocking goes in before the walls are closed up. My Zone by Zone Shower Grab Bar Placement Guide covers exactly where those bars need to go and why placement decisions have to happen before tile goes up.
- Skimping on the Drain Capacity: Curbless showers often perform better with linear drains. A standard center drain requires a 4-way slope, which can be hard to navigate. A linear drain allows for a single, consistent “plane” of slope, making the floor much more stable for those with balance issues.
When a Curbless Shower for Seniors May Not Work
While I can fix almost anything with a large enough budget, there are three common “deal-breakers” where a fully flush entry simply isn’t practical:
- Post-Tension Slabs: In many modern condos, you cannot jackhammer the slab because of high-tension steel cables inside the concrete. Cutting one of these can cause a catastrophic structural failure.
- Apartments/Condos: If you don’t own the “air rights” to the joist space below your floor, you cannot lower the plumbing. You are essentially stuck with the height of the existing drain.
- Very Shallow Joists (2×6): In some older bungalows, there isn’t enough wood to safely notch or recess. The “fix” here would involve adding a massive support beam in the room below, which often costs more than the rest of the bathroom remodel combined. This structural constraint applies even more directly in manufactured housing — my Mobile Home Bathroom Modifications for Seniors Guide covers exactly why a true curbless shower in a mobile home requires a level of structural work most families don’t anticipate.
If a full curbless conversion isn’t possible given your subfloor, the decision often shifts to a different bathing setup entirely. My Walk-In Tub vs Walk-In Shower Guide breaks down which option makes more sense depending on mobility level and long-term needs.
High-Quality Alternatives for Difficult Floors
A failed subfloor test isn’t the end of the conversation for aging parents or seniors — it just changes the direction. Here are the options I actually recommend when a full curbless shower for seniors conversion isn’t in the cards.
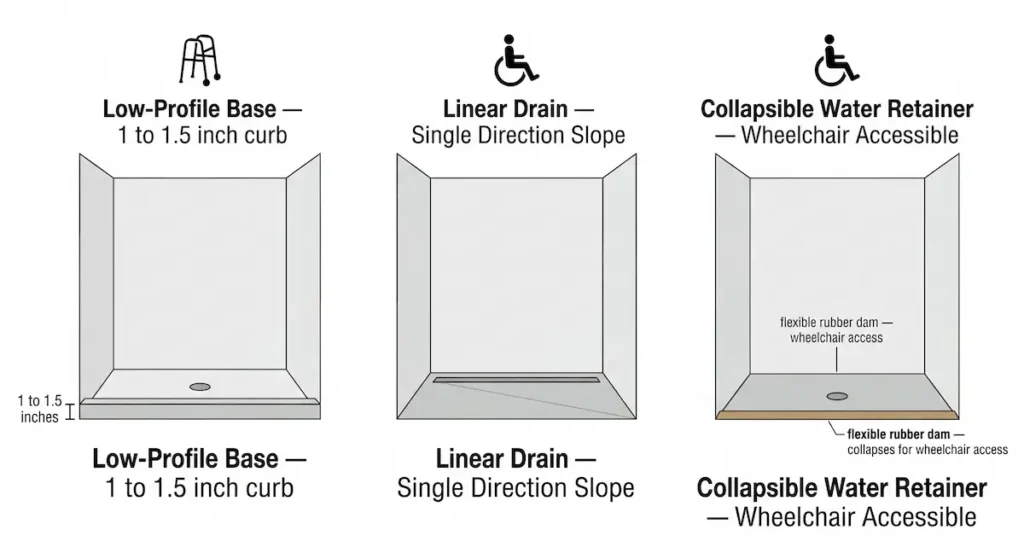
- Low-Profile Shower Bases: Low-Profile Shower Bases: These are pre-sloped pans, at only 1 to 1.5 inches high they are significantly easier for elderly users to navigate than a standard tub and don’t require structural joist work. My Non-Slip Shower Pans for Aging in Place Guide covers threshold heights, materials, and what to look for before you order.
- Linear Drain Systems: By placing a long, narrow drain against the back wall, we only have to slope the floor in one direction. This is much easier to manage in a small bathroom than a center drain that requires a “cone” shape. I spec linear drains on most of my aging-in-place builds now regardless of whether a full curbless entry is possible — the single-direction slope is just easier for everyone to navigate.
- Collapsible Water Retainers: If you need wheelchair access but can’t lower the floor, we use a rubber “dam.” It’s firm enough to keep water in but collapses flat when a wheelchair or walker rolls over it.
Many curbless showers I build for aging-in-place clients include a bench as part of the same project — the two elements work together as a safety system. My Best Shower Bench for Seniors guide covers what to look for when selecting and positioning one
The Cost Decision Framework
The total cost of a curbless shower for seniors conversion comes down to three variables.:
- Structural Modification: (+$1,500–$4,000) Reinforcing joists or trenching concrete.
- Plumbing Relocation: (+$500–$2,000) Moving the main waste line or lowering the P-trap.
- Waterproofing Scope: (+$1,000–$2,500) Creating a full “wet room” membrane.
Timeline Expectation: A “Simple” wood-frame conversion adds 2–3 days. A “Complex” slab or structural joist conversion can add 7–10 days of specialized labor.
Curbless Shower for Seniors: Contractor FAQ
How much does a curbless shower conversion cost? In 2026, the premium for a curbless entry (on top of a standard remodel) ranges from $3,000 to $8,500 depending on the structural needs of your subfloor. Reminder, these are estimates only. Each home is different, with different variables to consider so there is no one size fits all answer. That goes with any home renovation.
Can I install a curbless shower myself? Unless you are a licensed professional, no. This involves modifying the structural “bones” of your home. A DIY mistake here isn’t just a leak; it’s a potential structural failure of the floor.
Can a curbless shower work on a second floor? Yes, but it requires a careful assessment of the joists. We have to ensure that recessing the floor doesn’t weaken the ceiling structure of the room below.
How long does a curbless shower last? When installed with a bonded membrane system (like Schluter), a curbless shower should last 25–30 years—the same lifespan as the tile itself.
More Curbless Shower for Seniors Questions
Is a “Wet Room” the same as a curbless shower? A curbless shower is the entry style; a wet room is the entire bathroom being waterproofed and sloped.
Do I need a permit? It depends on the scope of work. Any time you’re modifying framing or moving plumbing — which most curbless conversions require — a permit is required. If you’re doing a straightforward swap that doesn’t touch the structural framing or relocate pipes, check with your local building department first. A licensed contractor should know exactly what triggers a permit requirement in your municipality and shouldn’t hesitate when you ask.
Will it leak into my hallway? Not if you have a proper 2% slope and a “tanked” waterproofing membrane that extends at least 3 feet outside the shower opening.
What is the best tile for a curbless shower? Mosaics or 2×2 tiles are best. They follow the slope of the floor much more accurately than large-format tiles. Ensure they have a DCOF rating of 0.42+.
Will it lower my home value? No. High-end, Universal Design features are in high demand for the “forever home” market.
Final Advice
A curbless shower for seniors isn’t a single product you order — it’s a system that has to be engineered from the subfloor up. if every piece is right it’s invisible. When one piece is wrong, you’re calling someone like me to fix it. When it’s done right, it’s a seamless safety feature that lasts decades. But when shortcuts like the “Hump Floor” creep in, you’re just swapping one trip hazard for another.