If you’re planning for the long haul, widening a doorway for aging in place is often the first structural project families ask me about. That can be the one obstacle that stops an aging-in-place safety plan in its tracks.
In most standard homes, a 30-inch bathroom door is the norm. It works fine today, but the moment you need a walker or a wheelchair, that 30-inch opening shifts from a minor tight squeeze to an impossible bottleneck. For a complete bathroom safety plan beyond the doorway, see our Senior Bathroom Safety Guide.
As a contractor, widening a doorway for wheelchair access is often the first thing families ask me about. They assume it’s a simple Saturday afternoon job. I wish that were true. Let’s walk through why widening that “simple 6 inches” can go from a $1,000 retrofit to a $5,000 “structural surgery” faster than you can grab your tape measure.
Widening a Doorway for Aging in Place: Which Scenario Are You?
Before you even call for an estimate on your senior home modification, do this 30-second “X-ray” of your wall:
- Check the Attic/Crawlspace: Do the floor joists run perpendicular to the door? If yes, the wall is likely supporting the weight of the house (Scenario B).
- The “Knock” Test: Tap the wall. A partition wall is typically 3.5 inches deep and sounds hollow. A load-bearing wall often feels more substantial and may contain hidden pipes or wires that make the “thud” feel denser.
- Search for “Hidden Services”: Look for HVAC vents in the wall or plumbing cleanouts nearby. If the wall houses your bathroom’s main vent stack for your curbless shower, your Scenario B costs will increase significantly.
How Contractors Actually Identify a Load-Bearing Wall
I’ve been inside enough walls to tell you that no two are built the same. Every single job is different.
Here’s my rule of thumb before I ever touch a wall: I look at which way the rafters, roof trusses, and floor joists are running. If they run parallel to the wall you’re widening, you’re probably dealing with a non-load-bearing partition. If they run perpendicular — crossing over that wall — the wall is likely carrying the weight of whatever is above it.
I say “probably” and “likely” because this isn’t a guarantee. Some walls are freestanding. Some look load bearing and aren’t. Others look like partitions and will drop your ceiling if you cut into them wrong. A carpenter understands this instinctively because they built the thing — they know where the weight lives. Everyone else is making an educated guess until the wall is open.
What I’ve seen when walls ARE open is a different story entirely. I’ve opened doors and found no header at all. Just 2×4 framing holding up whatever was above it. That happens more often than most homeowners would believe.
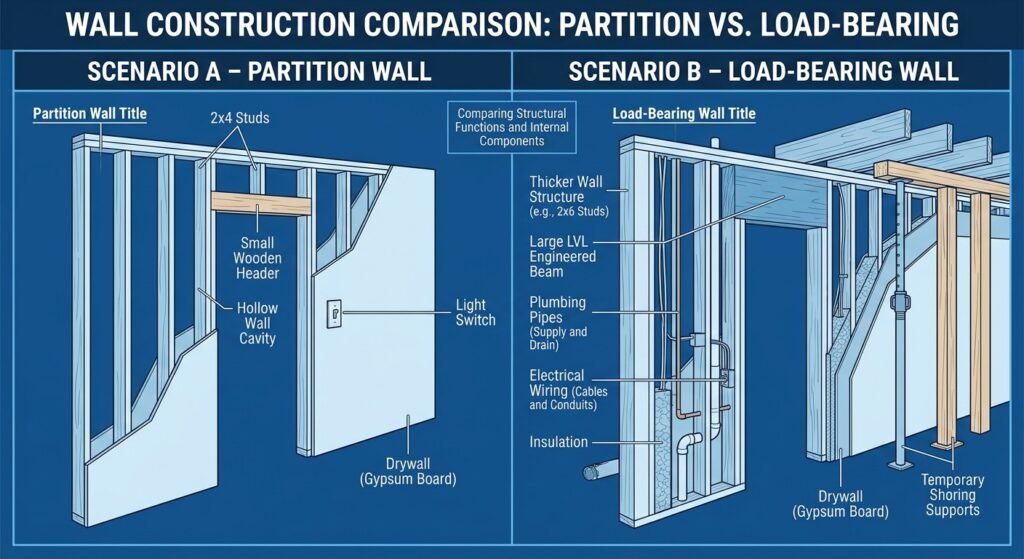
Here’s what correct framing looks like when we widen a doorway. Your rough opening should be one inch larger than the door on all sides — that gives you room to plumb and level the frame. You need jack studs and king studs at both sides of the opening. The king stud runs the full height from floor to top plate. The jack stud — the shorter one — runs from the floor to the bottom of the header. Skip these or install them wrong and you’ll bow your door jambs and weaken the whole opening. I’ve seen it.
The header sits on top of those jack studs, king to king. For a standard 36-inch door — which is what most aging in place projects call for — you don’t need to buy an LVL beam. You can build one on site: two 2x10s with half-inch OSB sandwiched between them, a 2×4 on the top and bottom plate. That’s a solid header for any span up to six feet. Longer spans need more, but for a 36-inch door that build will outlast the house.
For a non-load-bearing wall the job is straightforward: demo the drywall, build your header, move your studs, frame your rough opening. For a load-bearing wall, you’re building a temporary shoring wall first to carry the weight of the structure while the permanent header goes in. Same rough opening, same framing principles — just a lot more respect for what happens if you rush it.
The Contractor’s Rule: It’s Not About the Door, It’s About the Wall
Once you know which scenario you’re dealing with, the cost comes down to one thing: the header.
Scenario A: The “Non-Load-Bearing” Dream ($1,000–$2,000)
In many modern homes, some interior walls are just partitions. They don’t support the roof; they just separate the hallway from the toilet.
- The Job: When widening a doorway for aging in place in a non-load-bearing wall, we demo the drywall, remove the old 2×4 header, and install a wider one.
- The Catch: You’ll almost always have a light switch right next to the door. Widening the door means moving that electrical box, which requires “fishing” wires through the studs.
Scenario B: The “Load-Bearing” Surgery ($3,500–$6,000+)
This is what gives contractors grey hair. These walls are structural; they are holding up your second story or your roof.
- The Complexity: We must build temporary shoring walls to hold up your ceiling while the old header is out. For a standard 36-inch door, we can build a solid header on site using two 2x10s with half-inch OSB sandwiched between them — no LVL needed. If spans over six feet, that’s when an LVL engineered beam becomes necessary to carry the load across the wider opening. For structural specifications, the American Wood Council provides residential framing guidelines.
- The Permit Note: Your contractor should know if you need one and handle this automatically. If not, find a new one.
If the doorway widening reveals that a full bathroom conversion makes more sense, my guide to curbless shower installation covers what that structural work actually involves.
The Budget-Friendly Pivot: Alternatives to Widening the Wall
If you find yourself in Scenario B and the $5,000 price tag isn’t in the budget, don’t give up on home accessibility.
- Swing-Clear Hinges (The $50 Fix): Also called “offset hinges,” these allow the door to swing completely out of the frame. This gains you 1.5 to 2 inches of clear space—often just enough to get a walker through. If budget is a concern across the whole bathroom, my guide to aging in place bathroom safety without a full remodel covers every high-impact upgrade you can make without major structural work.
- Barn Doors: If you have enough empty wall space, a sliding barn door eliminates the “door swing” entirely.
- Stander Poles: If the doorway is too narrow for a walker but the user can shuffle, a floor-to-ceiling tension pole (Stander Pole) placed just inside the door can provide the stability needed to transition through the narrow opening safely.
If wheelchair access is driving the doorway decision the toilet height is worth addressing at the same time — my Comfort Height Toilet Guide covers the measurements that matter for wheelchair users specifically.
FAQ: Professional Insights for Senior Renovations
Can I widen a bathroom door myself? Widening a doorway for aging in place yourself is possible if the wall is non-load bearing, but if the wall is load bearing you are literally holding up your house. Never attempt to cut a structural header without professional shoring.
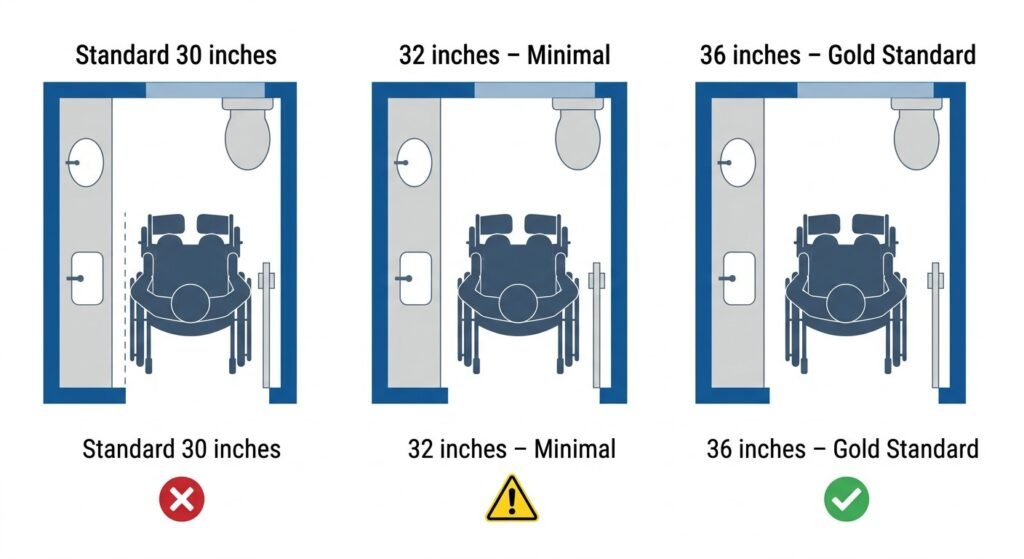
What’s the difference between a 32-inch and 36-inch door for accessibility? A 32-inch door only provides about 30 inches of clear opening once the door is open. A 36-inch door provides a true 34-inch clear opening, which is the gold standard for wheelchair maneuverability and long-term aging in place. Once the doorway is wide enough, grab bar placement becomes your next priority for making the space fully safe.
Does widening a door increase home value? Yes. Widening a doorway for aging in place is considered a Universal Design upgrade and is a major selling point in 2026. Buyers are increasingly looking for “forever homes” that are already accessible for all ages.
How long does a doorway widening project take? Scenario A is a 2-to-3-day job. Scenario B can take 5 to 7 days due to structural shoring and potential plumbing/HVAC relocation.
Will swing-clear hinges work on any door? Usually, yes. They are a direct replacement for standard hinges and are the most cost-effective “first step” before committing to a major renovation.
Do I need an architect? For Scenario A, no. For Scenario B, it depends. A reputable contractor will often work with a structural engineer if needed to size the new header correctly, so your home remains structurally sound.
Is it better to use a pocket door for senior safety? Pocket doors save space, but they can be difficult for those with limited hand dexterity to grip and slide. If you choose a pocket door, ensure it has D-shaped pulls rather than recessed finger cups.
Get a Structural Assessment Before You Commit
Never accept a flat quote over the phone for this job. A professional needs to verify the load-bearing status and check for hidden “vitals” like plumbing stacks or electrical trunks. Widening your door is a significant move toward independence—just make sure you aren’t cutting into a “Scenario B” wall with a “Scenario A” budget.
Not sure where the doorway fits into your broader safety plan? My Free Home Safety Checklist walks through the same audit framework I use room by room.