A built-in shower bench when it’s originally framed, is not the actual height of the finished product. It can seem perfect during the “rough-in” phase. But by the time we add the sloped mortar bed, the waterproof membrane, and the thick natural stone tile, the finished seat height is a few inches taller than when you started. This is important to remember, or you’ll end up with your feet not touching the floor. Most people assume “standard height” is fine, but when it comes to shower bench height for seniors, a few inches can make the difference between safe and awkward.
When researching shower seat height for elderly bathrooms, the number you land on has to account for finished floor height, hip angle, and how you actually stand up — not just what the product box says. Here is how to get it right the first time.
Contractor Quick Check: Shower Bench Height for Seniors
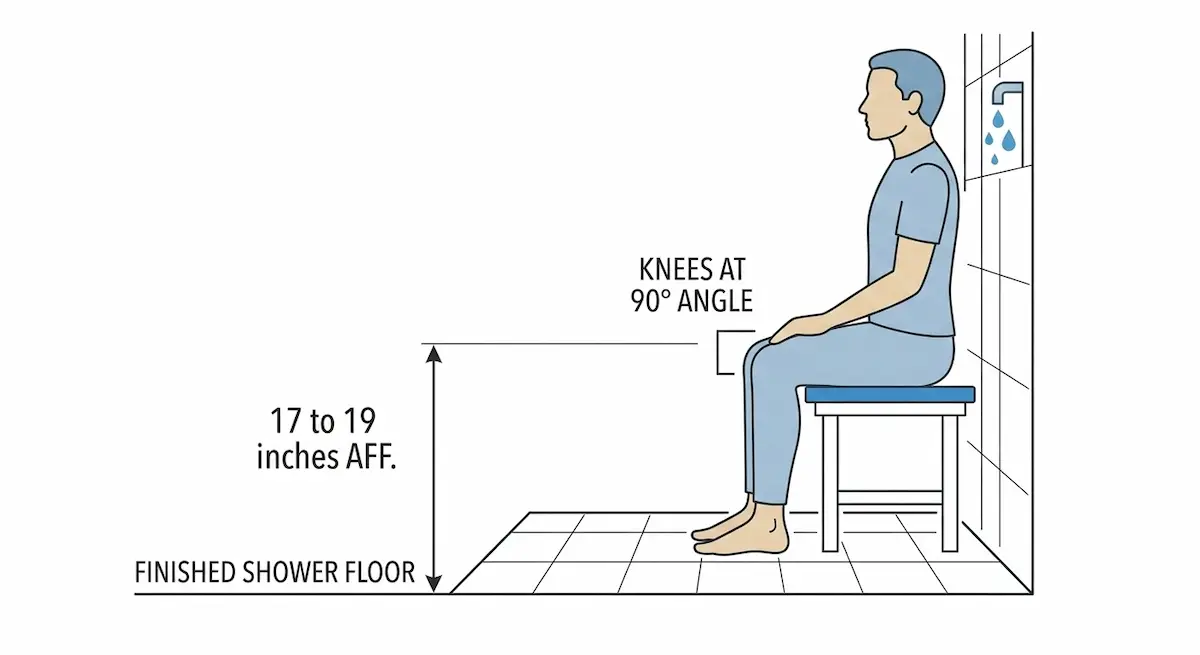
For most aging-in-place situations, the target height is: 17 to 19 inches from the finished shower floor. Getting the shower bench height for seniors right starts with that single measurement — everything else is a variable.
Notice I said finished shower floor — not subfloor, not before tile, not before slope.
This range isn’t arbitrary; it aligns with standard chair height and ADA recommendations. It allows for a “90-degree” bend at the knees, which provides the most leverage for standing back up. For a full breakdown of built-in bench types, materials, and what makes one hold up over time my Shower Bench for Seniors Guide covers every option in detail.

Why “Finished Height” is the Only Number That Matters
As a contractor, I see people make the same mistake constantly: they measure from the subfloor.
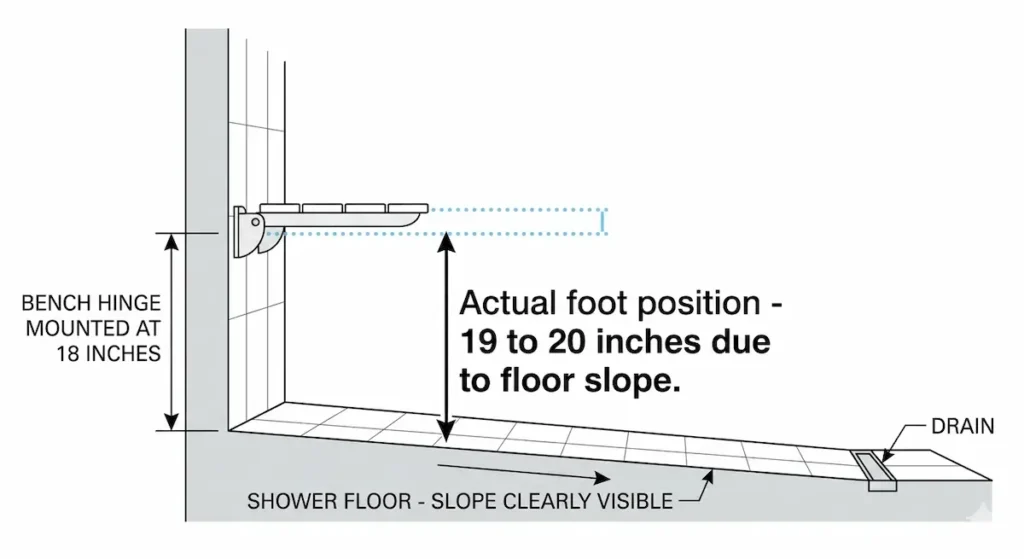
- The Slope Factor: Shower floors are not flat; they slope toward the drain at 1/4 inch per foot. If your bench is at the far end of the shower, the floor beneath it might be an inch higher than the floor at the drain.
- The Tile Buildup: Thinset and tile can add 1/2 inch to 3/4 inch to your floor height.
- Measuring Before the Tile: I’ve seen benches framed at 18 inches… then tile goes in, mortar builds up, slope gets added — and now it’s 19½ or 20 inches. That might not sound like much, but for someone with limited leg strength, it matters
- The Takeaway: Always calculate your bench height based on where the user’s feet will actually rest on the final, tiled surface.

Common Shower Bench Height Mistakes I See
Getting the height range right on paper is one thing. Here’s where it goes wrong in real bathrooms:
Installing Too Low
Some older builds have benches sitting at 15–16 inches. I’ve removed them because homeowners found them harder to use than just standing. At that height you’re forcing a deeper knee bend, which means more leg strength required to stand back up. For someone whose mobility is already declining, that’s exactly backwards from what a safety upgrade should do.
If you’re inheriting an older bathroom with a low bench, don’t assume it’s fine because it’s there. Measure it.
Ignoring User Height
A 6’2″ homeowner and a 5’2″ homeowner should not automatically get the same bench height. Within the 17–19 inch range there is real variation that matters:
Shorter individuals are typically more comfortable closer to 17 inches, where their feet sit flat and stable on the floor. Taller individuals often find 19 inches more natural for sitting and standing without having to fold themselves down awkwardly.
There’s no one-size-fits-all — but there is a safe range, and where you land within that range should be based on the person using it every day.
Assuming “Standard” Is Good Enough
This is the most common mistake I see on contractor bids. Someone specifies “standard bench height” without accounting for tile thickness, mortar bed depth, or drain slope — and ends up with a finished seat that’s 20 or 21 inches. By then the tile is in and the options are expensive.
Standard is a starting point. Finished floor measurement is the only number that matters. This is the most common error I see when contractors price out shower bench height for seniors without walking the finished space first.

Built-In Benches vs. Fold-Down Seats
While the target height remains the same, the structural requirements for these two options are worlds apart.
Built-In (Stone/Tile) Benches
These are permanent structures. Because they are “closed” to the floor, they require meticulous waterproofing. If a built-in bench isn’t integrated into the wall’s waterproofing membrane, it will eventually rot the wall studs behind it.
Fold-Down Benches
These are the contractor’s favorite for smaller bathrooms. They fold away for a “walk-in” experience.
- Contractor Insight (The Hinge-Slope Trap): Because fold-down seats are mounted to a vertical wall but hover over a sloped floor, your mounting height is critical. If you mount the hinge at 18 inches, but the floor slopes away from that wall toward a central drain, the user’s feet might end up 19 or 20 inches below the seat. Always measure the height from the specific spot where the feet will rest, not just where the bracket meets the wall.
- Structural Requirement: You must have 2×10 wood blocking installed inside the wall before the tile goes up.
Proper Installation Matters More Than Exact Height
Height is important — but structure is critical.
I’ve opened walls on renovation jobs where a bench was secured only into cement board. No blocking, no framing connection, nothing structural. It looked fine from the outside. It held up fine…until it didn’t.
That’s not a safety feature. That’s a liability.
A properly installed bench — built-in or fold-down — needs to be:
- Anchored into framing or dedicated blocking
- Waterproofed at every wall penetration
- Designed to handle full body weight plus lateral force
- Installed level to the user despite the shower floor slope
The height gets you comfortable. The anchoring keeps you safe. If you’re hiring someone to install a bench and they don’t mention blocking or waterproofing, that’s your cue to ask harder questions.
When a Shower Bench Height for Seniors Is NOT the Right Choice
Sometimes the best bench is no bench at all. I have talked many homeowners out of built-in seats for three specific reasons:
- The “Transfer” Problem: If a user is transitioning from a wheelchair, a standard shower curb creates a literal wall that prevents the chair from getting close enough to the bench for a safe “slide” across. This forces a dangerous standing pivot in a wet environment. If you are dealing with wheelchair access, a Curbless Shower Conversion is the only long-term structural solution that allows for a safe, level transfer.
- Narrow Showers (The 30-Inch Rule): In a standard 30-inch wide shower, a 12-inch deep bench leaves only 18 inches of standing room. That is a recipe for bruised shins and restricted movement. In these tight layouts, a built-in bench actually increases fall risk by crowding the standing area. If your shower is narrow, skip the permanent bench and use a high-quality adjustable chair that can be removed when not in use. My Shower Chair for Seniors Guide covers the compact options that work best in tighter spaces.
- The Transfer Bench Alternative: If balance is severely compromised and the homeowner cannot safely step over a tub wall or shower curb, I recommend a transfer bench. These have two legs inside the shower and two legs outside. This allows the user to sit down in a dry, stable area outside the shower and simply slide their legs over the barrier. It is far less “stylish” than a tiled bench, but it eliminates the most dangerous part of the shower routine: the mid-step balance shift.
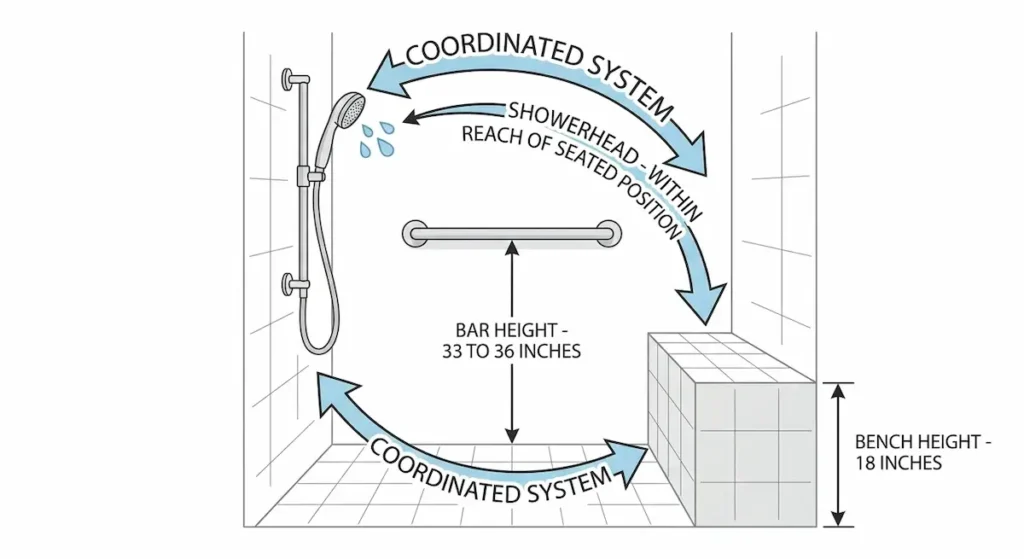
The “System” Approach: Benches, Bars, and Valves
A shower bench is only as good as the items surrounding it. If I install a bench at the perfect 18-inch height but the grab bars are four feet away, the bench becomes a trap.
- Grab Bar Alignment: I always install a horizontal bar 33–36 inches from the floor, positioned so the user can reach it while seated.
- Handheld Sprayers: Every bench install should include a handheld wand on a slide bar, reachable from the seated position. For more on coordinating these elements, see our Bathroom Safety Guide.
What I Recommend Before Installing
Before committing to a permanent height, do this first:
Measure your favorite chair at home — the one you sit in most comfortably. That number is your personal baseline, and it’s more useful than any chart.
Spend a week sitting and standing from a surface in the 17–19 inch range before anything gets framed. A stack of plywood on the bathroom floor works fine for this test. You want to know how your knees and hips feel after ten repetitions, not just the first one.
Standard bench depth runs 12 to 15 inches from the wall. Anything shallower than 12 inches creates an unstable seating surface — not enough surface area to sit securely. Anything deeper than 15 inches in a standard shower starts eating into your standing room, which creates the same crowding problem as the 30-inch rule.
Consider whether mobility is stable or still changing. A built-in bench is the right long-term answer for a stable situation. If someone is mid-recovery or their condition is progressing, a high-quality adjustable shower chair lets you dial in the height over time before locking into a permanent installation.
Finally, look at the whole layout — bench position, grab bar placement, and shower controls should all be planned together. A bench in the wrong corner of the shower can put the controls out of reach and the grab bars in the wrong position. These aren’t separate decisions.
FAQ: Contractor Insights on Seat Height
What is the ADA shower seat height requirement? ADA guidelines specify a height between 17 and 19 inches.
How deep should a shower bench be? Standard bench depth runs 12 to 15 inches from the wall. Anything shallower than 12 inches creates an unstable seating surface — there isn’t enough surface area to sit securely without feeling like you might slide off the front edge. Anything deeper than 15 inches starts eating into your standing room, which creates the same crowding problem as the 30-inch rule in narrow showers. For built-in benches I typically frame to 12 inches of finished depth — enough to sit securely without sacrificing floor space.
What is the best shower bench height for wheelchair users? For a safe pivot transfer, the bench should ideally match the height of the wheelchair seat (usually 18 to 19 inches). A level transfer minimizes the arm strength required to move between the chair and the bench.
How much weight can a fold-down shower bench hold? Most high-quality models are rated for 250 to 400 lbs, but this is entirely dependent on the anchoring. If the bench is not secured into solid 2×10 wood blocking, it will fail regardless of its weight rating.
Is 16 inches too low for a shower seat height for elderly users? Yes. For most seniors, 16 inches sits below the safe range and requires more leg strength to stand up safely than most people with changing mobility can reliably generate.
Can you adjust the height of a built-in bench later? No. It requires a total “gut” of the bench area.
Should the bench be perfectly level? The seat should have a very slight “pitch” (1/8 inch) toward the shower floor so water doesn’t pool on the seat.
Does bench height change for surgery recovery? Hip replacement patients often need a higher seat (19–20 inches) to avoid over-flexing the hip joint.
How long does a built-in shower bench last? If waterproofed correctly, it should last as long as the shower (25+ years).
Conclusion: Making Senior Bathroom Safety Intuitive
Finding the right shower bench height for seniors is about more than just hitting a number on a tape measure; it is about creating a “zero-friction” environment where sitting and standing feel natural. When a bench is even two inches too high or too low, it introduces unnecessary strain on the knees and hips, which can lead to fatigue—and fatigue is often the precursor to a fall.
By prioritizing the “finished floor” measurement and ensuring your structural anchoring is rock-solid, you are turning a simple seat into a life-long safety tool. Senior bathroom safety is a game of inches, and the bench must work in harmony with your grab bars and plumbing controls to be truly effective. If you are ready to evaluate the rest of your bathroom for hidden risks, I recommend starting with my Free Home Safety Checklist to identify potential hazards before they become emergencies.