Keeping It Level
Non-slip LVT flooring for seniors— luxury vinyl tile — is one of the best non-slip flooring options for elderly seniors aging in place. It’s warmer than tile, softer underfoot, budget friendly, and you can go from bare subfloor to finished floor in a single day. The most important things to know before you buy: make sure it’s waterproof not just water resistant, get at least 8mm thickness, and make sure your subfloor is properly prepped before anything goes down. Skip any of those three and you’ll regret it.
I got called to a bathroom last year where the homeowner had installed LVT flooring themselves. Looked great. Felt solid. Six months later they had a mold problem under the entire floor.
They bought water resistant LVT thinking it was the same as waterproof. It’s not. Water resistant means it can handle a splash. Waterproof means it can handle a wet bathroom. One letter difference on the label — thousands of dollars difference when it fails.
That’s the kind of thing that doesn’t show up on the packaging in big bold letters. It should. For elderly seniors aging in place, a bathroom floor that looks fine but holds moisture underneath is a hidden health hazard and a fall risk waiting to happen.
This guide covers what to look for when buying non-slip LVT flooring for seniors, how to make sure it’s installed correctly, and the mistakes that turn a budget friendly upgrade into an expensive problem.
For the complete bathroom safety picture my Senior Bathroom Safety Guide maps out every element from floor to fixtures.
LVT vs Tile: Which One Actually Makes Sense for an Aging in Place Bathroom
Ceramic and porcelain tile has been the standard bathroom flooring choice forever. It’s durable, waterproof, and looks great. But for elderly seniors aging in place it has some real drawbacks that don’t get talked about enough.
Tile is hard. If you fall on tile you’re falling on essentially a ceramic rock. It’s cold — walk into a tiled bathroom in January in an older home and you’ll feel it immediately. Grout lines collect dirt, require maintenance, and if the grout sealer fails water gets underneath. And once tile is down it’s staying there — removing tile is a full demo job.
LVT gives you most of the benefits of tile with fewer of the downsides.
Here’s the plain language comparison of LVT flooring for seniors vs. tile:
Cost — LVT wins. Material and labor combined LVT runs significantly less than tile. I personally use it in my own home.
Warmth — LVT wins. It doesn’t get as cold as tile underfoot which matters for elderly seniors getting up in the middle of the night.
Slip resistance — Comparable. Quality non-slip LVT performs as well as tile with a high DCOF rating. The difference is LVT maintains that slip resistance without grout lines that collect soap scum and reduce traction over time.
Durability — Tile wins long term. Quality LVT holds up well under normal use, but tile will outlast it over decades. For a wheelchair user tile is the better long-term investment — LVT can handle light wheelchair use but if a wheelchair is a permanent daily reality tile is worth the extra cost.
Installation — LVT wins by a mile. A standard bathroom goes from bare subfloor to finished floor in one day. No mortar, no grout, no curing time, no mess. Less labor means less cost to the homeowner.
Repairability — LVT wins. Don’t like it in five years? Take it up and put something else down without damaging anything underneath. Try that with tile.
The bottom line for aging in place: If full time wheelchair use is in the near future save up for tile. If it’s not in the cards right now quality non-slip LVT flooring for seniors is a smart budget friendly choice that can always be upgraded later. If the bathing setup is still being decided alongside the flooring my Walk-In Tub vs Walk-In Shower Guide covers the practical differences from a contractor’s perspective.
What to Look for When Buying Non-Slip LVT Flooring for Seniors
Walk into any big box store and you’ll find an entire aisle of LVT flooring at every price point. Here’s how to tell the difference between a floor that holds up and one that doesn’t.
Thickness
This is the single most important number on the label. LVT flooring comes in thicknesses ranging from 2mm on the cheap end to 8mm and above on the quality end.
For a bathroom in an aging in place home I recommend a minimum of 6mm. 8mm is better. Thicker flooring feels more solid underfoot, handles subfloor imperfections better, and holds up longer under daily use.
Anything under 4mm is not worth putting in a bathroom an elderly senior uses every day. It will feel hollow, show subfloor imperfections, and wear out faster.
The Wear Layer
The wear layer is the clear protective top coat of the flooring — it’s what protects the design layer underneath from scratches, scuffs, and daily foot traffic. It’s measured in mils — not millimeters, mils. One mil equals one thousandth of an inch.
For a senior bathroom I recommend a minimum 12 mil wear layer. 20 mil is better for high traffic areas. Anything under 8 mil is entry level and will show wear quickly.
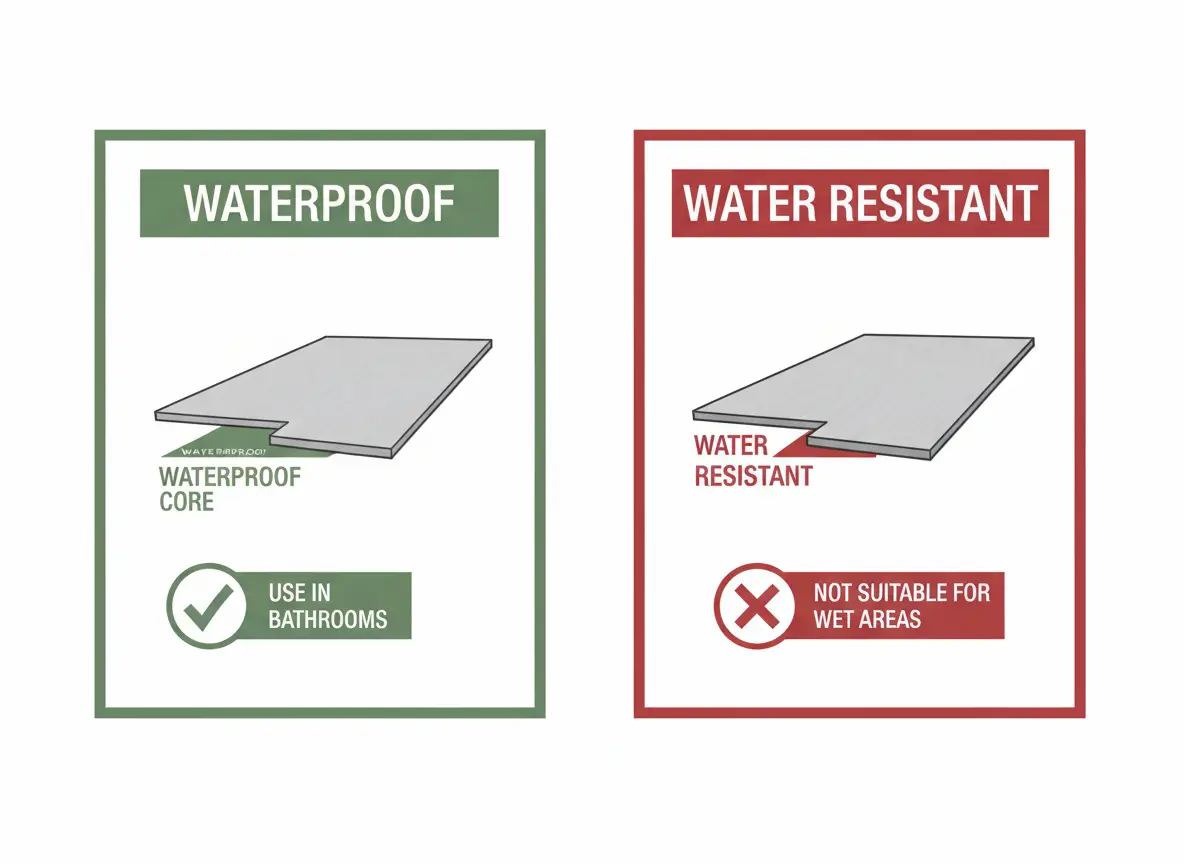
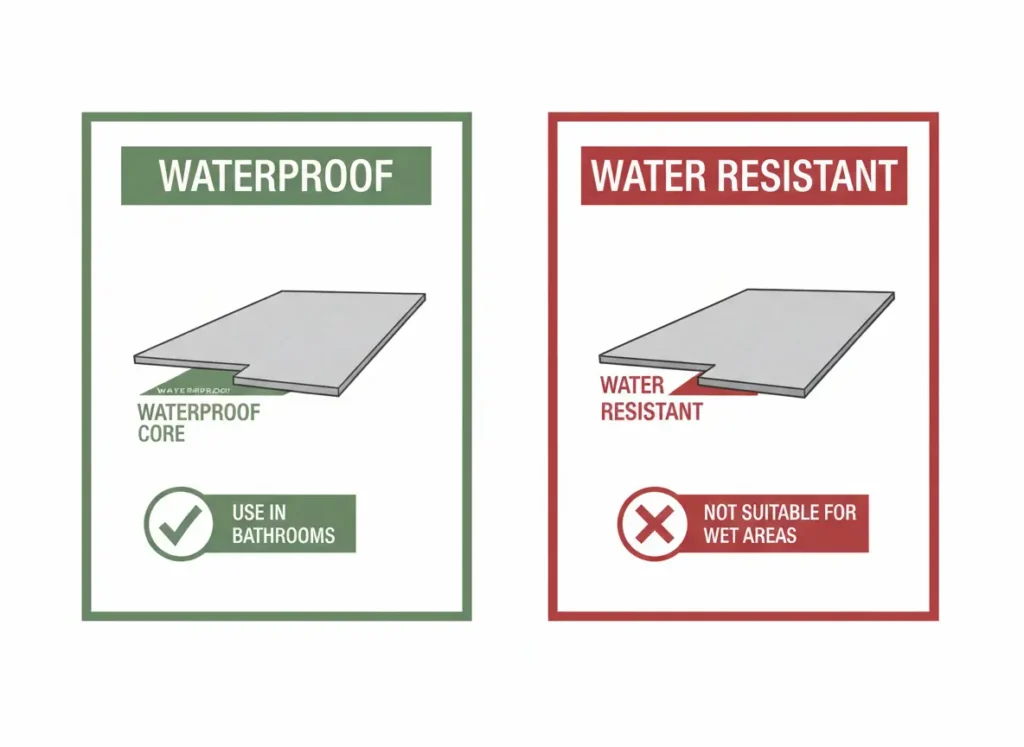
Waterproof vs Water Resistant
This is the most important label distinction and the one most people miss.
Water resistant means the surface of the flooring can handle light moisture — a splash, a small drip. It is not designed for sustained water exposure.
Waterproof means the core of the flooring won’t swell or warp.
In a bathroom — especially one used by elderly seniors who may have splashing from a shower, drips from a wet towel, or any kind of water on the floor regularly — you need waterproof. Not water resistant. Waterproof.
Check the label before you buy. If it says water resistant put it back.
Non-Slip Rating
Not all LVT is created equal for slip resistance. Look for flooring that specifically states a non-slip surface or has a texture to it. Smooth high gloss LVT looks great but gets slick when wet — exactly what you don’t want in a senior bathroom. The ADA’s official accessibility guidelines recognize slip resistance as a key requirement for accessible bathroom design — non-slip LVT meets that standard when installed correctly.
Matte and textured finishes provide better grip underfoot and maintain that grip even when the floor is wet. For aging in place bathroom flooring always choose texture over gloss.
Floating vs Glue Down LVT: Which One Is Right for Your Bathroom
LVT flooring comes in two installation types — floating and glue down. For most aging in place bathroom renovations the choice is straightforward but here’s what you need to know before deciding.
Floating LVT Flooring for Seniors
Floating LVT clicks together like a puzzle — the planks or tiles lock into each other and the whole floor sits on top of the subfloor without being permanently attached to it. That’s why it’s called floating. It’s not glued, nailed, screwed, or pinned down in any way.
This is the type I install most often for aging in place jobs and here’s why:
It’s faster — a standard bathroom in one day. It’s less invasive — if something goes wrong underneath the floor, a pipe leak, subfloor damage, anything — you can pull it up and replace it much easier. For elderly seniors aging in place whose bathroom needs may change over time that flexibility has real value.
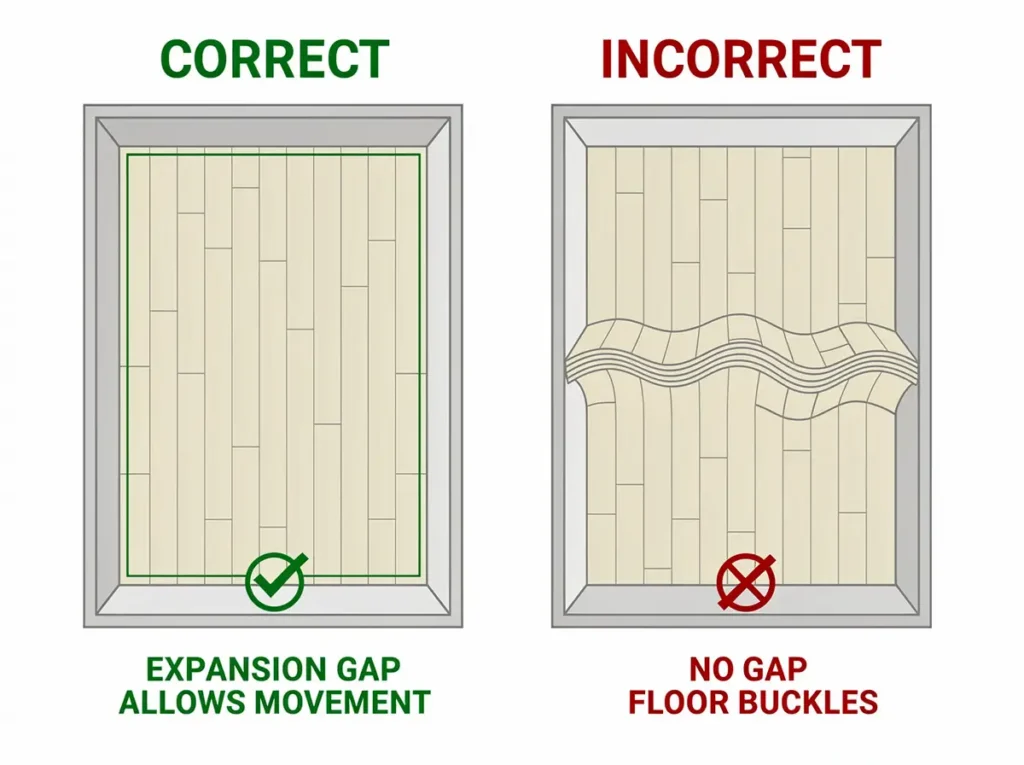
One critical rule with floating LVT — you must leave an expansion gap around the entire perimeter of the floor. The manufacturer specifies the exact size but it’s roughly a quarter inch. That gap allows the floor to expand and contract with temperature changes. Skip it and the floor has nowhere to go — it buckles up in the middle. I’ve seen it happen. It’s not subtle.
A floating floor should never be pinned down at the edges. No glue, no nails, no staples along the perimeter. It’s called floating for a reason — let it float.
Glue Down LVT Flooring for Seniors
Glue down LVT is adhered directly to the subfloor with adhesive. It’s more permanent, slightly more stable underfoot, and better suited for commercial applications or high traffic areas.
The downside is exactly what it sounds like — it’s glued down. If you need to access the subfloor for any reason you’re scraping adhesive. If you want to change the flooring in five years you’re scraping adhesive. It’s more labor intensive to install and significantly more labor intensive to remove.
For most aging in place bathroom renovations floating LVT is the better choice. The flexibility, the speed, and the non-permanent nature make it the smarter option for a homeowner whose needs may evolve over time.
The One Rule That Applies to Both
Regardless of which type you choose — waterproof core, minimum 6mm thickness, non-slip surface. Those three things don’t change based on installation method.
Subfloor Prep: The Most Important Step Nobody Talks About
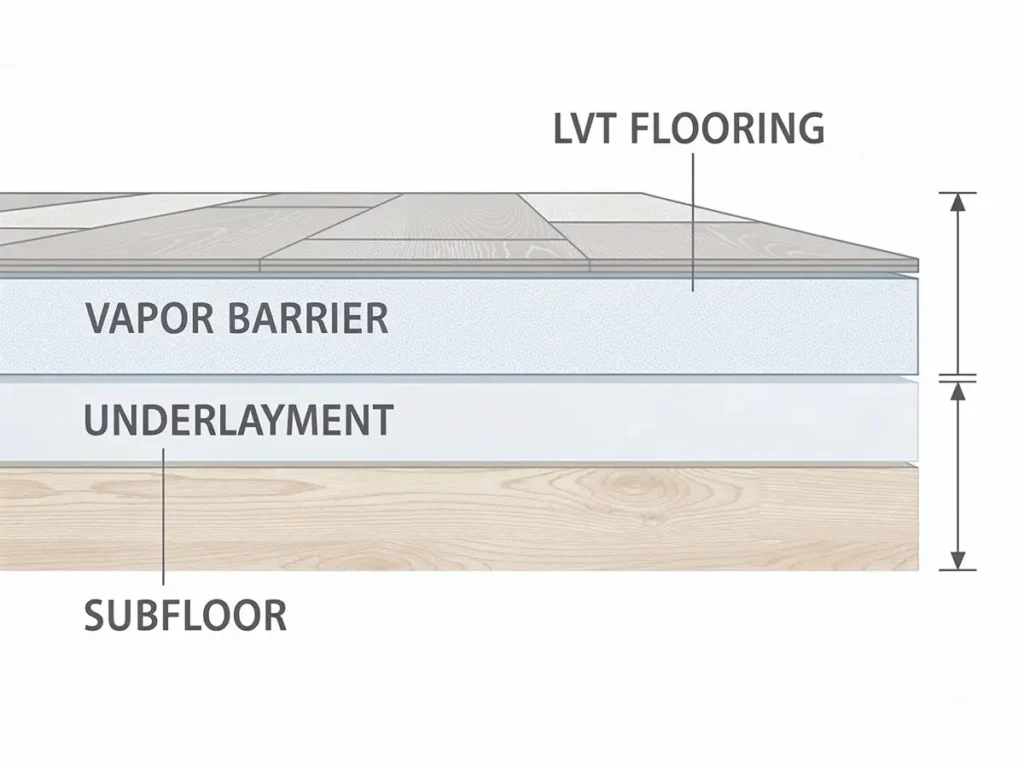
Everything we’ve covered so far — thickness, wear layer, waterproof core, floating vs glue down — doesn’t matter if your subfloor isn’t prepped correctly before the first plank goes down.
This is where most DIY LVT installations fail. Not the flooring. The prep.
Clean It
The subfloor has to be completely clean. Sweep it, vacuum it, get every piece of debris off that surface. Sounds obvious until you’ve seen someone floor over a small rock or screw and feel it under their foot every single time they walk across that spot for the next five years.
Level It
LVT flooring is unforgiving of an uneven subfloor. Most manufacturers allow roughly an eighth of an inch variance over a set span — check your specific product for the exact spec. Anything beyond that needs to be addressed before the floor goes down.
Sand down high spots where subfloor panels meet. Fill low spots with floor leveling compound — they make versions for both wood and concrete subfloors. Check the manufacturer specs before using any leveling product to make sure it’s compatible.
You can lay LVT right over existing linoleum or tile as long as the surface is flat and within manufacturer specs. The key word is flat. Lumpy old linoleum needs to go.
The Vapor Barrier
After the subfloor is clean and level the vapor barrier goes down before the LVT. There are a million different vapor barriers at different weights and specs — follow the manufacturer’s recommendation for your specific flooring. Don’t skip it and don’t substitute a cheaper version without checking compatibility first.
MDF Subfloor — The One That Has to Go
In older homes and mobile homes you’ll sometimes find MDF — medium density fiberboard — used as subfloor material especially in bathrooms and kitchens. If you find it my strong recommendation is to replace it before any new flooring goes down regardless of what type of flooring you’re installing.
MDF drinks water like a sponge. In a bathroom where an elderly senior is using a shower daily, any moisture that gets to that subfloor — and moisture always finds a way — will cause the MDF to swell, blister, and fail. It will ruin your floor from underneath, and you won’t see it coming until it’s already a problem.
The manufacturer may say you can install over MDF as long as it’s flat. Technically true. My recommendation as a contractor- change it. Especially in a bathroom used daily by an elderly senior, MDF and moisture is a disaster waiting to happen. The cost of pulling MDF and putting down plywood is significantly less than the cost of redoing the entire floor when the MDF fails.
For a deeper look at what goes behind your bathroom walls during a renovation my Shower Backerboard and Waterproofing Guide covers the full system.
Installation Basics of LVT Flooring for Seniors: What You Need and What to Avoid
LVT flooring is one of the most DIY friendly floors you can install. Here’s what you actually need and what to watch out for.
What You Need
The tool list for floating LVT is short:
- Razor knife for cutting planks to size
- Deadblow hammer
- Pull bar and tapping block — sold as a kit at most big box stores, usually under $20
- Tape measure
- Spacers for your expansion gap
That’s it. No tile saw, no mortar, no grout float. If you can follow directions and take your time you can install this floor yourself.
Stagger Your Joints
Never line up seams end to end — this is called seam on seam and it’s one of the most common installation mistakes I see. Stagger your joints the same way bricks are laid. Most manufacturers specify a minimum stagger distance — follow it.
Seam on seam looks wrong and weakens the floor structure. It also makes the joints more likely to separate over time.
Lock the Joints Completely
Every joint has to be fully locked before you move to the next plank. An incompletely locked joint will separate over time and once it separates moisture gets in. A cracked or chipped edge from rough handling does the same thing — if a plank is damaged before it goes down don’t install it. A damaged plank is no longer waterproof at that edge. For seniors aging in place that waterproof seal matters more than anywhere else in the house.
Never Pin the Edges
Already covered in the floating vs glue down section but worth repeating — do not glue, nail, staple, or pin the edges of a floating floor in any way. If it can’t expand it will buckle. Simple as that.
Transition Strips: The Hidden Trip Hazard
Transition strips are the strips that cover the gap between your new LVT floor and an adjacent flooring surface — where your bathroom floor meets a hallway, a bedroom, or a different flooring type. They’re the last thing most people think about and one of the most important safety details in an aging in place bathroom.
A poorly installed transition strip is a trip hazard. For an elderly senior that’s not a minor inconvenience — it’s a fall risk sitting on the floor of their home every single day.
Get the Right Strip
Not all transition strips work with all flooring. You need a strip specifically designed for LVT that matches the thickness of your flooring. Too tall and it creates a lip that catches toes. Too short and it doesn’t cover the expansion gap properly.
Most quality LVT flooring comes with recommended transition strips from the same manufacturer. Use them.
Install It Correctly for Your Subfloor Type
This is where a lot of DIY installations go wrong. Transition strips install differently depending on what’s underneath:
Wood subfloor — the track that holds the strip screws directly into the wood. Straightforward.
Concrete subfloor — you have to drill into the concrete and use concrete anchors before the track goes in. Skip the anchors and the strip will eventually work loose no matter how tight you set the screws.
Some transition strip kits come with everything you need. Some don’t. Check the package before you leave the store.
Snap It In and Check It
Once the track is secured the strip snaps into the channel. After it’s snapped in pull on it firmly — it should have zero movement. Any play in the strip means it’s not fully seated or the track isn’t secured properly. Fix it before anyone walks over it.
An unsecured transition strip that works loose over time doesn’t just become a trip hazard — it exposes your expansion gap and allows debris and moisture underneath your floor.

LVT Flooring for seniors in Mobile Homes and Older Homes: What’s Different
Mobile homes and older Eastern Kentucky homes present specific challenges for LVT flooring for seniors that standard installation guides don’t cover. Here’s what to watch for.
The MDF Problem
Already covered in the subfloor section but it shows up most often in mobile homes and older homes — so worth repeating here directly. If you pull up old flooring and find MDF underneath replace it with plywood before anything else goes down. No exceptions in a bathroom.
Floor Flexibility
Mobile home floor joists are typically 2x6s compared to the 2x10s or larger you find in standard construction. Smaller joists mean more flex in the floor — you’ll feel it when you walk across it.
That flex isn’t necessarily a structural problem but it does affect your LVT installation. More floor movement means joints work harder over time. This is one situation where a higher quality thicker LVT — 8mm and above — is worth the extra cost because it handles subfloor flex better than thinner flooring.
Weight
Mobile home floors have lower weight tolerances than standard construction. This isn’t usually a concern for flooring itself but if you’re doing a full bathroom renovation in a mobile home — new toilet, new vanity, adding a walk-in shower — factor the cumulative weight into your planning.
Leveling
Older homes and mobile homes settle unevenly over time. Before any flooring goes down check the entire bathroom floor with a level. In a mobile home I’ve found floors that look flat but have a noticeable pitch from one end to the other. Self leveling compound fixes it but you have to find it first.
Check your specific self-leveling product for compatibility with your subfloor type — not all leveling compounds work on all surfaces. For everything else that’s different about a mobile home bathroom renovation — framing, plumbing, surrounds, and what you find when the walls come open — my Mobile Home Bathroom Modifications for Seniors Guide covers the full picture.
FAQ: LVT Flooring for Seniors
Is LVT flooring slippery when wet?
Quality non-slip LVT flooring for seniors with a matte or textured finish is not slippery when wet and is one of the better non-slip flooring options for elderly seniors aging in place. Avoid smooth high gloss LVT in a bathroom — it gets slick when wet. Always check that the product specifically states non-slip before buying.
Is LVT flooring for seniors good for wheelchairs?
It depends on the situation. Quality thick LVT — 8mm and above — handles light or short-term wheelchair use fine. If a wheelchair is a permanent daily reality tile is the better long-term investment because it’s harder and more durable under constant wheel traffic. LVT is a smart budget friendly choice that can be upgraded to tile later if mobility needs change.
What is the difference between waterproof and water resistant LVT?
Water resistant LVT can handle surface moisture — splashes and drips. Waterproof LVT has a core that won’t swell or warp. In a bathroom always buy waterproof not water resistant. Check the label before you leave the store.
Can I install LVT flooring myself?
Possibly — floating LVT is one of the most DIY friendly floors available. You need a razor knife, dead blow hammer, pull bar and tapping block, and a tape measure. The most important steps are subfloor prep and following manufacturer specs for expansion gaps and vapor barrier. If your subfloor has MDF or significant leveling issues call a professional before attempting installation.
Final Thoughts and Recommended Products
Non-slip LVT flooring for seniors is one of the smartest aging in place upgrades you can make — lower cost than tile, warmer underfoot, safer, and done in a day when installed correctly. Buy waterproof not water resistant, get at least 6mm thickness, prep your subfloor right, and let the floor float. Do those four things and you’ll have a floor that holds up for years.
Field Tested Products
LifeProof Sterling Oak LVT — 8mm Waterproof My go-to recommendation for aging in place bathroom flooring. Fully waterproof core, textured non-slip surface, 8mm thickness handles subfloor imperfections well. Available at Home Depot. Budget friendly without sacrificing quality where it matters.
Roberts 70-193 Flooring Installation Kit Everything you need to install floating LVT in one kit — pull bar, tapping block, spacers, and knee pads. Under $20 at most big box stores. No reason to buy tools individually when the kit costs less.
Henry 336 Multi-Surface Flooring Adhesive For glue down LVT installations specifically. Compatible with most LVT products — confirm compatibility with your specific flooring before purchasing.
For a complete picture of non-slip flooring for senior options beyond LVT my Non-Slip Bathroom Flooring Guide covers tile, DCOF ratings, and which surfaces to avoid in an aging in place bathroom.
If you’re ready to evaluate your home room by room my Free Home Safety Checklist walks you through the same process I use.