
Keeping It Level
Most mobile home bathroom modifications for seniors — grab bars, comfort height toilets, and low entry showers are all achievable without extraordinary structural work. The real constraint is a true curbless shower, which requires floor joist upgrades that usually cost more than they’re worth compared to a quality low profile pan. Always replace MDF subfloor when the walls are open. Always replace PB pipe when the plumbing is exposed. Always put a vapor barrier in. And always assess the structural condition of the floor before committing to anything heavy. The state of the original bathroom drives everything else — a clean job with no rot is a completely different project from one hiding fifteen years of water damage behind a factory surround.
- Why Mobile Home Bathroom Modifications for Seniors Are Different
- The Subfloor Reality: MDF Has to Go
- The Plumbing You Might Find: PB Pipe, CPVC, and Why It Matters
- The Drywall Decision
- Shower Surrounds in a Mobile Home: The Non-Standard Size Problem
- The Framing Reality: 2×3 Studs and What That Means for Grab Bars
- Low Entry Showers: The Right Solution for Most Mobile Homes
- Curbless Showers in a Mobile Home: The Honest Conversation
- Walk-In Tubs in a Mobile Home: What Has to Be Assessed First
- What Aging in Place Actually Looks Like in a Mobile Home
- Common Mistakes I See on the Job
- FAQ: Mobile Home Bathroom Modifications for Seniors
- More FAQs: Mobile Home Bathroom Modifications for Seniors
- Bottom Line on Mobile Home Bathroom Modifications for Seniors
I pulled the factory surround out of a double wide a while back and what was behind it was about what I expected. Regular drywall — not moisture resistant, just standard drywall — sitting wet behind a leaking surround for what looked like years. The studs were rotted. There was mold. The subfloor was soft in two spots. The homeowner had no idea any of it was happening because from the inside of that shower it looked fine.
That’s the mobile home bathroom reality. Not always. But often enough that it’s the first thing I’m prepared for when I walk into one.
The modification itself — low entry shower, grab bars, comfort height toilet — wasn’t complicated. The remediation that came first was. And the family didn’t know to budget for it because nobody had told them that what’s behind a factory surround in an older trailer is often a different project than the one they called about.
This guide is that conversation about mobile home bathroom modifications for seniors. Not to scare anyone off from doing it — mobile home bathroom modifications for seniors are completely achievable and worth doing. But if you’re planning this for an elderly parent or for yourself, you need the contractor version. The one that tells you what’s different, why it matters, and what questions to ask before anyone starts pulling walls.
For the complete picture of what a safe bathroom renovation looks like from floor to fixtures, my Senior Bathroom Safety Guide covers every element before we get into the mobile home specifics.
Why Mobile Home Bathroom Modifications for Seniors Are Different
This isn’t a criticism of manufactured housing. It’s a structural reality that shapes every decision you make inside one, and a contractor who doesn’t understand it is going to create problems they don’t see coming.
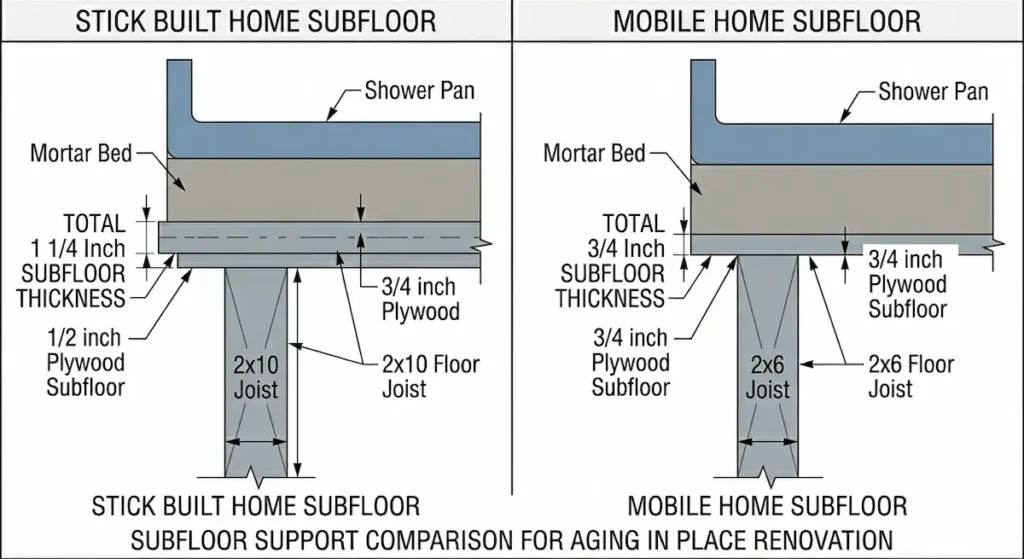
Manufactured homes are built to minimum standards. That’s not an insult — it’s a code requirement and a cost reality. What it means in practice is that the structural systems inside a mobile home are sized to do the job they need to do, with little extra margin. In a stick-built home you typically have 2×10 floor joists and a subfloor that runs 1 1/8 to 1 1/4 inches thick — 3/4-inch plywood over 1/2-inch plywood. In a mobile home you’ve typically got 2×6 floor joists and a 3/4-inch subfloor. That’s either 3/4-inch plywood or — and this is where it gets important — 3/4-inch MDF.
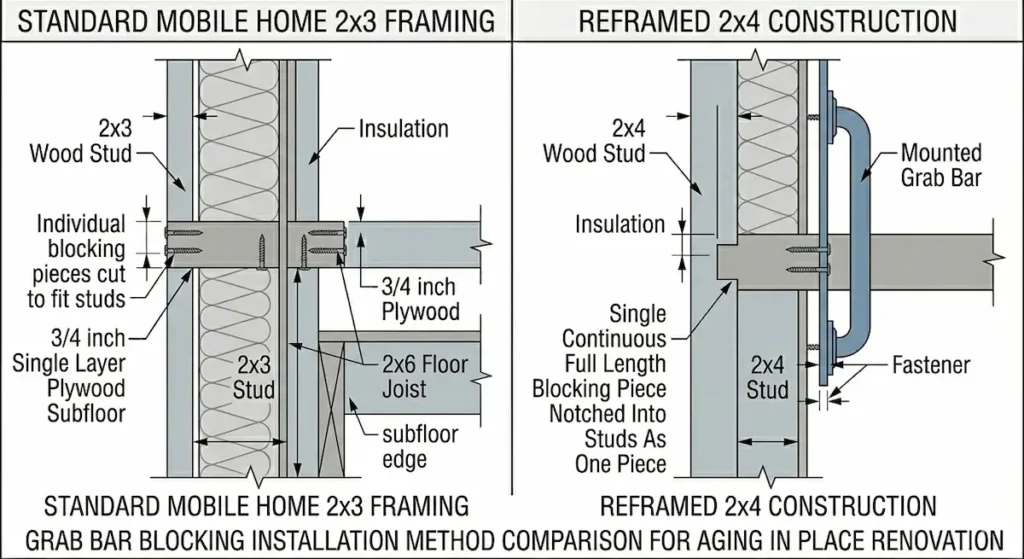
The interior wall framing is different too. Standard stick-built homes frame interior walls with 2×4 studs. Most mobile homes use 2x3s. That’s a meaningful difference when you’re talking about blocking for grab bars, which I’ll get to in a minute.
None of this makes a mobile home bathroom unworkable for aging in place modifications. It makes it different. And different requires a contractor who actually knows what they’re walking into.
The Subfloor Reality: MDF Has to Go
If you open up a mobile home bathroom floor and find MDF, it gets replaced. Every time, no exceptions.
Most people don’t know the history on this. MDF — medium density fiberboard — was never supposed to function as a standalone subfloor. It was designed to go over plywood. But over time, loopholes in manufactured housing standards allowed it to be installed in place of plywood, and it became common in mobile home construction. It’s dense and solid when it’s dry. When it gets wet it swells, softens, and fails — and it takes everything on top of it with it. A bathroom is exactly the wrong place for it.
Replace it with plywood. There’s no version of a bathroom renovation where leaving wet or compromised MDF under a new shower pan ends well.
Now here’s the weight consideration that most guides skip entirely. If you’re putting a mortar bed under your shower pan — and in a mobile home I recommend it even more strongly than in a stick-built home, because the floor flex is greater — you’re adding weight to a floor system that was already built to minimums. That matters. Depending on the condition and size of the floor joists, you may need to beef them up before the mortar goes in. Sistering the joists, adding beams, pilings — the right approach is job specific and depends on what you find when you get in there. The middle of the room is always the weakest point, where you’re getting the most deflection. That’s also where the shower usually is. Make sure your contractor can handle actual structural issues, not just the cosmetic renovation on top of them.
The Plumbing You Might Find: PB Pipe, CPVC, and Why It Matters
A family spending real money on a bathroom renovation for an elderly parent doesn’t want to finish the job and have the pipes fail six months later.
PB pipe — polybutylene — is what you’re most worried about. It’s flexible, black or gray, and looks a lot like PEX. It has a high failure rate, fails at the fittings, is known to burst, and they stopped making it. If you see it during a renovation, take it out and upgrade to PEX. All of it. Don’t finish a renovation and leave PB pipe in the wall to fail on its own schedule.
One critical detail if someone tries to connect new PEX to existing PB: they look similar, they do not go together with standard PEX crimp rings. You need special directional crimp rings — one side sized for PB, the other for PEX. A contractor who doesn’t know this will create a connection that looks right and isn’t.
CPVC is the off-white, yellow-tinted pipe. Lower failure rate than PB, but when the plumbing is already exposed it’s worth upgrading to PEX while you’re in there.
PEX is what you want. Blue, red, or white, marked on the pipe, flexible and durable. If you’re doing any significant plumbing work in a mobile home bathroom this is the right answer.
One more detail worth catching before drywall goes up — the diverter setback. Where your faucet handle sits relative to the finished wall depends on wall thickness. Keeping 3/8 inch drywall versus going to 1/2 inch changes the setback for the diverter. A contractor who doesn’t account for this before the rough-in creates a handle that doesn’t sit flush — annoying to look at, annoying to fix after the fact.
The Drywall Decision
This is less complicated than it sounds, but it has downstream effects on the installation that are worth understanding before anyone orders materials.
Mobile homes typically come with 3/8 inch drywall. Standard big box stores stock 1/2 inch — sometimes they have 3/8 inch but around here it usually has to be ordered. Both thicknesses work. The 3/8 inch that came in the trailer will line up perfectly with the lip on a stud to stud surround if you’re doing a direct replacement. The 1/2 inch makes the trim line up more cleanly in a full remodel and stiffens the studs slightly. Neither is wrong.
What matters is that you think through the wall situation before you start. If the shower surround sits on a wall that runs the full length of the bathroom and you decide to change the drywall thickness, you have to do the entire wall — not just the shower section. That changes the scope and the cost. Know that before you commit to a thickness.
Whatever you choose, it has to be moisture resistant behind any shower surround. Not standard drywall. Moisture resistant drywall. Many older trailers came from the factory with regular drywall behind the shower surround — which is exactly what I find rotted and molded when I pull those factory surrounds out. When you’re in there replacing it, do it right. Vapor barrier behind stud-to-stud surrounds, moisture resistant drywall behind glue up surrounds per manufacturer spec, and the correct waterproofing at every seam and corner. My Shower Backerboard and Waterproofing Guide covers that system in full detail.
Shower Surrounds in a Mobile Home: The Non-Standard Size Problem
Here’s the detail that trips up contractors who don’t work in manufactured housing regularly. Mobile home shower openings are frequently non-standard dimensions. The surround you can buy off the shelf at the big box store may not fit without modification — and sometimes it won’t fit at all.
If you’re sourcing a surround for a mobile home, check the actual opening dimensions before you order anything. Manufactured housing specific suppliers carry sizes built for these openings. It’s worth knowing where those suppliers are in your area before you’re standing in a gutted bathroom waiting on a part.
This is one place where PVC panel surrounds have a real advantage over standard one-piece acrylic units. PVC panels can be cut and fitted to custom dimensions. The cutting and fab work that makes PVC slightly more demanding in a standard shower becomes an actual advantage when the opening is non-standard. You’re not hoping the panel fits — you’re cutting it to fit. My Shower Surrounds for Seniors Guide covers the PVC panel installation specifics in detail.
The factory acrylic surround replacement in an older trailer almost always goes like this. You pull the surround. You find regular drywall behind it. You assess what the moisture has done. In the best case you replace the drywall and move on. In the more common case you’re replacing studs, treating for mold, and rebuilding before a new surround ever goes up. Budget for the more common case.
The Framing Reality: 2×3 Studs and What That Means for Grab Bars
This is the most important aging in place specific section for mobile home bathroom modifications, because grab bars are almost always the first thing a family wants and the framing situation changes how they get installed.
Standard mobile home interior walls use 2×3 framing. In a stick built home with 2×4 studs you can notch full length blocking pieces into the studs and lock them together as one continuous piece — a solid, integrated blocking system that goes in before the wall closes up. With 2×3 studs there isn’t enough stud depth to notch into. The blocking has to be cut individually to fit between the studs and screwed in place. It’s still solid. It’s still correct. It’s just different, and a contractor who’s only ever done blocking in 2×4 construction needs to know that before they start.
If you’re reframing the shower — which I recommend for any serious aging in place renovation in a mobile home — use 2x4s. Stronger, sturdier, less bounce, less flex. Especially important for tile, which will pop out over time on a wall with too much movement. A surround is more forgiving, but you still want the wall solid, particularly in a bathroom where someone is putting real weight on grab bars every day. You can run 2x4s on 12-inch centers instead of 16 to really beef it up. The blocking then gets notched in and locked as one continuous piece at full wall width. It makes the wall solid in a way 2×3 framing simply can’t achieve.
The other thing to remember is that the wall has to hold up over time under load. Grab bars in an aging in place bathroom aren’t decorative. They’re getting pulled on daily by someone who needs them. Build the wall to that standard. My Grab Bar Installation Guide covers what correct blocking looks like and why the placement decisions have to happen before anything closes up.
Low Entry Showers: The Right Solution for Most Mobile Homes
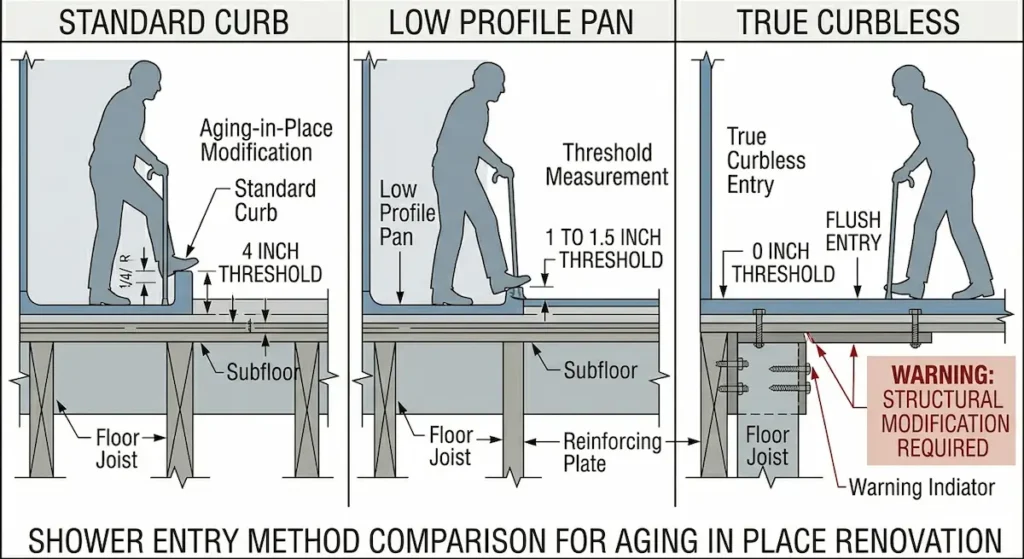
This is where most families end up, and it’s the right answer. Low entry shower pans with a 1 to 1.5 inch threshold are completely compatible with mobile home floor systems without extraordinary structural work. You get the vast majority of the accessibility benefit — the meaningful reduction in step height, the lower fall risk, the easier entry for someone with limited hip mobility — without touching the floor joists.
For pan selection in a mobile home the considerations overlap with standard construction, but a few things matter more here. Measure the actual opening before you order — non-standard dimensions are common and a pan that doesn’t fit is a delay you don’t need. Put a mortar bed under any acrylic or fiberglass pan — the floor flex in a mobile home makes this even more important than in a stick-built home, and the mortar bed takes the flex out. If you’re going mortar bed, account for the weight when you’re assessing the floor joists. And for any senior using a shower chair, a linear drain gives you a single consistent slope under that seat instead of the four-way bowl you get with a center drain. My Non-Slip Shower Pans for Aging in Place Guide covers threshold heights, drain configurations, and material selection in detail.
Pair the pan with a surround that fits the actual opening, with proper grab bar blocking already installed in the wall behind it. The pan decision and the surround decision are the same conversation — and the blocking goes in before either of them does.
Curbless Showers in a Mobile Home: The Honest Conversation
I’m going to be direct about this because I’ve seen contractors tell families what they want to hear and then leave them with a floor problem nobody wants to deal with.
A true curbless shower in a mobile home requires cutting into the floor joists to drop the shower floor. In a standard home with 2×10 joists that’s a significant but manageable structural conversation. In a mobile home with 2×6 floor joists, it’s a different situation entirely.
You know that old Hefty bag commercial — wimpy, wimpy, wimpy, hefty, hefty, hefty? That’s how I think about 2×6 versus 2×10 floor joists. A 2×6 is the literal structural minimum. And a true curbless conversion wants you to cut into it. You cannot take 2 inches out of a 2×6 floor joist and expect the floor to function. What you have left isn’t a floor joist anymore. It’s a problem.
What would it actually take to do it right? You’d need to upgrade to 2×10 joists or better, sister them, and confirm the entire system can handle the modification before anyone picks up a saw. It can be done. It’s a lot of work and a lot of money. For most mobile home situations a low profile pan achieves 90 percent of the accessibility benefit at maybe 10 percent of the cost and structural complexity. That’s the honest contractor math.
Don’t trust the contractor down the road who says they’ll just make a couple cuts and it’ll be fine. It won’t. When a floor joist that was already at minimum fails, it doesn’t just create a soft spot you can feel. It creates a structural problem that affects everything sitting on top of it.
For almost every mobile home aging in place situation I recommend the low-profile pan. Full stop.
Walk-In Tubs in a Mobile Home: What Has to Be Assessed First
Walk-in tubs are not impossible in a mobile home, but the structural assessment has to happen before anyone orders anything.
A freestanding walk-in tub sits on four feet. All the weight — tub, water, person inside — concentrates on four small contact points. In a stick built home with 2×10 joists and a 1 1/4 inch subfloor that’s a manageable load. In a mobile home with 2×6 joists and a 3/4 inch subfloor it requires eyes on the actual floor before a decision gets made. The middle of the room is where you get the most deflection — and that’s usually where the bathroom sits.
In a double wide, one more thing worth knowing. The center beam — where the two pieces of the home bolt together — is a major structural element. If the bathroom layout puts the tub near that beam and the modification requires any work near it, the scope changes significantly.
The contractor who orders the tub and then figures out the floor situation is doing it backwards. My Walk-In Tub vs Walk-In Shower Guide covers the decision between those two options from a contractor’s perspective.
What Aging in Place Actually Looks Like in a Mobile Home
Most of what makes a bathroom safer for an elderly senior works in a mobile home without extraordinary effort or expense. Grab bars are completely achievable with correct blocking for the framing you have. A comfort height toilet is a direct swap with no structural considerations at all. A low entry shower pan works in almost every manufactured home with the right selection and a mortar bed. LVP flooring handles the floor flex better than tile and installs clean. A handheld showerhead follows the same process as any home.
The cost reality is this — a mobile home bathroom in good condition with no rot, no PB pipe, and minimum structural needs is a very different project from one in disrepair that needs new subfloor, mold remediation, plumbing upgrades, and structural work before the aging in place modifications even begin. That’s why phone quotes on mobile home bathroom renovations aren’t worth the paper they’re not written on. A contractor has to see it. The state of the original bathroom drives everything.
Common Mistakes I See on the Job
Skipping the subfloor assessment and finding MDF after the shower pan is already ordered. Open the floor first. Know what you have before anything gets bought.
Installing grab bars into 2×3 framing without proper blocking. The bar feels solid during installation. Under real load, over time, it isn’t. Block correctly or don’t put the bar in.
Ordering a standard size surround without measuring the actual opening. Mobile home openings are frequently non-standard. Measure first, order second.
Connecting PEX to PB without the correct directional crimp rings. They look like they should go together. They don’t. If you see PB pipe, replace it.
Attempting a curbless conversion without the structural upgrade. The floor fails. Not maybe. Eventually.
Not replacing PB pipe during a renovation and having it fail six months after a complete bathroom remodel. You were in there. You had the chance. Take it.
Installing a walk-in tub without assessing the floor system first. Order second, assess first. Always.
Skipping the vapor barrier. Behind every stud to stud surround in a mobile home bathroom. Always. No exceptions.
FAQ: Mobile Home Bathroom Modifications for Seniors
Can I install grab bars in a mobile home bathroom? Yes — but the approach is different from a stick-built home. Standard mobile home framing uses 2×3 studs which don’t allow full length notched blocking. Blocking has to be cut individually to fit between studs and screwed in place. If you’re reframing the shower, use 2x4s, which allow for notched continuous blocking and significantly stronger anchoring. My Grab Bar Installation Guide covers what correct blocking looks like and why it has to go in before anything else closes up.
Can I put a curbless shower in a mobile home? Technically yes but practically it requires cutting into 2×6 floor joists that are already the structural minimum — and that’s a significant problem. A low-profile shower pan with a 1 to 1.5-inch threshold achieves most of the accessibility benefit without the structural complexity and cost. For most mobile home situations, the low-profile pan is the right answer.
What is PB pipe and why does it matter during a bathroom renovation? PB stands for polybutylene — a flexible black or gray pipe common in older manufactured housing. It has a high failure rate, fails at the fittings, and is no longer manufactured. If you see it during a renovation, take it out and upgrade to PEX. It looks similar to PEX but the two don’t connect without special directional crimp rings. Standard PEX crimp rings will not work.
More FAQs: Mobile Home Bathroom Modifications for Seniors
Can a walk-in tub be installed in a mobile home? Yes, but the floor system has to be assessed before anything is ordered. Mobile home floor joists are typically 2×6 and the subfloor is 3/4 inch compared to the 1 1/8 to 1 1/4 inch in a stick-built home. Freestanding walk-in tubs concentrate significant weight on four small feet. A structural assessment of the floor joists, subfloor condition, and support options has to happen before you commit to a walk-in tub installation in a manufactured home.
What size drywall should I use in a mobile home bathroom renovation? Both 3/8 inch and 1/2-inch work. The 3/8 inch that came in the trailer lines up perfectly with a stud-to-stud surround lip on a direct replacement. The 1/2 inch most big box stores stock makes trim line up cleanly in a full remodel and stiffens the studs slightly. If you’re changing the drywall thickness on a wall that runs the full length of the bathroom you need to do the entire wall not just the shower section. Whatever thickness you choose it must be moisture resistant behind any shower surround.
Do I need a mortar bed under a shower pan in a mobile home? Yes — more so than in a standard home. Mobile home floor joists are typically 2×6 which means more floor flex than standard 2×10 construction. A mortar bed eliminates the flex that causes shower pans to crack over time. Keep in mind the mortar bed adds weight — if the floor joists need reinforcement to handle that added load address it before the pan goes in.
Bottom Line on Mobile Home Bathroom Modifications for Seniors
A mobile home bathroom is a completely legitimate candidate for aging in place modifications. Grab bars, comfort height toilet, low entry shower, better flooring, accessible fixtures — most of what makes a bathroom safer for an elderly senior works in a manufactured home without extraordinary effort.
The constraints are real but they’re specific. A true curbless shower is the big one. Structural assessment matters before any heavy fixture goes in. And what you find when you open the walls determines everything else about the scope and the cost.
Get a contractor who has actually worked in manufactured housing. Not someone who’s done plenty of stick-built aging in place renovations and assumes a trailer is the same thing with different trim. The details that don’t exist in a stick-built home exist here — the 2×3 framing, the MDF subfloor, the PB pipe, the non-standard openings, the 2×6 floor joists. Those details matter and a contractor who hasn’t seen them before will find out about them at your expense.
If cost is a concern for your family, the USDA Section 504 program provides grants specifically for elderly low-income rural homeowners making safety modifications to their home — it’s worth checking before assuming a renovation is out of reach.
Ready to evaluate the rest of your home for hidden safety risks? My Free Home Safety Checklist walks through the room-by-room framework — so you can find the risks before they find you.