- Why Shower Grab Bar Placement Is Different from Every Other Bar in the Bathroom
- The Three Zone Framework: How to Think About Shower Grab Bar Placement
- Shower Type Variations: How Placement Changes Based on Your Shower Layout
- Wall Type Considerations: What's Behind Your Shower Surface Determines Everything
- Blocking for Showers: Why Wet Wall Blocking Is Different
- Common Mistakes in Shower Grab Bar Placement
- FAQ: Shower Grab Bar Placement
- Final Thoughts and Recommended Products
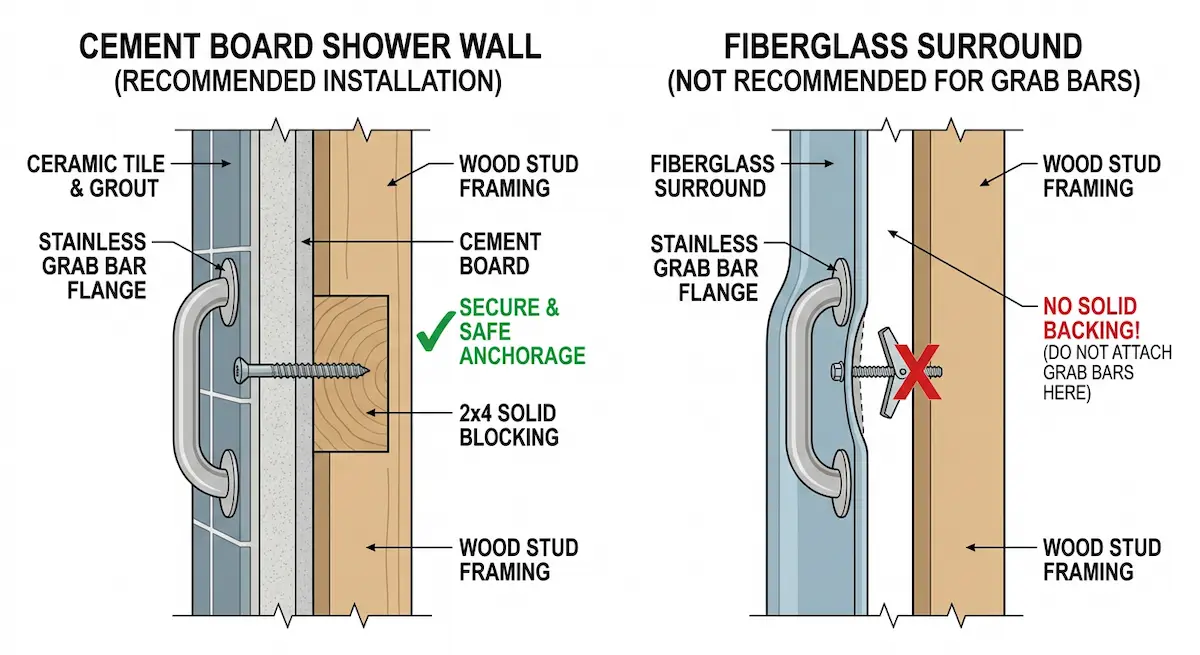
I’ve walked into bathrooms where someone ignored basic shower grab bar placement entirely and installed a bar using toggle bolts straight into a fiberglass surround. No blocking. No stud. Just a toggle bolt through the fiberglass and a prayer.
Here’s the problem with that. A lot of fiberglass and acrylic surrounds have a gap between the surround panel and the wall behind it. That gap means the surround itself is the only thing holding the bar — and fiberglass is not a structural material. It’s a finished surface. When that bar pulls out it doesn’t just leave a hole you can patch. It leaves a hole in a wet area that you can’t use until the surround is replaced. You’re not fixing a grab bar. You’re buying a whole new shower.
I’ve seen it happen more than once.
The second thing nobody talks about is waterproofing. When you drill through any shower wall — tile, fiberglass, solid surface — you’re creating a penetration in a wet area. Every grab bar flange needs a bead of silicone around the backing plate before it goes against the wall. That silicone creates a gasket that keeps water from wicking behind the flange and into the wall cavity. You can build the most waterproof shower in the world and have it fail at the grab bar flange because someone skipped a two dollar bead of silicone.
Shower grab bar placement starts with understanding what’s behind your wall — and what your wall can actually hold.
Why Shower Grab Bar Placement Is Different from Every Other Bar in the Bathroom
Every grab bar in a bathroom serves the same basic purpose — give someone something solid to hold onto. But shower grab bar placement has variables that don’t exist anywhere else in the bathroom.
The toilet area is a dry wall. The vanity area is a dry wall. The shower is a wet wall in a confined space where the floor is slick, the user is unclothed and off balance, and the wall surface itself is often the least structurally reliable surface in the entire bathroom.
For elderly seniors aging in place that combination makes the shower the highest risk zone in the house — and the zone where a misplaced or poorly anchored bar does the most damage. For the complete bathroom safety picture beyond the shower my Senior Bathroom Safety Guide maps out every element of a safe bathroom renovation from floor to fixtures.
The Wall Type Variable
In a standard room you’re drilling into drywall over wood framing. In a shower you’re drilling through tile, fiberglass, acrylic, or solid surface before you ever reach the wall behind it. Each of those materials behaves differently under a drill bit, requires different hardware, and has different implications for waterproofing. A grab bar installation approach that works perfectly in a tile shower can destroy a fiberglass surround completely.
The Three Zone Problem
A shower isn’t one moment — it’s a series of movements. Entering, moving through the space, sitting or standing at a bench, exiting. Each movement has different balance demands and requires support in a different location. A single bar covers one zone. Most showers serving elderly or senior users need a minimum of two and often three bars to cover the full range of movement safely.
The Waterproofing Variable
Every penetration through a shower wall is a potential water intrusion point. Shower grab bar placement isn’t just a structural decision — it’s a waterproofing decision. The wrong placement can compromise the waterproofing system behind your tile and create a slow leak that rots your subfloor before you ever see it on the surface. For a complete understanding of what that waterproofing system involves behind your shower walls my Shower Backerboard and Waterproofing Guide covers every layer from studs to tile.
These three variables are why shower grab bar placement requires more planning than any other bar in the bathroom — and why getting it right matters more for elderly seniors aging in place than almost any other modification you can make.
The Three Zone Framework: How to Think About Shower Grab Bar Placement
Understanding shower grab bar placement as a zone-by-zone decision rather than a single bar location is what separates a safe shower from one that only looks safe.
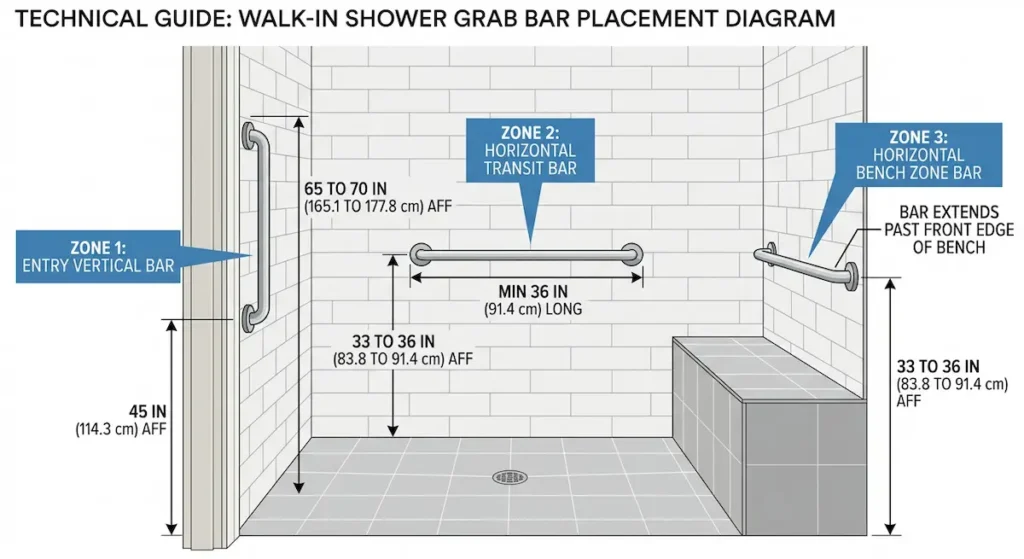
Zone 1 — Entry and Exit
The entry zone is the most underrated grab bar placement in any shower. This is where the most dangerous moment happens — one foot in, one foot out, full body weight on a single leg over a wet threshold or a slick zero entry floor.
For elderly seniors aging in place this is the moment that causes the most falls. Not while washing. Not while seated. During the transition.
A vertical bar mounted at the shower entry jamb is the solution. Mount it so the top sits between 65 and 70 inches from the finished floor and the bottom at 45 inches. This gives users of varying heights a full grip range — tall users grab near the top, shorter users grab lower — without repositioning their hand mid-step.
The bar should be on the same side as the user’s dominant or stronger hand. If someone has had a hip replacement or stroke that affects one side, that dominant side gets the entry bar.
Zone 2 — Transit
Once inside the shower the user needs a handhold while moving toward the faucet, adjusting water temperature, and washing. This is your side wall horizontal bar — the longest bar in the shower and the one that does the most work for an elderly or senior user over time.
Mount it horizontally on the long side wall at 33 to 36 inches from the finished floor. Length should be a minimum of 24 inches — 36 inches is better for seniors aging in place because it provides a continuous handhold through a wider range of movement along the wall. These measurements are per the ADA’s official accessibility guidelines.
Position it so it’s reachable from the center of the shower without a lateral lean. If the user has to shift their weight sideways to grab it the placement is wrong.
Zone 3 — Rest
The rest zone covers any shower bench or seat — the sit to stand transition that puts the most demand on upper body strength and balance simultaneously. For elderly seniors this is often the most critical bar in the entire shower.
The rest zone bar works in direct relationship to your bench height. A bar positioned correctly for a 17 inch bench is in the wrong place for a 19 inch bench. This is why I always set bench height before I spec the rest zone bar — not the other way around. If you’re still deciding between a built-in bench and a portable chair my Shower Bench vs Shower Chair Guide covers which option works best for your specific space and budget before you commit to a bar position.
Mount the rest zone bar on the side wall adjacent to the bench at 33 to 36 inches from the finished floor — same height range as the transit bar. Position the front end of the bar even with or slightly forward of the front edge of the bench so the user has something to grip through the full forward lean of the standing motion.
For a deeper look at how bench height and bar placement work together my Shower Bench Height Guide covers the relationship between those two elements in detail.
Shower Type Variations: How Placement Changes Based on Your Shower Layout
The three zone framework applies to every shower — but where exactly those bars go changes significantly depending on the type of shower you’re working with. These are the four layouts I encounter most frequently on aging in place jobs.
Standard Threshold Shower Grab Bar Placement
A standard shower with a curb — typically a 4 inch raised threshold at the entry. The entry vertical bar is critical here because the step-over moment is the highest risk point in the entire shower routine for elderly seniors.
Mount the entry vertical bar at the jamb on the dominant side. Inside the shower the transit bar goes on the long side wall and the rest zone bar adjacent to the bench if one is present. In a standard threshold shower all three zones are typically coverable with two to three bars depending on layout.
Curbless Zero Entry Shower Grab Bar Placement
A curbless shower eliminates the step-over risk at entry but creates a different challenge — there’s no natural visual or physical cue that tells the user where the wet zone begins. For elderly seniors aging in place a curbless shower is almost always the better long term choice but the entry bar placement logic changes.
Without a threshold to step over the entry vertical bar becomes less critical as a step-over support and more important as an initial balance reference point — something to touch as you transition from dry floor to wet floor. I still install it at the jamb on the dominant side, but I often add a second horizontal bar inside the entry zone at 33 to 36 inches to give the user continuous support through the first few steps inside.
For a deeper look at curbless shower construction and what’s happening structurally beneath the floor my Curbless Shower Subfloor Guide covers the full system.
Corner Shower Grab Bar Placement
Corner showers present a placement challenge because two walls meet at the entry point and the interior space is often tighter than a standard shower. The entry vertical bar typically goes on the wall perpendicular to the door opening — the first wall the user faces as they enter.
Inside a corner shower the transit bar goes on whichever long wall gives the most continuous coverage. In a tight corner shower that may only be 36 inches — use the full available wall length. A second bar on the adjacent wall can cover the rest zone if a bench is present in the corner.
Shower Tub Combo
The shower tub combo is the highest risk configuration for elderly seniors aging in place — it combines the step-over demand of a bathtub with the wet surface of a shower. I always recommend converting a shower tub combo to a dedicated walk-in shower as part of any serious aging in place renovation but when that’s not possible the bar placement has to compensate for the elevated risk.
You need a minimum of three bars — a vertical entry bar at the leading edge of the tub wall for the step-over, a horizontal bar on the back wall for shower use, and a second horizontal or angled bar on the control wall near the faucet. That control wall bar is the one most people skip and the one that matters most — adjusting water temperature requires leaning forward which shifts your center of gravity exactly when you’re standing on a wet slick surface. A handheld showerhead on an ADA rated slide bar mounted to that same control wall eliminates the need to lean toward the faucet entirely — my Handheld Shower Head for Seniors Guide covers why the slide bar follows the same structural mounting rules as the grab bar beside it.
For a full breakdown of whether a walk-in shower conversion makes sense for your specific situation my Walk-In Tub vs Walk-In Shower Guide covers the decision from a contractor’s perspective.
Wall Type Considerations: What’s Behind Your Shower Surface Determines Everything
Shower grab bar placement strategy is only half the equation. The other half is whether your wall can actually support what you’re asking it to hold. I’ve seen perfect placement decisions fail completely because nobody thought about what was behind the tile before they started drilling.
These are the four wall types I encounter on aging in place shower jobs and what each one means for grab bar installation.
Tile Over Cement Board
This is the gold standard for shower wall construction and the most grab bar friendly surface you’ll encounter. Cement board is dimensionally stable, doesn’t compress under load, and holds a lag screw reliably when there’s blocking or a stud behind it.
Drilling through tile requires a diamond tipped drill bit and patience — tile cracks if you rush it or apply too much pressure. Start slow, no hammer drill function through the tile itself, and switch to a standard drill bit once you’re through the tile and into the cement board and framing behind it.
With proper blocking behind cement board tile a grab bar can go anywhere on that wall. This is why I spec cement board on every shower wall in an aging in place renovation without exception.
Fiberglass and Acrylic Surrounds
Fiberglass and acrylic surrounds are one piece or multi piece panels that sit against the wall framing. The critical variable is how much gap exists between the surround panel and the framing behind it. Some surrounds sit tight against the wall. Others have a gap of half an inch or more — and that gap means the surround is essentially floating with no solid backing.
For elderly seniors aging in place choosing the right wall surface during a remodel is worth the extra cost of cement board, or a glue up surround that is flush to the wall over fiberglass — it’s the difference between a grab bar that goes anywhere you need it and one that’s limited by what the wall can actually hold. Before drilling into any fiberglass or acrylic surround press firmly on the surface at your intended bar location. If it flexes at all there is more than likely a gap behind it. A toggle bolt through fiberglass with a gap behind it will hold until it doesn’t — and when it fails it takes a chunk of the surround with it.
The correct approach for a fiberglass surround with adequate backing is a grab bar with a large flange plate that distributes load across the surface and lag screws that penetrate through the surround and into solid framing or blocking behind it. Always silicone around every flange — fiberglass surrounds are especially vulnerable to water intrusion at any penetration point.
If the surround has a gap and no solid backing behind the bar location your options are limited — add blocking by accessing the wall from the other side (if possible) or replace the surround with one that sits tight against the wall.

Solid Surface and Cultured Marble
Solid surface and cultured marble panels are increasingly common in aging in place bathroom renovations because they’re seamless, easy to clean, and look significantly more finished than fiberglass. They drill similarly to fiberglass but are generally denser and more dimensionally stable.
The same gap assessment applies — press the surface before drilling. Silicone around every flange is non-negotiable on solid surface panels just as it is on fiberglass.
One advantage of solid surface in new construction is that blocking can be spec’d to sit tight against the back of the panel eliminating the gap problem entirely. If you’re doing a full remodel and choosing your wall surface this is worth building in from the start.
Natural Stone and Porcelain Tile
Natural stone — marble, travertine, slate — and large format porcelain tile are the most demanding surfaces to drill through for shower grab bar placement. Both require diamond tipped bits, slow speed, water cooling to prevent cracking, and significantly more patience than standard ceramic tile.
The reward is that natural stone and large format porcelain over cement board with proper blocking is the most structurally sound grab bar substrate you can have. The wall system behind a properly installed stone tile shower is essentially bulletproof for grab bar purposes.
The risk is that a cracked stone tile is an expensive repair and, in some cases, — book matched marble, discontinued tile runs — an irreplaceable one. If you’re not confident drilling through natural stone call a professional. The cost of professional installation is significantly less than replacing a cracked marble wall.
Blocking for Showers: Why Wet Wall Blocking Is Different
We covered blocking in depth in the toilet grab bar placement guide — the principle is the same here. If there’s no stud where you need it you need blocking before you need a bar. But shower blocking has two considerations that don’t exist in a dry wall installation.
The Waterproofing Conflict
In a dry wall you access the stud cavity from the front, add blocking, patch the drywall, and you’re done. In a shower the wall surface is part of your waterproofing system. Opening a tiled shower wall to add blocking means disturbing that waterproofing layer — and putting it back together correctly requires more than just patching and painting.
This is why I’m more aggressive about speccing blocking in showers during new construction or full remodel than anywhere else in the bathroom. Once that tile is up and the waterproofing is intact I don’t want to touch it unless I absolutely have to.
The rule I follow on every aging in place shower renovation — put 2×10 blocking across the entire shower wall from 30 to 38 inches above the finished floor before any cement board or wall surface goes up. All three walls if the layout allows it. Entry wall, side walls, back wall. Every surface a bar might ever need to go.
Retrofitting Blocking in an Existing Shower
If the tile is already up retrofitting blocking in a shower is significantly more involved than in a dry area. Your options in order of preference:
For elderly seniors aging in place who want to avoid the cost and disruption of retiling this approach is worth exploring before assuming the tile has to come down. Access from the other side — if the shower shares a wall with a closet or hallway opening from the back is cleaner than disturbing the tile. Same principle as the toilet zone retrofit we covered in the toilet grab bar placement guide.
Remove and replace tile in the bar zone — expensive but gives you a clean result with proper blocking and fresh waterproofing. If the tile is old, dated, or already showing grout issues this is often worth doing as part of a broader bathroom refresh.
The Silicone Step Is Not Optional
Every grab bar flange in a shower gets a bead of silicone around its perimeter before the screws go in. Not after — before. The silicone creates a gasket between the flange and the wall surface that prevents water from wicking behind the plate and into the wall cavity.
I’ve seen beautifully waterproofed shower systems fail at the grab bar flange because someone skipped this step. The silicone costs two dollars and takes thirty seconds. There is no excuse for skipping it.
Use a mold resistant silicone rated for wet areas — not standard white paintable caulk, not general-purpose silicone. Mold resistant wet area silicone specifically. In a shower environment standard silicone will fail within a year.
Common Mistakes in Shower Grab Bar Placement
Most shower grab bar mistakes fall into one of four categories — wrong location, wrong wall, wrong hardware, or skipped waterproofing. These are the ones I see most consistently.
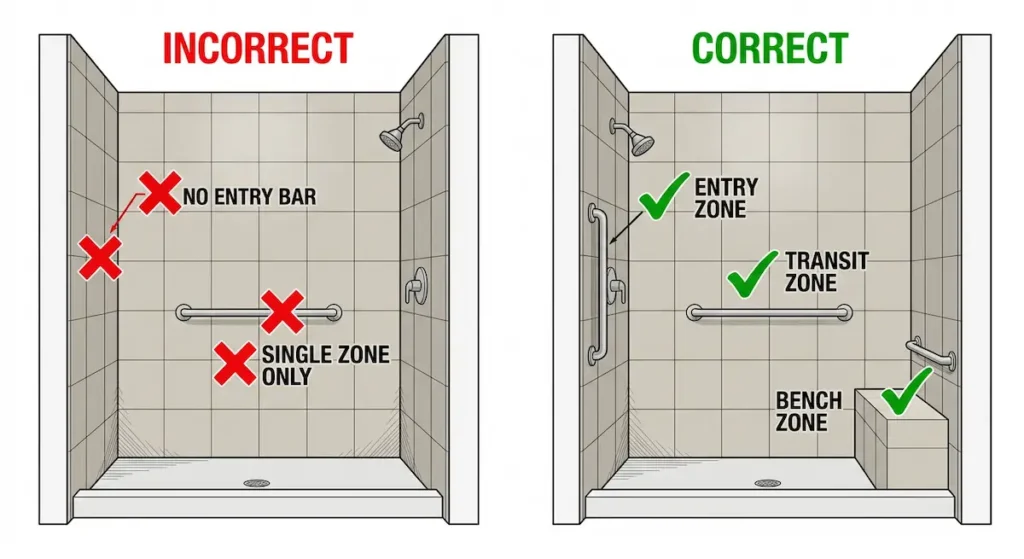
Installing Only One Bar
A single bar in a shower covers one zone. For an elderly senior aging in place one bar leaves two zones unprotected — and the zone without coverage is always the one where the fall happens.
I spec a minimum of two bars in every aging in place shower — entry vertical and transit horizontal. Three if there’s a bench. The cost difference between one bar and three bars is negligible compared to the cost of a fall. For everything you need to know about built-in bench types and positioning my Shower Bench for Seniors Guide covers the options in detail.
Wrong Zone for the User’s Actual Movement Pattern
A bar installed where it looks right on the wall isn’t necessarily where the user’s hand goes during their actual shower routine. I always watch the user walk through their routine before finalizing placement — where they reach for the wall, where they pause, where they transition from standing to seated.
A bar six inches from where the user actually reaches is a bar that won’t get used. A bar that doesn’t get used is a bar that doesn’t prevent falls.
Skipping the Entry Bar
The entry vertical bar is the most skipped bar in aging in place shower installations — and the most critical one for elderly seniors. Everyone thinks about the bar inside the shower. Nobody thinks about the bar at the moment of entry when one foot is on dry floor and one foot is on wet tile.
That transition moment is statistically the highest risk point in the entire shower routine. The entry bar exists specifically for that moment.
Toggle Bolts in Fiberglass
We covered this in the introduction but it bears repeating in the context of mistakes because it’s the single most dangerous shower grab bar installation error I encounter. A toggle bolt through a fiberglass surround with a gap behind it will hold under normal use — right up until it doesn’t. And when it fails it fails suddenly and completely.
If you can’t get to solid framing or blocking behind your fiberglass surround find a different solution before you drill. A bar that looks installed is not the same as a bar that’s safe.
Skipping the Silicone
Every flange, every penetration, every shower wall grab bar installation — silicone around the backing plate before the screws go in. Skipping this step on a fiberglass surround or tile wall turns your grab bar installation into a slow water intrusion point that won’t show itself until there’s subfloor damage behind the wall.
Two dollars of silicone prevents a repair that costs thousands.
FAQ: Shower Grab Bar Placement
Where should grab bars go in a walk-in shower?
Correct shower grab bar placement requires a minimum of two bars — a vertical bar at the entry jamb on the dominant side and a horizontal bar on the long side wall at 33 to 36 inches from the finished floor. If a bench is present add a third bar adjacent to the seat at the same height positioned so the front end extends slightly past the front edge of the bench. For elderly seniors aging in place three bars covering all three zones is always the right call.
How high should shower grab bars be?
The ADA standard is 33 to 36 inches from the finished floor for horizontal bars. For the vertical entry bar mount the top between 65 and 70 inches and the bottom at 45 inches. Always measure from the finished floor after tile is installed — not from the subfloor or before tile goes up.
How long should a shower grab bar be?
For the transit side wall bar a minimum of 24 inches — 36 inches is better for seniors aging in place because it provides continuous support through a wider range of movement. When it comes to an entry vertical bar 24 inches is standard. For the bench zone bar length depends on bench position but the front end should always extend past the front edge of the seat.
More Shower Grab Bar Placement FAQs
Can grab bars be installed in a fiberglass shower?
Yes — but only if the surround has solid backing behind the bar location. Press firmly on the surface before drilling. If it flexes there is a gap behind it and toggle bolts are not the solution. Access the wall from behind to add blocking. Never use toggle bolts through fiberglass as a primary aging in place safety solution.
Do I need silicone around shower grab bar flanges?
Yes — every time, no exceptions. A bead of mold resistant wet area silicone around every flange before the screws go in creates a waterproof gasket that prevents water intrusion behind the wall surface. Skipping this step on any shower wall penetration is a waterproofing failure waiting to happen.
What is the difference between shower grab bar placement for a curbless shower vs a standard threshold shower?
In a standard threshold shower the entry vertical bar supports the step-over moment — one foot in, one foot out, full body weight on a single leg. In a curbless shower that step-over risk is eliminated but the entry bar still serves as a balance reference point for the transition from dry floor to wet floor. The internal placement logic for transit and rest zone bars is the same in both shower types.
How do I know if my shower wall can support a grab bar?
Press firmly on the wall surface at your intended bar location. Any flex in a fiberglass or acrylic surround means a gap behind the panel.
Final Thoughts and Recommended Products
Shower grab bar placement comes down to three things done right — zone coverage, wall assessment, and waterproofing. Get a bar in every zone the user actually moves through. Know what’s behind your wall before you drill anything. Silicone every flange without exception.
For elderly seniors aging in place those three things together turn a shower from the highest risk zone in the bathroom into a space they can use independently and safely for years.
Field Tested Products for Shower Grab Bar Placement
Moen Home Care 24 Inch Grab Bar — Peened Finish My standard specification for shower entry vertical and bench zone installations. Same SecureMount system and peened finish as my toilet bar recommendation — genuine grip when wet, tolerates minor stud misalignment in retrofit situations. Weight rating 500 lbs, diameter 1.25 inches.
Moen Home Care 36 Inch Grab Bar — Peened Finish My transit side wall specification for aging in place shower installations. The extra length over a 24 inch bar provides continuous support through a wider range of movement — worth the marginal cost difference for any elderly senior using the shower daily. Weight rating 500 lbs, diameter 1.25 inches.
Moen Home Care Left and Right Angled Grab Bar For elderly seniors with arthritis or wrist weakness in the bench zone specifically. The angled bar allows a more natural wrist position through the sit to stand transition than a strictly horizontal bar. Available in left and right hand configurations — confirm dominant side before ordering. Weight rating 500 lbs.
If you’re ready to evaluate your full bathroom using the same framework I use on job sites my Free Home Safety Checklist walks you through every major transition zone room by room.
For the structural installation details behind everything we covered here — drill bits, diamond tipped bits for tile, and the pull test — my Grab Bar Installation Guide covers the technical how-to from start to finish.
For the complete picture of grab bar strategy across your entire bathroom beyond the shower my Grab Bar Placement Guide covers toilet, bathtub, and entry placement in the same depth we covered the shower here.