Keeping It Level
Choosing a shower pan for aging in place comes down to four things — threshold height, slip resistance, correct installation, and the right material for your budget. For aging in place always look for a low-profile threshold of 2 inches or under, ADA prefers 1.5 inches or lower. Get a pan with a verified DCOF slip resistance rating. Make sure whoever installs it levels it correctly before anything else goes in. And if you’re going with acrylic or fiberglass, put a mortar bed under it — I’ve never personally seen a fiberglass pan with a mortar bed crack. As long as it’s installed properly- not saying it doesn’t happen, I just have never personally seen it. Without one I’ve seen hundreds.
- What Is a Shower Pan and Why Does It Matter for Aging in Place
- Threshold Height: The Most Important Number on the Spec Sheet
- Shower Pan Materials: What's Actually Worth Buying
- Built-In Bench Pans: Convenient But With Real Trade-Offs
- Slip Resistance: What to Actually Look For
- Drain Configuration: Personal Preference With One Exception
- Standard Pan Sizes: What's Actually Available
- Installation: What Getting It Right Actually Looks Like
- Shower Pans in Mobile Homes: What's Different
- FAQ: Shower Pans for Aging in Place
- Field Tested Products
I’ve had this conversation more times than I can count. A homeowner spends serious money on a custom shower — beautiful tile, good fixtures, solid grab bars. Six inch curb. Looks great at 55. By 70 that six inch curb might as well be a wall.
Here’s what I tell every client before we start: you ain’t getting any younger. If you’re spending the money, now think about where you’re going to be in 15 years. A low-profile threshold costs the same as a standard one. The difference is whether your shower works for you for the rest of your life or whether you’re calling someone like me to tear it out and start over.
The shower pan is the foundation of that decision. Get it right the first time.
For the complete bathroom safety picture beyond the shower floor my Senior Bathroom Safety Guide maps out every element from floor to fixtures.
What Is a Shower Pan and Why Does It Matter for Aging in Place
A shower pan is the floor of your shower — the waterproof base that everything else sits on. In a tile shower it’s a mortar bed built on site. In a prefab shower it’s a manufactured unit that drops into the framed opening.
For elderly seniors aging in place the shower pan is one of the most consequential decisions in the entire bathroom because it determines three things that directly affect safety:
How high you have to lift your foot to get in — the threshold height.
How slip resistant the floor surface is underfoot — the DCOF rating.
How stable a shower chair or shower bench sits on the floor — the slope and drain configuration.
Get those three things right and the shower pan works for decades. Get them wrong and you’re either doing this renovation twice or living with a hazard you can’t easily fix.
Threshold Height: The Most Important Number on the Spec Sheet
For aging in place the threshold height is the first number I look at on any shower pan spec sheet. Everything else is secondary.
A standard shower curb runs 4-6 inches high. That’s the industry default and it works fine for most adults at most ages. But for an elderly senior with limited hip mobility, balance issues, or anyone using a walker that 4-inch curb is a significant obstacle — and a fall risk every single time they step in or out.
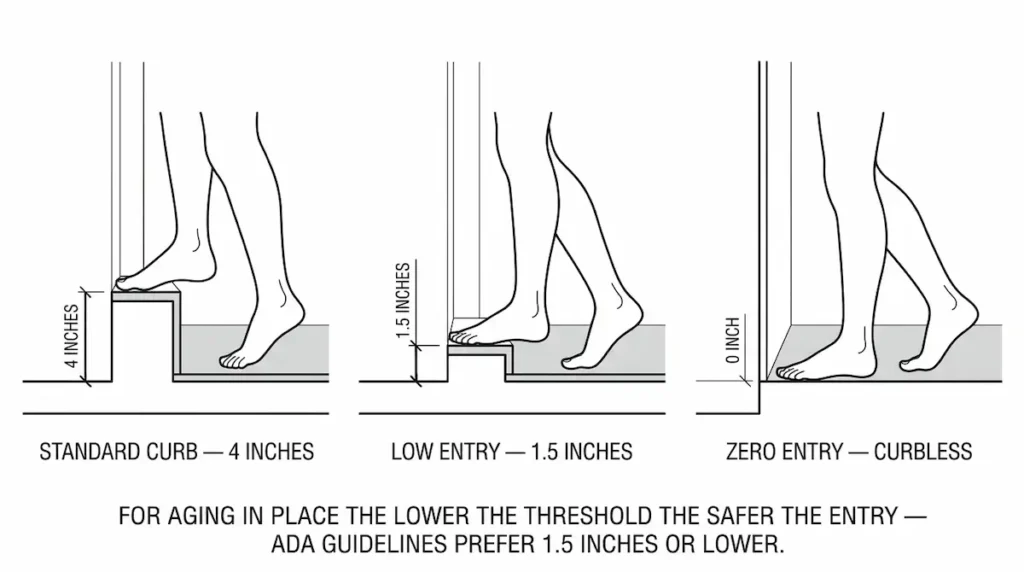
The threshold options and what they mean:
Standard curb — 4-6 inches. Fine for a general renovation but not what I specify on aging in place jobs. Even in general renovations I tend to push for low profile because it’s safer all around and goes back to thinking ahead.
Low entry — Also called “low profile”. Under 2 inches, usually 1 to 1.5 inches. The lowest threshold available in a prefab pan. ADA guidelines prefer 1.5 inches or lower for accessible shower design. This is what I spec whenever a client wants the benefits of a prefab pan with the lowest possible barrier.
Zero entry — 0 inches. This requires a curbless shower conversion rather than a prefab pan. If true zero entry is the goal the decision isn’t about which pan to buy — it’s about whether your subfloor can support the structural work required. My Curbless Shower Subfloor Guide covers the three diagnostic tests every bathroom floor needs to pass before a curbless conversion begins.
The honest contractor take:
For most aging in place jobs a low entry prefab pan at 1 to 1.5 inches is the practical sweet spot. It’s significantly more accessible than a standard curb, it doesn’t require the structural work of a full curbless conversion, and it’s available at every price point across every material. If budget is a concern a low-profile pan delivers most of the accessibility benefit of a full curbless conversion at a fraction of the cost. For seniors who want meaningful safety improvements without major structural work my Aging in Place Bathroom Safety Without a Full Remodel Guide covers the practical upgrades that don’t require gutting your whole bathroom.
Shower Pan Materials: What’s Actually Worth Buying
Every shower pan material has a place — the right choice depends on budget, longevity expectations, and what the specific job requires. Here’s the honest breakdown from someone who has installed all of them.
Acrylic fiberglass — the most common choice
This is what I install roughly 70 percent of the time. It’s budget friendly, widely available in every size and threshold height, and installs quickly. For most aging in place bathroom renovations where you’re on a limited budget it’s the right call.
The honest caveat: acrylic fiberglass can crack — most commonly near the drain — and it will flex underfoot without proper support underneath it. I’ve seen hundreds of cracked fiberglass pans in my career. The fix is simple and I’ll cover it in the installation section but it’s worth knowing going in.
Steel — the longevity winner
Steel pans outlast everything else. They don’t crack, they don’t flex, and they hold up under decades of daily use without complaint. If longevity is the priority and budget allows steel is the right answer.
The trade-off is weight and cost. Steel pans are significantly heavier than acrylic which affects shipping and handling during installation. They also run more expensive than acrylic or fiberglass.
Molded stone resin — the aesthetic choice
These are the beautiful ones. Molded stone resin pans look like natural stone, feel substantial underfoot, and photograph well. For clients who want an upscale finish without the cost and complexity of a full tile mortar bed they’re an excellent option.
Longevity is good — better than acrylic, comparable to steel in most cases. The price point reflects the aesthetic premium.
Mortar bed for tile showers — the custom option
A mortar bed isn’t a prefab product — it’s built on site by the installer. You’re not buying a pan, you’re building the shower floor from scratch. This gives you complete control over slope, drain placement, and tile selection including whatever DCOF rated tile you choose for the surface.
The trade-off is cost and time. A mortar bed takes longer to build, requires a skilled installer to slope it correctly, and the tile on top adds another layer of material and labor cost. For aging in place builds where a specific DCOF rating is required and aesthetics matter a mortar bed tile shower can be the right long-term answer. My Non-Slip Bathroom Flooring for Seniors Guide covers the DCOF ratings and tile specifications that matter most for an aging in place shower floor.
Built-In Bench Pans: Convenient But With Real Trade-Offs
Some prefab shower pans come with a built-in bench already molded into the unit. You’ve seen them — the bench is part of the pan itself, same material, same color, designed as one piece. For elderly seniors aging in place they look like a simple solution. One purchase, bench included, no separate installation required.
Here’s the contractor reality on these.
The pros:
Everything matches. The bench surface, the floor surface, and the walls if you buy a kit are all the same material and finish. No grout lines at the bench edge, no waterproofing joint between the bench and the floor to worry about. It’s a clean install.
For budget conscious aging in place renovations a pan with a built-in bench is significantly less expensive than a custom tiled bench. You’re getting a seating surface without the framing, waterproofing, and tile labor that a built-in bench requires in a tile shower.
The cons:
The bench height is fixed. Whatever height the manufacturer molded it at is the height you get. You cannot adjust it. For elderly seniors where a 1-inch difference in seat height can affect how easily they stand up that lack of adjustability is a real limitation. My Shower Bench Height Guide covers exactly why the 17-to-19-inch finished floor measurement matters and why getting that number right for the specific user is so important — with a molded bench pan you’re accepting whatever number the manufacturer chose.
The bench depth and position are also fixed. It’s going where the manufacturer put it. If that position doesn’t work for the specific user’s movement pattern or grab bar placement needs, you can’t change it. My Grab Bar Placement Guide covers exactly how bench position affects where bars need to go — and why those decisions have to be made together not separately.
The bench is the same material as the pan. For acrylic fiberglass pans that means the bench surface CAN have the same flex characteristics as the floor — and the same potential for cracking under repeated load over time. Some companies do reinforce the benches with wood for this exact reason, that is always something you want to check before you buy. A properly framed and waterproofed tiled bench doesn’t have that vulnerability.
Size limitations. Built-in bench pans come in fewer size options than standard pans. If your shower opening doesn’t match the available dimensions, you’re out of luck (without further work involved).
My honest take:
A built-in bench pan is a reasonable budget option for an aging in place bathroom when the fixed height happens to work for the specific user. Before purchasing confirm the bench height against the user’s actual sit-to-stand mechanics — not just the spec sheet number. If the height is right and the budget is tight it’s a workable solution. If the height is off by even an inch or two look at a standard pan paired with a quality adjustable shower chair instead. A portable chair you can dial in to exactly the right height will serve an elderly senior better than a permanent bench that’s the wrong height every single day.
Slip Resistance: What to Actually Look For
Not all shower pans are created equal for slip resistance and the label “non-slip” on a box means nothing without a number behind it.
Many shower pans are tested using DCOF standards — the same Dynamic Coefficient of Friction rating system used for tile. When shopping for a shower pan for aging in place check the product spec sheet for a DCOF rating. The same threshold that applies to tile applies here — 0.42 is the minimum for a wet floor, 0.60 or higher is what I look for on an aging in place job.
Not every manufacturer publishes this number. If the spec sheet doesn’t include a DCOF rating, ask the retailer or check the manufacturer’s website before purchasing. A pan without a published slip resistance rating is a pan I can’t confidently spec for an elderly senior.
Drain Configuration: Personal Preference With One Exception
Shower pans come with several drain configurations and the honest answer is that for most seniors aging in place the drain type is largely a matter of personal preference. They all move water — what matters more is that the pan is leveled correctly so the built-in slope actually works.
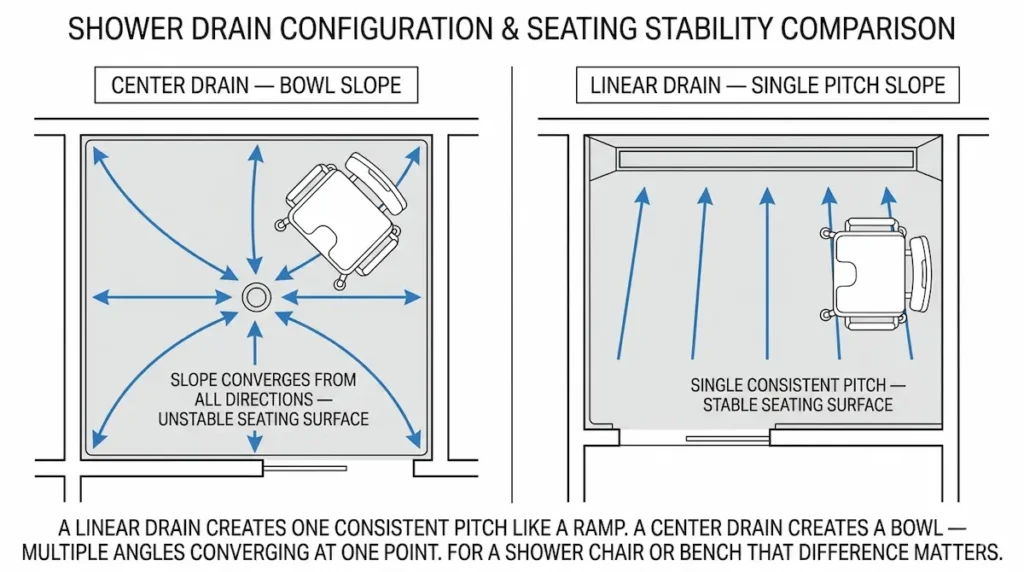
Center drain
— built into the center of the pan. Common in square pans. The floor pitches toward the center from all four sides creating what is essentially a bowl shape. The slope is coming from multiple angles simultaneously — left, right, front, and back all pitching toward that one center point.
Right hand or left-hand drain
— positioned on one side of the pan. The floor slopes consistently toward that side. Better than a center drain for seating stability but still has some bowl characteristics depending on the pan design.
Linear drain
— a trough style drain that typically runs the length of one side of the pan. This is the one I prefer for aging in place specifically and here’s the technical reason most guides never explain. A linear drain creates a single consistent pitch — the entire floor slopes in one direction from one side to the other like a ramp. It’s completely flat from side to side. There are no competing angles, no bowl shape, no multiple directions of slope happening at once.
With a center drain, right hand, or left hand drain you have a bowl situation — multiple slopes converging at one point. You may not be able to see all those angles but they’re there. A shower chair or bench sitting on a bowl slope is sitting on an uneven surface that pitches in multiple directions. A shower chair sitting on a linear drain floor is sitting on a single consistent plane. That’s a meaningful stability difference for an elderly senior who depends on that seat every day.
That’s why for aging in place I reach for the linear drain when the option is available. The stability advantage for seating is real and it’s a detail most contractors and most product guides never mention. For a complete look at how drain slope affects seating stability my Shower Bench vs Shower Chair Guide covers how floor configuration factors into which seat works best for your specific shower.
Standard Pan Sizes: What’s Actually Available
Shower pans come in a wide range of sizes. The most common dimensions I encounter are:
32×32, 32×60, 30×60, 48×48, and up to 60×60 for larger walk-in configurations.
The tub-to-shower swap
If you’re converting a standard bathtub to a shower without changing the wall framing the two sizes I encounter 90 percent of the time are 30×60 or 32×60 — and occasionally 30×56 or 32×56 depending on the tub. Those four dimensions cover the vast majority of standard tub footprints.
One important note on a tub-to-shower conversion — you cannot reuse the existing tub surround walls. The pan height maxes out at 4 to 6 inches while a tub surround is significantly taller. New shower walls are required regardless of the pan material you choose. Even if you have tile walls, you cannot add new tile to the bottom of your existing walls adequately. Budget for new walls as part of any tub-to-shower conversion.
Installation: What Getting It Right Actually Looks Like
The most technically perfect shower pan in the world performs poorly if it isn’t installed correctly. These are the installation details that matter most for aging in place specifically.
Level the pan first — everything else depends on it
This is the single most important installation step and the most commonly skipped. Unlike a mortar bed where you build your own slope a prefab pan has the slope already built in. If the pan isn’t perfectly level front to back and side to side that built-in slope is wrong before a single drop of water hits it. Water will pool in the wrong spots, drain poorly, and create standing water on the shower floor — which is exactly the fall risk you’re trying to eliminate.
Check level in both directions before the pan is secured. Adjust with shims if needed. Confirm level again after the pan is set and before any walls go up.
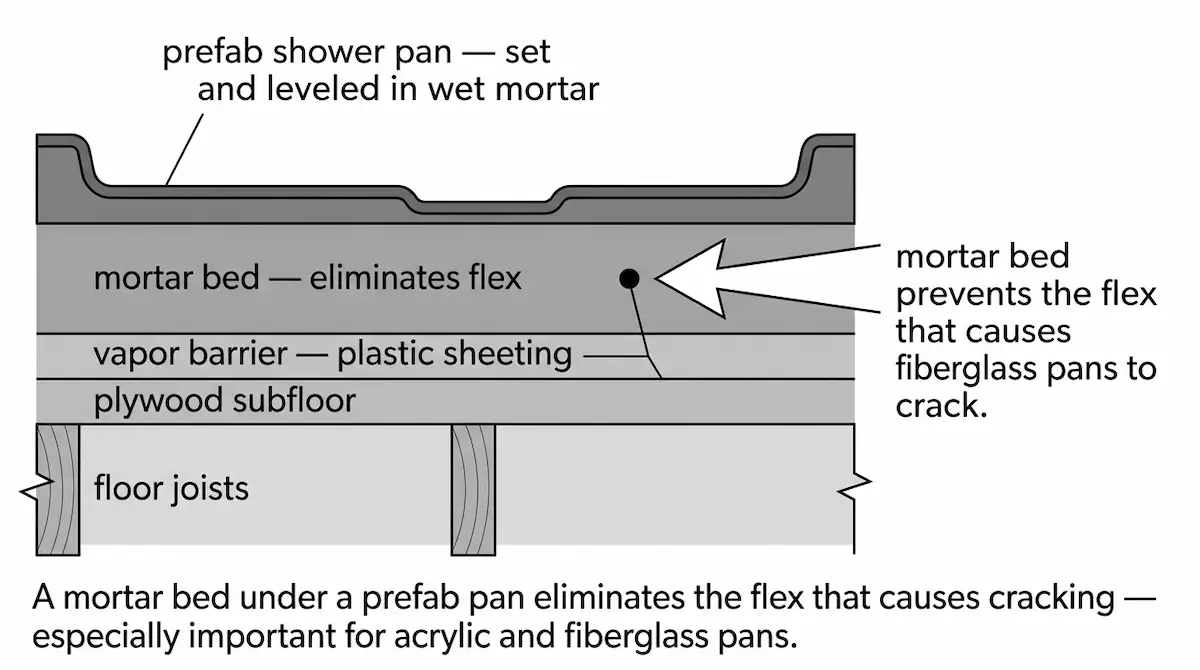
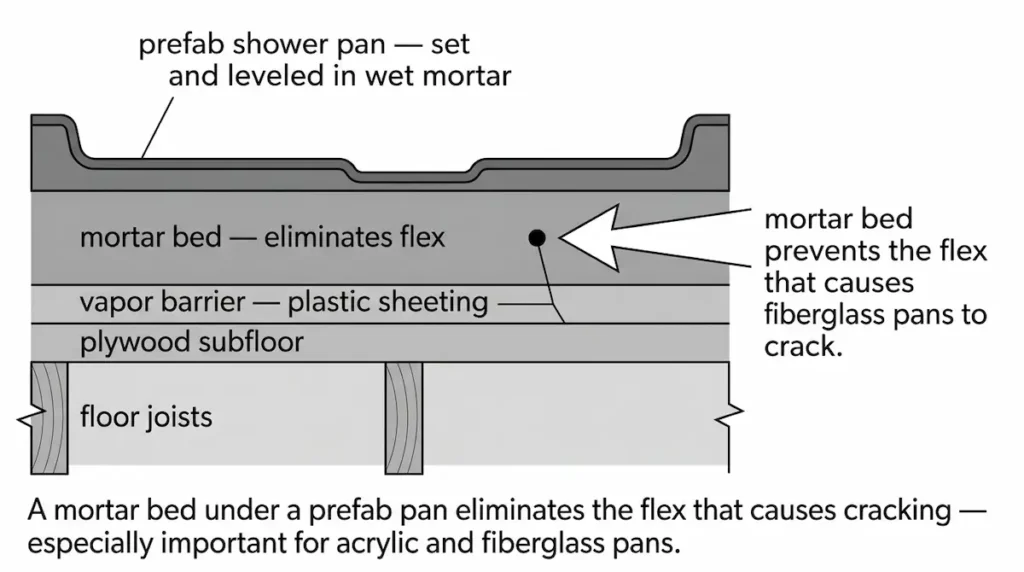
The mortar bed recommendation
For any acrylic fiberglass pan I recommend installing a mortar bed underneath before setting the pan — regardless of what the manufacturer’s installation guide says about it being optional.
Here’s my field observation: I’ve installed hundreds of shower pans over my career. I’ve seen hundreds of cracked fiberglass pans. I have never personally seen a fiberglass pan with a mortar bed crack. That’s not a guarantee — I’m sure it can happen — but in my experience the mortar bed eliminates the flex that causes cracking almost entirely.
The process: lay plastic sheeting on the subfloor first as a vapor barrier. Build your mortar bed over the plastic. Set the pan into the wet mortar, level it carefully, then put weight on the pan for 24 hours while the mortar cures. The pan beds into the mortar and the mortar eliminates the flex point at the drain where most cracks originate.
This adds time and a small amount of material cost. It’s worth it.
Sealing — 100% silicone, nothing else
The joint between the pan and the wall must be sealed with 100% silicone. Not painter’s caulk. 100% silicone.
In a wet environment silicone is the only sealant that maintains a waterproof flexible bond over years of thermal expansion and daily use. If anyone tells you otherwise they’re wrong. This joint is where water gets behind your walls if it’s not done correctly — and water behind your walls means the kind of damage that doesn’t show up until it’s expensive.
The drip lip — getting the surround to sit correctly
The pan has a lip around the perimeter — typically about an inch tall and quarter inch thick — that the shower surround walls sit on top of. The surround has to sit over that lip and down to the shower base itself for the system to work correctly. If the wall material above is too thick or too thin the joint between the pan and the wall either gaps or overhangs — neither is acceptable in a wet area.
For stud to stud surrounds the wall framing itself needs to be at the right depth to land flush with the lip so the surround can slide over the lip down to the base of the shower pan. For glue up surrounds the wall behind needs to be packed out correctly so the surround surface lines up. I always add blocking where the top of the surround lands in stud-to-stud surrounds to ensure I have something solid to attach it to — the same principle that applies to grab bars applies here.
The specific requirements for what go behind glue up surrounds versus stud-to-stud surrounds — cement board, moisture resistant drywall, manufacturer specifications — is enough material for its own guide. My Shower Surrounds Guide covers that in full detail.
Subfloor considerations
The subfloor under a shower pan needs to be solid, level, and free of MDF. If you pull up old flooring and find MDF underneath replace it with plywood before the pan goes in — MDF and moisture is a disaster waiting to happen regardless of how waterproof the pan above it is.
Shower Pans in Mobile Homes: What’s Different
Mobile homes present specific installation considerations that standard guides don’t cover.
MDF is more common — check before you install. If you find it replace it. No exceptions.
Most mobile homes have glue up surrounds rather than stud to stud. Know which type you’re working with before you buy materials — the wall prep requirements are different for each.
Floor joists are typically 2×6 rather than the 2×10 or larger in standard construction. More flex in the floor. This makes the mortar bed recommendation even more important in a mobile home — the extra support is worth it given the floor movement.
A mortar bed is non-negotiable in a mobile home for any acrylic or fiberglass pan in my opinion. The combination of a flexible subfloor and a pan that already tends toward cracking without support is asking for problems. Put the mortar bed in. For the full picture of what makes mobile home bathroom renovations different from standard construction my Mobile Home Bathroom Modifications for Seniors Guide covers subfloor, framing, plumbing, and every constraint specific to manufactured housing.
FAQ: Shower Pans for Aging in Place
What is the best shower pan threshold height for elderly seniors?
ADA guidelines prefer 1.5 inches or lower. For aging in place I recommend a low entry threshold of 1 to 1.5 inches as the minimum. A standard 4 inch curb creates a meaningful fall risk for elderly seniors with limited hip mobility or balance issues. If zero threshold is the goal a curbless shower conversion is required rather than a prefab pan.
Are shower pans slip resistant?
Many shower pans are tested using DCOF standards — the same slip resistance rating system used for tile. Always check the product spec sheet for a published DCOF rating before purchasing. Look for 0.42 minimum and 0.60 or higher for an aging in place bathroom. If the manufacturer doesn’t publish a DCOF rating ask before you buy.
What shower pan material is best for aging in place?
For budget conscious aging in place renovations acrylic fiberglass with a mortar bed underneath is the right call — accessible, affordable, and durable when installed correctly. For maximum longevity steel wins. For aesthetics molded stone resin delivers the look of a custom tile shower at a lower cost and complexity. A mortar bed tile shower gives you the most control over slip resistance and design but at higher cost and installation time.
Do I need a mortar bed under a prefab shower pan?
Manufacturers often say no. My recommendation based on field experience is yes — especially for acrylic fiberglass pans. A mortar bed eliminates the flex that causes cracking and I have never personally seen a fiberglass pan with a mortar bed crack. The added cost is minimal compared to the cost of replacing a cracked pan.
What drain type is best for a senior shower?
For elderly seniors using a shower chair or bench a right hand, left hand, or linear drain is preferable to a center drain. Single direction slope creates a more stable seating surface than the four-way slope of a center drain. My Shower Bench Height Guide covers how floor slope and seat height work together as part of the same system.
Can I install a shower pan in a mobile home?
Yes — with specific considerations. Check for MDF subfloor and replace it if found. Use a mortar bed under any acrylic fiberglass pan given the increased floor flex from smaller joists.
Field Tested Products
Swanstone TALI-3660 Low Threshold Shower Pan A solid acrylic pan with a low threshold option and good slip resistance ratings. Available in multiple sizes covering the most common tub-to-shower conversion dimensions. Clean finish that doesn’t read as a medical modification. Confirm DCOF rating on the current spec sheet before ordering — verify against your specific size and finish.
Kohler Choreograph Shower Base My recommendation when aesthetics matter alongside accessibility. Available in low threshold configurations, solid construction, and a surface texture that performs well for slip resistance. Higher price point than basic acrylic but the finish quality justifies it on jobs where the bathroom needs to look as good as it functions.
QEP Flooring Mortar — Floor Mix My go-to for building the mortar bed under prefab pan installations. Mixes consistently, sets reliably, and compatible with the wood subfloor systems I work with most often in Eastern Kentucky homes and mobile homes. Always confirm compatibility with your specific subfloor type before mixing.
Ready to evaluate the rest of your bathroom for hidden safety risks? My Free Home Safety Checklist walks through the room-by-room framework — so you can find the risks before they find you.