Keeping It Level
Shower surrounds for seniors come in three main materials — acrylic fiberglass, PVC panel, and tile. Acrylic fiberglass is your budget option. PVC panel is the best value for the money. Tile is the most durable and most expensive. For aging in place the most important thing to understand before you pick a material is this — no surround supports a grab bar. Only blocking does. That conversation has to happen before anything goes up on the wall. Use the right adhesive, use enough of it, use silicone not painter’s caulk, and read the manufacturer specs before you touch a thing. Everything else follows from those four decisions.
- What Is a Shower Surround and Why Does It Matter for Aging in Place
- The Two Installation Types: Glue Up vs Stud to Stud
- Shower Surrounds for Seniors Materials: The Honest Contractor Breakdown
- The Aging in Place Reality: Grab Bars and Surrounds Are the Same Conversation
- What Goes Behind the Shower Surrounds for Seniors: The Invisible Work That Determines Everything
- Adhesive and Silicone: Where Most Glue Up Surrounds Fail
- Getting the Walls Right: Level, Plumb, and Square
- Common Mistakes I See on the Job- Shower Surrounds for Seniors
- Questions Worth Asking Your Contractor
- Contractor FAQ: Shower Surrounds for Seniors
- Bottom Line
I recently finished a bathroom in a double wide. The homeowner needed grab bars, a low entry shower, and a comfort height toilet. The surround conversation happened before anything else did.
She wanted something that looked nice. That’s completely reasonable. But the moment grab bars enter the picture the surround choice stops being purely an aesthetic decision. What she put on her walls had to work with what she needed for safety — not the other way around.
We ended up with a PVC glue up panel that looked like marble. It was beautiful. It was also flat against the wall, properly blocked behind it, and fully capable of supporting the grab bars she needed to stay safe in that shower for the next twenty years.
Pretty is easy. Pretty and safe takes planning before the first panel goes up.
If you’re planning a bathroom renovation for an elderly parent or for yourself and aging in place is part of the picture — this guide is for you. Not the glossy version. The contractor version. The one that tells you what goes wrong, why it goes wrong, and how to make sure it doesn’t happen in your bathroom.
For the complete bathroom safety picture beyond the surround my Senior Bathroom Safety Guide maps out every element from floor to fixtures.
What Is a Shower Surround and Why Does It Matter for Aging in Place
A shower surround is exactly what it sounds like — the wall surface inside your shower. It’s what keeps water where it belongs and what everything else in your shower system attaches to or works around.
For most people it’s a purely visual decision. They pick what looks good and move on.
For an elderly senior aging in place it’s one of the most consequential decisions in the entire bathroom renovation. Here’s why.
The surround determines whether grab bars can be installed correctly. It determines how easy the shower is to clean for someone with limited mobility. It determines whether the wall behind it stays dry for twenty years or starts failing in five. And it determines whether the contractor you hire can actually do what you’re asking them to do — or whether what you want and what you need are going in two different directions.
Get this decision right and everything else is easier. Get it wrong and you’re either tearing it out and starting over or living with a safety compromise you didn’t plan for.

The Two Installation Types: Glue Up vs Stud to Stud
Before we talk about materials we need to talk about installation types. Because the type of installation determines what goes behind the surround — and what goes behind the surround determines how long it lasts.
Glue Up Surrounds
A glue up surround is exactly what the name says. The panels adhere directly to a substrate behind them using construction adhesive. The substrate is the wall surface — typically moisture resistant drywall or cement board depending on what the manufacturer specifies.
And that last part is critical.
Every manufacturer has their own substrate requirements. Some say moisture resistant drywall is acceptable. Others say you need cement board. Some have specific waterproofing requirements on top of the substrate. Read the spec sheet before you buy anything and definitely before anyone touches a wall. The adhesive manufacturer recommendation is equally important — some adhesives bond to one material but not another. Use the wrong one and that panel is coming back off the wall. Maybe immediately. Maybe eventually. But it’s coming.
For an extra layer of protection on a glue up I’ll apply Mapei or a similar waterproofing sealer over the substrate especially in the corners before the panels go up. It’s not always required by the manufacturer but in an aging in place bathroom where a waterproofing failure means tearing out a carefully planned accessible shower — it’s cheap insurance.
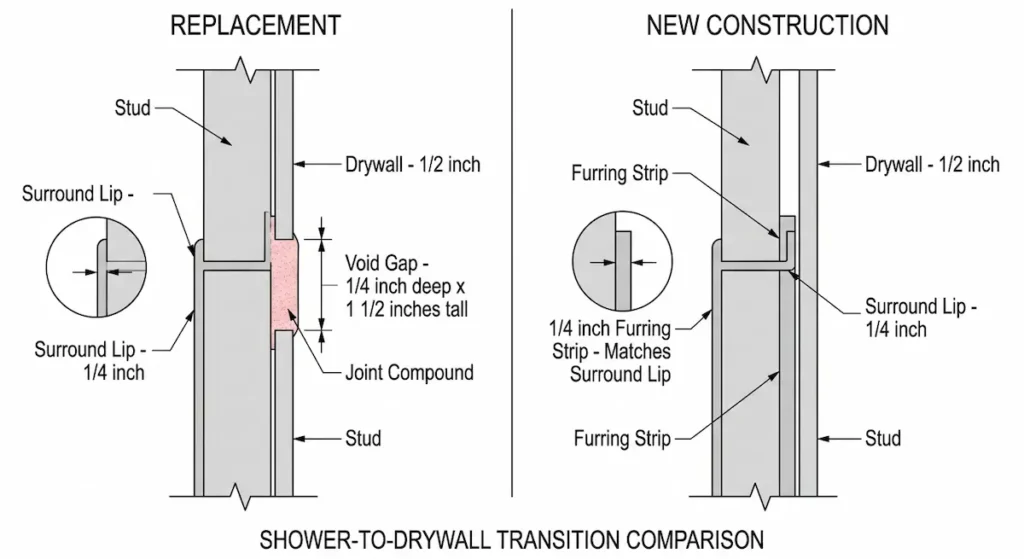
Stud to Stud Surrounds
A stud to stud surround spans from stud to stud across the full width of your shower opening. The only thing behind it is a vapor barrier — typically 6 mil poly — stapled over your blocking and studs. No drywall, no cement board. Just the barrier and the studs.
This creates a specific situation at the top of the surround that catches people off guard.
The surround has a lip at the top — about a quarter inch thick — that’s how it attaches to the wall. Standard drywall is half an inch thick. So when you run your drywall down to meet the top of the surround you’ve got a quarter inch void — roughly an inch and a half tall — where the drywall meets the surround lip.
The correct fix is joint compound. Fill it like a standard wall joint, tape it, finish it. Don’t put trim over it. I’ve seen that done and it looks wrong every single time.
If you’re doing new construction where the drywall isn’t up yet there’s a cleaner solution. Install furring strips on the face of your studs — one per stud all the way around the stall. Match the furring strip thickness to the surround lip and your drywall slides right over it with no void at all.
One important note on furring strips — you can only do this where the stall actually is. If your shower ends in the middle of a long wall you’d have to fur the entire wall not just the shower section. That changes the math significantly so think it through before you start.
Every situation is different. There is more than one way to skin a cat, and every layout brings its own set of constraints. What works perfectly in one bathroom may not be possible in the next one.
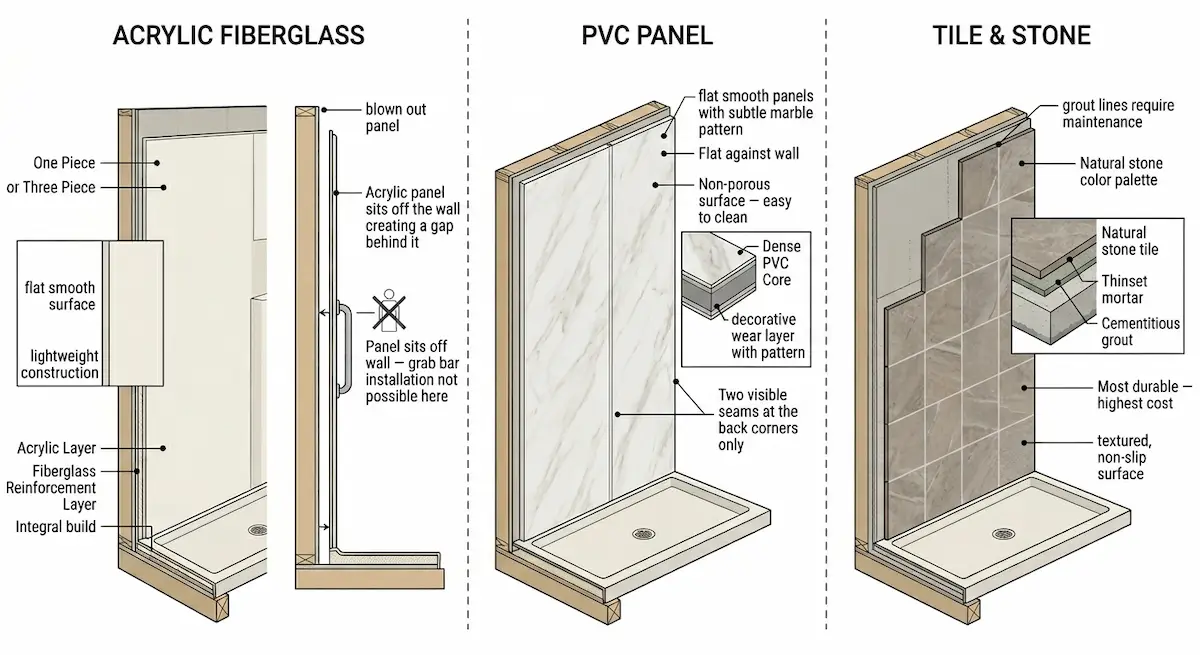
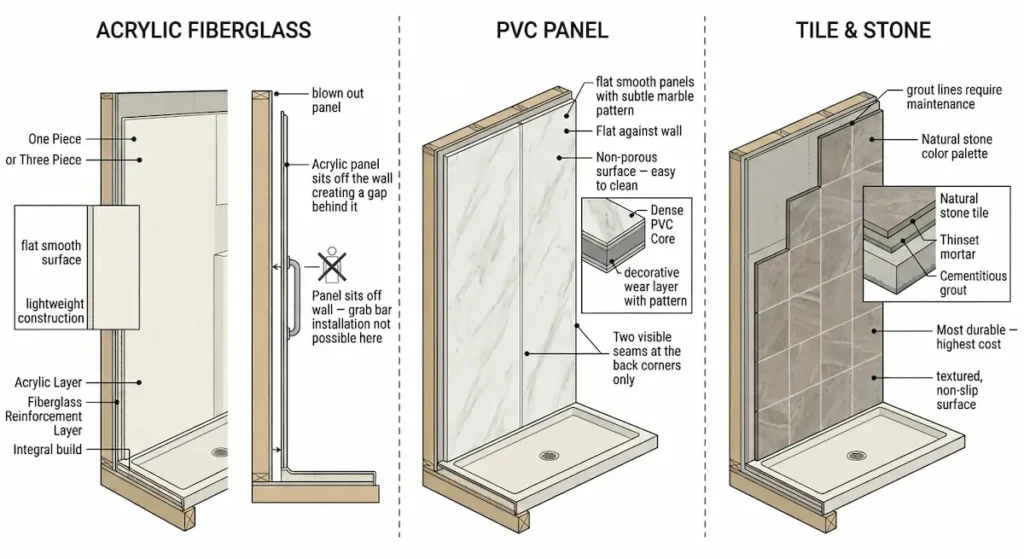
Shower Surrounds for Seniors Materials: The Honest Contractor Breakdown
Three main materials. Three different price points. Three different trade-offs. Here’s the reality of each one from someone who has installed all of them.
Acrylic Fiberglass — The Budget Option
Acrylic fiberglass is the most common surround material on the market and the most affordable. It installs relatively quickly, it’s widely available, and it gets the job done at a price point that works for most budgets.
I generally stick with a one piece or three-piece unit when I’m working with acrylic fiberglass. More seams equal more leakage possibilities — that’s a rule that applies to every surround material, but it matters most with acrylic because the material itself is less forgiving of installation errors than PVC.
Here’s the thing nobody tells you about acrylic fiberglass in an aging in place context.
Some acrylic surrounds come with built in shelves, soap dishes, and other features molded right into the panels. They look convenient. The problem is those features are created by blowing the panel out from the wall — the panel isn’t flat against the substrate behind it. It sits off the wall to create those voids.
That means grab bar installation becomes extremely difficult. Sometimes impossible.
If an elderly senior needs grab bars — and in most aging in place bathrooms they do — a blown fiberglass surround with those built in features can take grab bar installation off the table entirely. I won’t install grab bars in a wall where the surround isn’t sitting flat against a properly blocked substrate. That’s not a preference. That’s a safety decision.
If acrylic fiberglass fits your budget choose a flat panel version without the built-in features. It gives you a wall that can actually work with the rest of your safety system.
PVC Panel — The Best Value for the Money
This is my personal recommendation for most aging in place bathroom renovations and what I have in my own home.
PVC panel surrounds have come a long way. The one I just installed in that double wide looked like marble. The homeowner’s guests won’t know the difference and frankly neither would most contractors looking at it from across the room.
Here’s why I reach for PVC on most jobs.
It installs faster than tile — significantly faster. A direct swap with no fixture modifications runs about two days start to finish. That matters for an elderly senior who may be without their primary shower during the renovation. Less time without a safe bathing option is always better.
It costs less than tile in both materials and labor. You’re saving on both ends of the invoice.
It’s flat against the wall which means grab bar installation works correctly when the blocking is properly placed behind it.
It’s non-porous and easy to clean — important for someone with limited mobility who may have difficulty scrubbing textured surfaces.
One honest caveat — PVC panel requires better cutting than acrylic fiberglass. The back panel almost always needs to be trimmed to fit and the cuts need to be straight. If the cuts aren’t straight the seams won’t line up and you’ll see it every time you step in the shower. Not every contractor who can hang an acrylic surround can cut PVC cleanly. Ask before you hire.
Tile and Stone — The Premium Option
Tile is the most durable, the most customizable, and the most expensive. It requires the most labor, the most skill, and the most ongoing maintenance of any surround option. It also lasts the longest when it’s installed correctly.
For aging in place, the tile conversation is really a substrate and waterproofing conversation more than anything else. The same backerboard and membrane system that applies to any tile shower applies here — cement board, waterproofing membrane, proper seam and corner treatment. My Shower Backerboard and Waterproofing Guide covers that system in full detail.
Tile will always require more upkeep than PVC or acrylic. Grout lines collect soap scum, require periodic sealing, and can deteriorate over time. For an elderly senior who may have difficulty cleaning a textured surface that maintenance reality is worth factoring into the decision.
That said — if the budget allows and the installation is done correctly tile is a legitimate long term investment.
The honest ranking is simple. Budget is acrylic fiberglass. Value is PVC panel. Premium is tile. There is no wrong answer as long as it’s installed correctly.
The Aging in Place Reality: Grab Bars and Surrounds Are the Same Conversation
I want to be direct about this because it’s the most important thing in this article for anyone renovating a bathroom for an elderly senior.
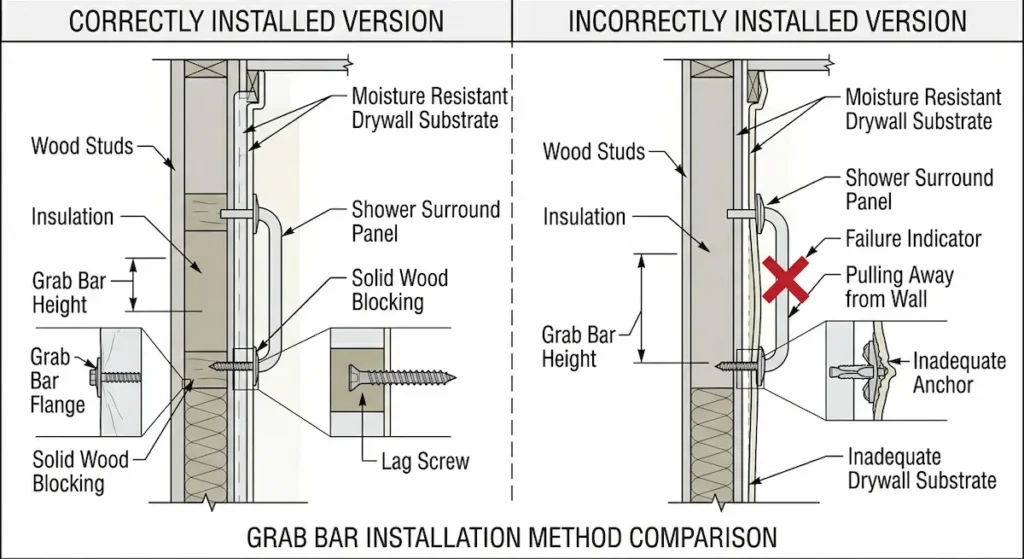
No surround material supports a grab bar. Not acrylic. Not PVC. Not tile. Not solid surface. Nothing.
The only thing that supports a grab bar is wood blocking installed between the studs before the wall closes up. The surround material is completely irrelevant to grab bar strength. What matters is what’s behind the surround — and that decision has to be made before anything goes up on the wall.
This is why the surround conversation and the grab bar conversation are the same conversation. You cannot separate them.
When a family comes to me with a surround they love the look of, and grab bars are already on the list, the first question I ask is whether that surround will allow me to install the blocking and bars correctly. If the answer is no — if the surround sits off the wall, if the material makes proper anchoring impossible, if the layout doesn’t accommodate the blocking placement — we find a different surround.
Sometimes what someone likes doesn’t work with what they need. My job is to be honest about that before anything gets ordered.
For a complete zone by zone breakdown of exactly where those bars need to go my Shower Zone Grab Bar Placement Guide covers entry, transit, and bench zone placement in detail.
There is one exception worth knowing about. Some manufacturers make ADA specific prefab shower units that come with grab bars already integrated into the structure. The bars are part of the surround system itself — built into the framing and blocking during manufacturing. These are a legitimate option when the right product is specified for the right space. But they’re a different product category entirely from a standard surround with bars added after the fact.
For a complete picture of how grab bar blocking works and why placement decisions have to happen before the wall closes my Grab Bar Installation Guide covers the full structural system.
What Goes Behind the Shower Surrounds for Seniors: The Invisible Work That Determines Everything
The surround is what you see. What goes behind it is what determines whether it’s still standing in twenty years.
The Vapor Barrier
Behind every stud-to-stud surround goes a vapor barrier. Six mil poly. It runs over the blocking and staples to the studs. This is not optional.
Without it moisture moves through the wall cavity and eventually you have mold. With insulation present — which I’ll get to in a moment — a missing vapor barrier is especially problematic because the insulation holds that moisture right against the framing.
If I’m taking the walls all the way down to the studs on a full renovation I vapor barrier the entire bathroom from ceiling to floor. Not just the shower area. The whole room. Steam and humidity don’t stay inside the shower — they move through the air and settle on every wall surface in the room.
On a direct swap where the walls aren’t coming down it’s not always possible to get behind the existing substrate. That’s the reality of renovation versus new construction. You work with what you have access to.
Insulation — The Thing Nobody Talks About
Here’s something most aging in place guides never mention.
Insulation in a shower wall isn’t primarily about temperature. It’s about sound.
Ever been in someone’s house where you could hear everything happening in the bathroom? No insulation. Standard R13 batt insulation between the studs deadens sound significantly. You can also use dedicated sound deadening material if you prefer. Either works as long as the vapor barrier is in place.
For an elderly senior who may need assistance bathing privacy matters. Sound transmission through bathroom walls matters. It’s a small detail that costs almost nothing during a renovation and makes a real difference in daily life.
Corner Flashing
Corners are where surrounds fail first. Always.
Water finds corners. Seams at corners are the most vulnerable point in any surround system and if water gets behind the surround at a corner it has direct access to your framing.
I install corner flashing on every stud to stud surround. Aluminum roll flashing about ten inches wide or rubber flashing depending on the situation. It runs from just below the top of the surround all the way down to the pan. If water somehow gets behind the surround at the corner it hits the flashing and rolls down to the pan instead of into your wall.
For glue up surrounds I use Mapei and fiber mesh tape in the corners — run about six to eight inches wide — before the panels go up. Some manufacturers include their own corner treatment system. The glue up I just installed in the double wide came with mesh tape that worked with silicone to create the corner seal. After the panels were installed, I ran silicone over the seams again as normal. That particular installation ended up triple siliconed at the corners. That’s not excessive. That’s correct.
Follow the manufacturer specifications for corner treatment. Every product is different and what works for one surround system may not be appropriate for another.
Adhesive and Silicone: Where Most Glue Up Surrounds Fail
This section is where most glue up installations go wrong. Not the panel selection. Not the substrate. The adhesive and the silicone.
Adhesive
Use the manufacturer’s recommended adhesive. Every time. Without exception.
Different adhesives bond to different materials. An adhesive that works perfectly on acrylic may not bond correctly to PVC. An adhesive that bonds to your cement board substrate may not adhere to the surround panel material. Use the wrong one and that panel is coming back off the wall — maybe right away, maybe after a few years of use, but it’s coming.
Some PVC panel surrounds come with the manufacturer’s recommended adhesive included in the kit along with color matched silicone. When that’s the case use what they give you. They engineered the product and they know what it bonds to.
How much adhesive? More than you think.
I used six tubes of adhesive on a three panel glue up surround recently. Six tubes. Pretend you’re a three-year-old who just got ahold of their first Elmer’s glue bottle and go to town. We are not trying to save a nickel here. Adhesive is cheap. Pulling a failed surround off a wall and starting over is not.
Silicone
Painter’s caulk in a shower is wrong. Every time. Full stop.
In a wet environment painter’s caulk will fail. It’s not rated for constant moisture exposure. It shrinks, it cracks, it pulls away from the surface, and when it does water gets in behind your surround.
Use 100% silicone rated for wet areas. When the manufacturer provides color matched silicone — use it. It exists for a reason.
Run a 3/16 to 1/4-inch bead. Not a thin little line. A real bead. A thin bead will crack and pull out. I’ve seen contractors run the thinnest possible line of silicone at a seam and call it done. That seam will fail.
The water trick — tool your silicone with a wet finger or a wet caulking tool. The water prevents the silicone from sticking to your finger while you’re smoothing it. But here’s the part people get backwards — the surface you’re applying the silicone to has to be completely dry. Completely. Silicone won’t adhere to a wet surface.
Wet tool. Dry surface. Every time.
Personally I use my finger. The best tools the Lord ever gave me are my hands. Whatever you use just make sure it’s sealed properly when you’re done. A sealed seam is a dry wall. An unsealed seam is a future problem you can’t see coming.
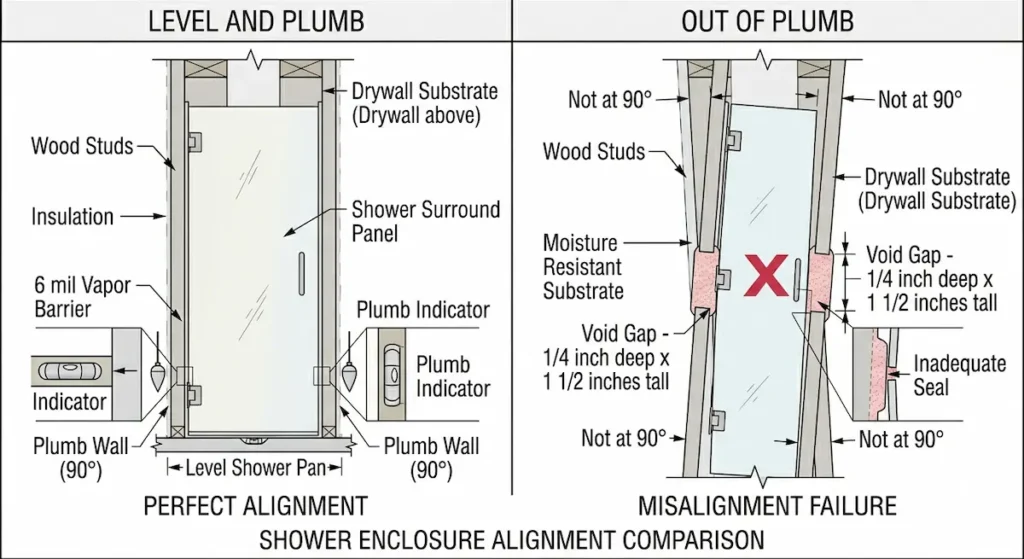
Getting the Walls Right: Level, Plumb, and Square
Your surround panels are straight. Your shower doors are straight. Your walls need to be straight too.
This sounds obvious until you’ve been called to install shower doors in a bathroom where the walls aren’t plumb and the pan isn’t level. Then it becomes the most expensive obvious thing you’ve ever dealt with.
Frameless glass shower doors are built to go into a square opening. Plumb walls. Level pan. Ninety degrees. That’s it. There’s little to no adjustment built into a fixed frameless system. If your opening isn’t square the doors don’t fit correctly.
Some frameless doors have a small amount of adjustment. Some have zero. If the walls are too far out of plumb your options are limited — redo the walls and the pan or live with a shower curtain. I’ve had to have that conversation with homeowners more than once.
Framed glass doors have more adjustment ability. If you’re not confident your walls are perfectly plumb a framed door system gives you more room for error.
The lesson is to get the walls right before the surround goes up — not after the doors are on order.
For glue up surrounds the walls also need to be flat for the panels to adhere correctly across their entire surface. A wall with high and low spots means sections of the panel aren’t making full contact with the adhesive. Those are the sections that eventually fail.
The surround also has to fit correctly over the shower pan lip- my Non-Slip Shower Pans Guide covers threshold height and installation specifics that affect how that transition works. For stud-to-stud surrounds this is largely handled by the fact that the system is designed to fit together — pan and surround from the same system, pre-engineered to work. For glue up surrounds the wall behind has to be packed out correctly so the panel fits down over the lip the way it’s supposed to. Get that wrong and you’ve got a gap at the bottom of your surround that water will find.
Common Mistakes I See on the Job- Shower Surrounds for Seniors
– No vapor barrier.
Behind a stud-to-stud surround this is a serious problem — especially with insulation present. The insulation holds moisture against the framing, and you end up with mold inside the wall before anyone knows there’s a problem.
– Installing over regular drywall.
There is a difference between standard drywall and moisture resistant drywall. If your contractor doesn’t know that difference fire them immediately. This is not negotiable.
In mobile homes this is even more common — older trailers frequently came from the factory with regular drywall behind the surround. My Mobile Home Bathroom Modifications for Seniors Guide covers the full picture of what to expect when you open those walls.
– Wrong adhesive or cheap adhesive.
The panel comes back off. Maybe right away, maybe after a few years. Either way you’re tearing it out and starting over. Use the manufacturer’s recommended product and use enough of it.
– Painter’s caulk instead of silicone.
It will fail in a wet environment. It is not rated for constant moisture. Use 100% silicone. Every time.
– Thin silicone bead at seams.
A thin line cracks, pulls out, and lets water in. Run a real bead — 3/16 to 1/4 inch minimum.
– Not reading the manufacturer specifications.
Adhesive compatibility, substrate requirements, corner treatment, cure time. Every manufacturer is different. Read the spec sheet before you buy and before you build.
– Walls not plumb before installation.
Panels won’t align correctly. Doors won’t fit. You’re either fixing it or living with it. Get it right before the first panel goes up.
Questions Worth Asking Your Contractor
What substrate are you putting behind this surround and does it match the manufacturer specification? What adhesive are you using and why? Can you show me previous surround work? Can you cut PVC cleanly? What are you doing at the corners?
Just because a contractor can hang a fiberglass stud to stud surround doesn’t mean they can cut and install PVC panels. Those are different skill sets. Ask specifically about the material you’re having installed.
That’s why finding a contractor you trust matters more than being able to inspect the installation yourself. You cannot see through the wall.
For a full breakdown of what contractors skip on aging in place jobs and the questions to ask before you sign anything my Aging in Place Bathroom Modifications Guide covers every detail.
Contractor FAQ: Shower Surrounds for Seniors
Can I install grab bars in any shower surround? No. No surround material supports a grab bar — not acrylic, not PVC, not tile. Only wood blocking installed between the studs before the wall closes up supports a grab bar correctly. The surround type affects whether blocking installation is practical, but the blocking itself is what holds the bar. My Grab Bar Installation Guide covers exactly what that blocking needs to look like and why it has to go in before anything else closes up.
What is the best shower surround for aging in place? It depends on budget and what the bathroom needs. PVC panel is my recommendation for most aging in place renovations — best value, flat against the wall for grab bar compatibility, easy to clean, and aesthetically flexible. Acrylic fiberglass works at a lower budget point as long as you choose a flat panel version without built in features. Tile is the most durable long-term option at a higher cost. None of them support grab bars without proper blocking behind the wall.
What is the difference between a glue up and a stud-to-stud surround? A glue up adheres directly to a substrate — moisture resistant drywall or cement board depending on manufacturer specifications. A stud-to-stud surround spans the full wall from stud to stud with only a vapor barrier behind it. Installation method, substrate requirements, void treatment at the top, and corner flashing approach all differ between the two systems.
Do I need a vapor barrier behind a shower surround? Behind a stud-to-stud surround — yes, always. Six mil poly over the blocking, stapled to the studs. Behind a glue up surround follow the manufacturer specification for substrate and any additional waterproofing requirements. Some manufacturers recommend a waterproofing sealer over the substrate as an added layer of protection regardless of what they require as a minimum.
What silicone should I use for a shower surround? 100% silicone rated for wet areas. Never painter’s caulk. Run a 3/16 to 1/4-inch bead at every seam and corner — not a thin line. Tool it with a wet finger or wet caulking tool but make sure the surface you’re applying it to is completely dry. Use color matched silicone when the manufacturer provides it.
What are the signs a surround needs to be replaced? Panels that flex or bubble when touched, silicone pulling away from seams or corners, visible discoloration at the drywall edge, and doors or fixtures that no longer seal correctly. Don’t wait until the surround is visibly failing — by that point the damage behind the wall has usually already been happening for longer than you’d want to know.
Bottom Line
The surround is what you see every time you step into that shower. What’s behind it is what determines whether it’s still doing its job in ten or twenty years.
In an aging in place bathroom the stakes are higher than a standard renovation. A surround failure doesn’t just mean water damage. It can mean tearing out a carefully planned accessible shower and starting completely over — potentially leaving an elderly parent without a safe place to bathe while the work gets redone.
Have the grab bar conversation before you pick the surround. Not after.
Pretty is easy. Pretty and safe is what we’re building here.
Ready to evaluate the rest of your bathroom for hidden safety risks? My Free Home Safety Checklist walks through the room-by-room framework — so you can find the risks before they find you.
Have a question about your specific situation that we haven’t covered? Send it our way — we read every one and your question might become a future post.