I’ve been called to a home where the family had spent money on high-tech fall detection sensors but still had a 1970s shag rug at the bottom of a dimly lit staircase. They were investing in the “emergency response” rather than the “prevention.” As a contractor working on home modifications for seniors, my job is to spot the trip hazard before it becomes a 911 call.
Most houses are built for young, agile bodies. As we age, the physics of how we move changes, but our homes stay the same. Aging in place isn’t about clinical-looking renovations; it’s about identifying the “friction points” in your daily routine and fixing them with smart, durable solutions.
This guide is the master blueprint I use when auditing a home for safety. We’ll walk through every room to identify the hidden risks and the specific upgrades that actually work.
1. Bathroom Safety: The High-Stakes Zone
If you only have the budget to address one room, start here. The bathroom is the most dangerous room in the house because it combines water, hard surfaces, and tight maneuvering. In my experience, senior bathroom safety is about more than just adding a mat; it’s about creating a stable environment for every transition. Our bathroom safety guide provides an overview of the entire room.
The Shower Transition
Stepping over a 14-inch tub wall is the single most dangerous move most seniors make daily. If a full remodel isn’t in the cards, we can still improve safety significantly without a total overhaul.
- Seating: Don’t just throw a plastic chair in the shower. Use a weight-rated shower chair or a permanent shower bench that allows for a stable, seated wash.
- Conversion Options: If you are debating a larger project, my comparison of walk-in tubs vs. walk-in showers breaks down the long-term accessibility of each. For the ultimate “future-proof” bathroom, a curbless shower is the gold standard.
- Smart Strategy: You can achieve significant bathroom safety without a full remodel by focusing on high-friction surfaces and lighting.
Grab Bars: The Foundation of Stability
Never trust a “suction-cup” grab bar. I’ve seen them fail under half the weight of a grown adult. A real safety bar must be anchored into 2×4 wood blocking or secured with professional-grade toggles.
- Deep Dive: See my Grab Bar Installation Guide for exact placement and height measurements.
2. Kitchen Safety: Beyond the Countertop
Kitchens are the second most common site for accidents. While most people worry about knife safety, as an aging in place contractor, I worry about the “step-stool temptation.”
The “High-Shelf” Trap
I once visited a client who had fallen because she tried to climb onto a kitchen chair to reach a holiday platter on the top shelf. We often design kitchens for maximum storage, but for seniors, that top 20% of cabinet space is a hazard.
- The Contractor Fix: I recommend installing pull-down shelving systems or “glide” drawers. This brings the contents of the cabinet down to chest level, eliminating the need for climbing or overextending.
- Lighting: Install LED under-cabinet lighting. It eliminates shadows on the workspace, which is critical for preventing accidental cuts or burns.
3. Stairs and Entryways: Managing Elevation
A fall on the stairs is statistically more likely to result in a serious injury than a fall on a flat surface. My approach to stair safety focuses on three pillars: Traction, Lighting, and Leverage.
The “Last Step” Visibility Issue
Many falls happen because the user thinks they’ve reached the floor when there is still one step left.
- The Fix: Use high-contrast anti-slip tape on the edge (nosing) of each step. This provides a visual cue that helps the brain process the change in depth.
- Double Handrails: Residential codes usually require only one rail. For true safety, you need two. This provides “four-point” stability, allowing you to use both arms for leverage.
4. Bedroom and Living Room: The “Transition” Zones
We spend the most time in these rooms, yet they are often overlooked in home safety audits. The risks here aren’t about water; they are about furniture height and “entrapment” hazards.
The Bed Height “Sweet Spot”
I’ve seen many seniors struggle with beds that are too high (requiring a “hop” to get in) or too low (making it nearly impossible to stand up).
- The Test: When sitting on the edge of the bed, your feet should be flat on the floor with your knees at a 90-degree angle. If the bed is too low, we use furniture risers; if it’s too high, we may need to swap the box spring for a low-profile version.
Living Room “Launch Pads”
Low, soft sofas are incredibly difficult to exit. I often suggest clients look for chairs with firm armrests that extend to the edge of the seat. This allows the user to use their arm strength to “launch” themselves into a standing position.
- Cord Management: In the age of tablets and lamps, “cord creep” is a major trip hazard. I always install cord channels along baseboards to keep the walking path 100% clear.
5. Flooring and Lighting: Your First Line of Defense
You can’t avoid what you can’t see, and you can’t stay upright on a floor that acts like a skating rink.
- The Path of Light: You should never have to walk into a dark room to find a light switch. Motion-activated lighting in hallways and bathrooms is a non-negotiable for fall prevention.
- Traction: If your home has slick hardwood or polished stone, you need to address it. My non-slip flooring guide covers the best materials for maintaining aesthetics while maximizing grip.
ADA Standards: The Professional “Gold Standard”
While the ADA was designed for public spaces, its measurements are the best starting point for home modifications for seniors.
| Feature | ADA Standard Recommendation | Why it Matters |
| Grab Bar Height | 33–36 inches from the floor | Ideal leverage for sitting/standing. |
| Doorway Width | 32 inches minimum | Clear path for walkers/wheelchairs. |
| Toilet Height | 17–19 inches (Comfort Height) | Reduces strain on knees and hips. |
| Ramp Slope | 1:12 (1″ rise for every 12″ run) | Prevents the ramp from being too steep. |
Small vs. Large Modifications: Budgeting for Safety
You don’t need to spend $50,000 on day one. I categorize upgrades into two distinct phases based on cost and impact:
Phase 1: High-Impact / Low-Cost (Under $1,000)
These are “weekend warrior” or small handyman projects that immediately reduce fall risk.
- Professional Grab Bars: Anchored in the primary bathroom and near the front door.
- LED Motion Lighting: Installed in the “path to the bathroom” and on stairs.
- Lever Handles: Swapping round doorknobs for easier-to-grip lever styles.
- Clearance: Removing all throw rugs and securing electrical cords.
Phase 2: Structural Modifications ($2,500+)
These are long-term investments that increase the home’s value and accessibility.
- Walk-In Shower Conversion: Removing the tub to eliminate the high-step threshold.
- Stair Lifts: For multi-level homes where stairs have become a daily barrier.
- Doorway Widening: Ensuring wheelchairs and walkers have a 32-inch clear path.
- Permanent Ramps: Replacing front-step entryways with beveled or sloped access.
Download the “Invisible Risk” Home Safety Checklist
Most fall risks are hiding in plain sight. I created this checklist to give you the same framework I use when I walk onto a job site to audit a home for safety. It’s a technical walk-through designed to spot the issues most people miss until it’s too late.
Get the Free Home Safety Checklist Here
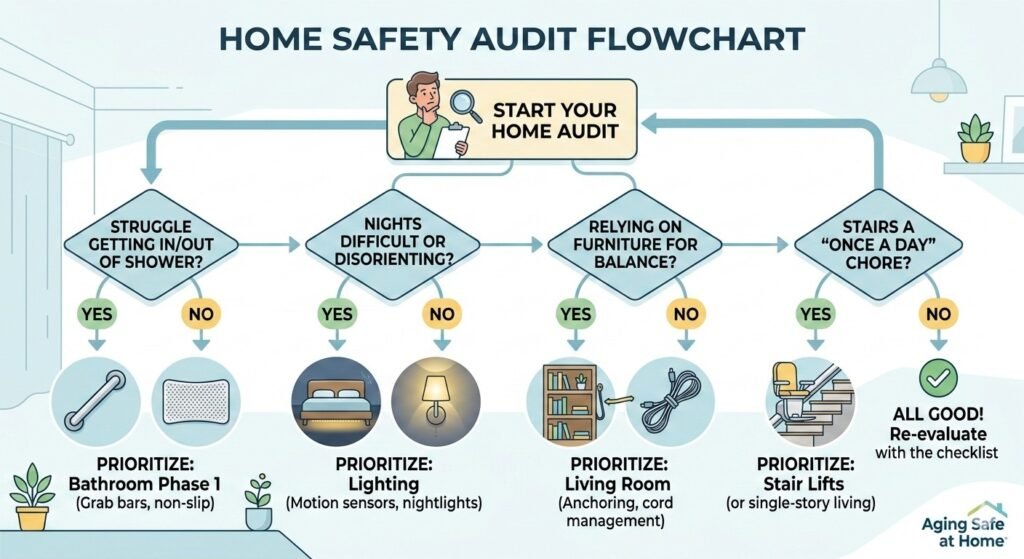
Next Steps: Your Home Audit Flowchart
Not sure where to start? Use this logic to prioritize your home safety projects:
Conclusion: Think Systems, Not Products
The most important thing to remember is that bathroom safety is a system, not a collection of gadgets. A high-end shower bench is virtually useless if you don’t have a properly anchored grab bar to help you stand up from it. A well-lit hallway doesn’t matter if there’s a loose throw rug waiting at the end of it.
When you evaluate your home, don’t just look for things to buy—look for how you move. Safety isn’t about making your home feel clinical or “old.” It’s about engineering your environment so that it supports your independence rather than challenging it. Start with one room, focus on the transitions, and build a home that is ready for your future.