
- The Two-Mark Stud Finding Method
- Why the Toilet is the Most Overlooked Zone in the Bathroom
- The Leverage Problem: Why Standing from a Toilet Requires More Support Than You Think
- ADA Measurements for Toilet Grab Bar Placement: The Numbers and Why They Exist
- The Side Wall Scenario: Ideal Toilet Grab Bar Placement When You Have Wall Access
- The No Side Wall Scenario: Stander Poles and Floor-to-Ceiling Options
- The Floating Toilet Problem: When the Toilet Isn't Near a Wall
- Blocking: The Invisible Work That Determines Whether Your Toilet Grab Bar Actually Holds
- Common Mistakes in Toilet Grab Bar Placement: What I See on the Job
- FAQ: Toilet Grab Bar Placement
- Final Thoughts on Toilet Grab Bar Placement
I walked into a bathroom once where someone had installed a toilet grab bar using Zip-Its. If you’re not familiar, Zip-Its are the little plastic anchors you use to hang a picture frame. Not a 200 pound person grabbing for their life in the middle of the night. Getting toilet grab bar placement right starts behind the wall — not at the hardware store.
That bar was coming out of the wall. It was just a matter of when.
The most common mistake I see with toilet grab bars — and grab bars in general — is trusting the drywall. Drywall is not a structural material. It is the finish layer over your framing, nothing more. A grab bar screwed only into drywall is a liability dressed up as a safety feature.
In older homes — usually built in the early 1900s — you’re often dealing with plaster and lath instead of drywall. That’s a completely different animal. Lath is horizontal strips of thin wood running across your studs with plaster coated over it. Standard stud finders are useless here — the wood lath throughout the wall registers as dense on the sensor and the finder essentially tells you the whole wall is a stud. You need a deep scan stud finder to actually locate the framing behind it. And if a bar does pull out of a plaster and lath wall, the repair is significantly more time consuming and expensive than patching drywall — you’re not just mudding seams, you’re rebuilding the wall surface itself.
I’ve done more plaster and lath work in older city homes than I care to count. It takes more skill, more time, and more money than standard drywall repair. New construction doesn’t have it — but if your home was built before 1950 and you live in an older neighborhood, there’s a real chance it’s behind your bathroom tile.
The Two-Mark Stud Finding Method
Regardless of your wall type, here’s the field method I use to find the center of a stud accurately before drilling anything:
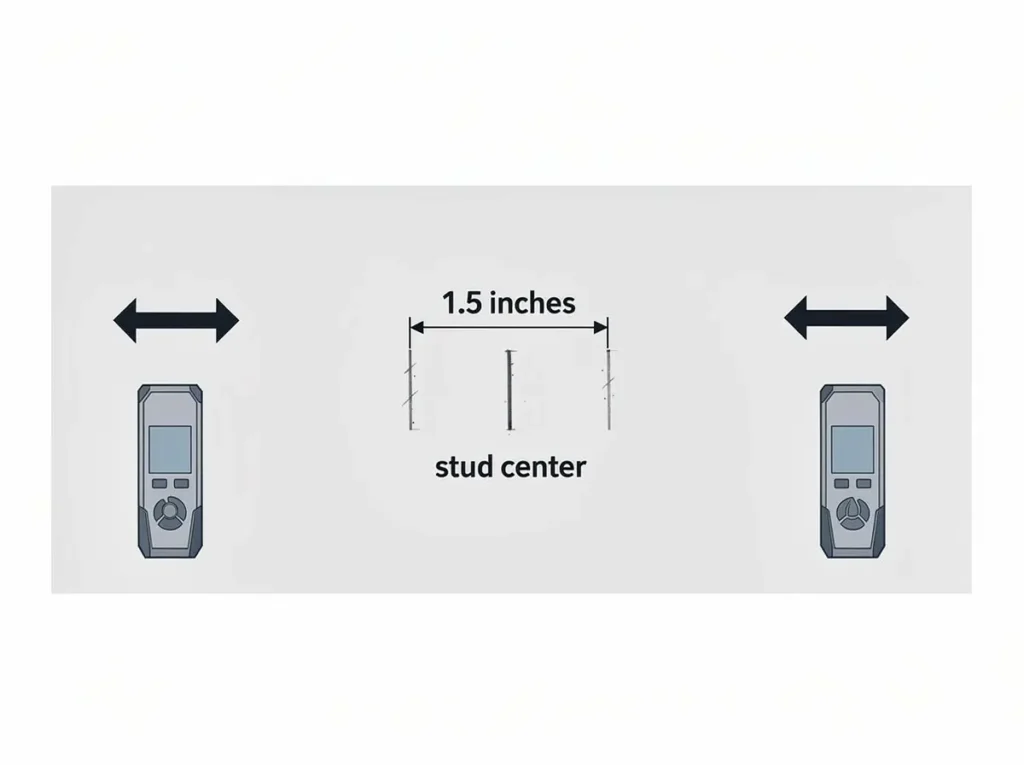
Take your stud finder and slide it across the wall from left to right. When it triggers, make a small pencil mark. Now repeat the same pass coming from the right side of the wall. When it triggers again, make a second mark.
You should now have two marks on the wall. On a standard modern stud those two marks will be roughly 1.5 inches apart — the center point between them is your stud center. That’s exactly where your lag screw needs to go.
A few things to watch for:
If the gap between your two marks is around 3 inches you’re likely looking at a double stud — common at door frames and corners. That’s actually a great anchoring point, more wood means more holding power.
If the gap is over 3 inches be cautious. You may be picking up two separate studs with a gap between them, or your stud finder may be reading something else entirely — a pipe, a wire, or in older homes, the lath itself. Don’t drill until you’re confident.
In plaster and lath walls skip the standard stud finder entirely and go straight to a deep scan model. A regular stud finder will read the wood lath throughout the wall as continuous density and trigger constantly — essentially telling you the entire wall is a stud, which is useless.
Once you have your center mark confirmed, that’s your anchor point. Everything else — bar height, angle, length — gets planned around where the wood actually is, not where you wish it were. This applies to every toilet grab bar placement project regardless of wall type — know where your framing is before you commit to a location.
Why the Toilet is the Most Overlooked Zone in the Bathroom
Ask most homeowners where they think the biggest fall risk in their bathroom is and they’ll point at the shower every time. Slippery tile, wet floors, stepping over a curb — the shower looks dangerous so it gets the attention.
The toilet quietly causes just as many injuries — especially for elderly adults and seniors aging in place.
Unlike shower falls which often happen during the act of bathing, toilet falls happen during one of the most routine moments of the day. Your guard is down. You’re not thinking about balance. You stand up the same way you have ten thousand times before — and one morning your legs just don’t cooperate the way they used to.
The shower gets the grab bars. The toilet gets a towel bar screwed into drywall with Zip-Its — if it gets anything at all.
Correct toilet grab bar placement is one of the highest-impact aging in place upgrades you can make — and one of the most frequently skipped. If you’re still building out your overall bathroom safety plan my Senior Bathroom Safety Guide maps out every element from floor to fixtures before we get into the toilet zone specifically.
The Leverage Problem: Why Standing from a Toilet Requires More Support Than You Think
Most people assume that if you can get up from a chair you can get up from a toilet. The heights are similar so the movement should feel roughly the same.
It doesn’t. And the difference matters enormously for elderly seniors and anyone planning aging in place modifications.
Here’s what’s actually happening. Your center of gravity is behind your feet when seated. To stand, your body has to shift that weight forward over your feet before your legs can push upward. From a chair you do this naturally — scoot forward, lean slightly, stand. A toilet doesn’t give you that same freedom. The bowl geometry, the confined space, and the seat position all work against the natural sit-to-stand mechanics your body has relied on for decades.
Add any degree of hip weakness, knee pain, or neurological changes — all of which become more common with age — and that routine movement becomes a genuine physical challenge every single time.
This is why toilet grab bar placement isn’t just about having something to hold onto. It’s about giving your upper body the mechanical advantage it needs to compensate for what your lower body can no longer do reliably.
A bar in the wrong position doesn’t solve this problem. Too far back and you’re pulling yourself up rather than pushing — significantly harder on the shoulder and far less stable. Too far forward and your weight shifts over your toes before your legs are ready. Wrong height and your elbow is either fully extended or jammed against your ribs — neither position generates meaningful force.
Correct toilet grab bar placement puts the bar exactly where your arm naturally falls when your elbow is at roughly 90 degrees while seated. Maximum leverage, minimum strain. The same sit-to-stand physics that make toilet grab bars essential also determine whether a shower bench or shower chair is the right choice — my Shower Bench vs Shower Chair Guide covers that decision in detail.
ADA Measurements for Toilet Grab Bar Placement: The Numbers and Why They Exist
The ADA’s official accessibility guidelines don’t pull measurements out of thin air. Every number exists because someone studied how human bodies actually move under physical stress. For toilet grab bar placement these are the numbers we build from — and why each one matters.
Bar Height: 33 to 36 Inches from Finished Floor
This range keeps the bar within the natural reach zone of a seated adult. For shorter elderly users I install closer to 33 inches. For taller users or anyone recovering from hip surgery 36 inches gives more clearance. Always measure from the finished floor — not the subfloor, not before tile. The same finished floor principle that applies to shower bench height applies here — tile thickness and mortar depth affect your final measurement more than most contractors account for. The finished floor applies to slide bar mounting for handheld showerheads as well. My Handheld Shower Head for Seniors Guide covers why these measurements have to happen before tile goes up.
Bar Length: 42 Inches Minimum
A shorter bar might be within reach when seated but gone by the time you’re halfway up. For seniors aging in place I typically install 48 inches when the wall allows it. The extra 6 inches costs almost nothing and covers a much wider range of body positions through the full sit-to-stand motion.
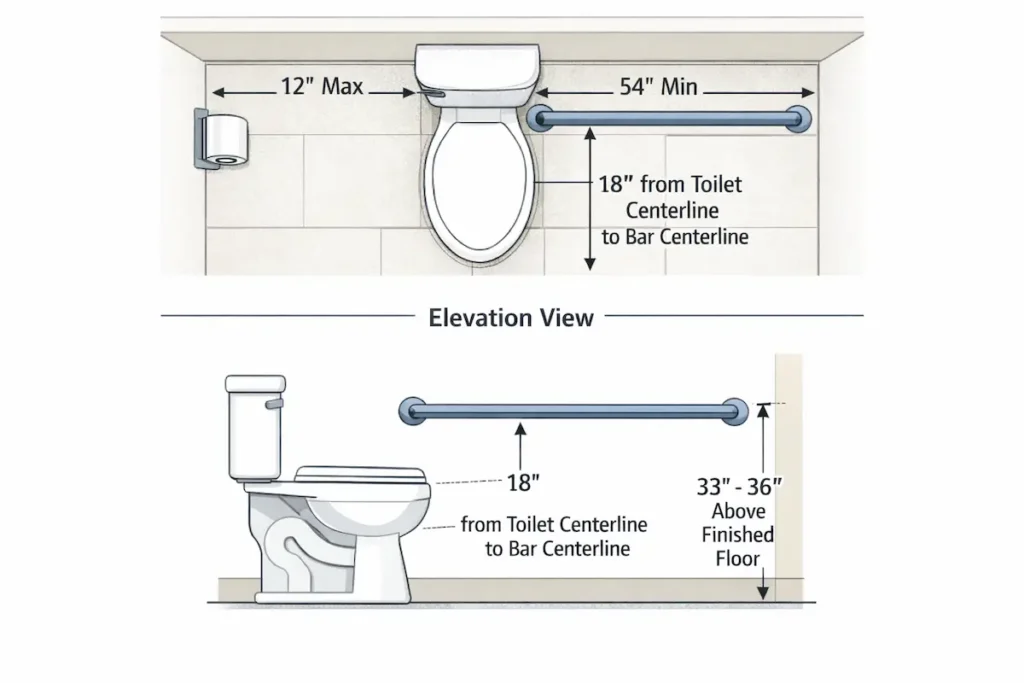
Distance from Rear Wall: 12 Inches Maximum to Start, 54 Inches Minimum to End
The bar must start within 12 inches of the rear wall so it’s reachable while fully seated. It must extend to at least 54 inches from the back wall, so it’s still reachable at the end of the standing motion. So, you’re 42 in bar 12 inches off the wall equals 54 inches. If your bar starts at 18 inches from the rear wall an elderly user sitting fully back may not be able to reach it at all.
Centerline Placement: 18 Inches from Toilet Centerline
This puts the bar within natural lateral reach without requiring the user to lean dangerously sideways to grab it.
A note on ADA in private homes — these standards are not legally required in a private residence. They represent the gold standard for ergonomics based on actual biomechanics research. When I spec toilet grab bar placement for an elderly homeowner or senior aging in place ADA is always my baseline. From there I adjust for the specific user.
The Side Wall Scenario: Ideal Toilet Grab Bar Placement When You Have Wall Access
The side wall scenario is the most common layout I encounter — a toilet with a wall within reach on at least one side. The ADA measurements we just covered are specifically designed for this situation. But straightforward doesn’t mean simple. I’ve seen more side wall installations done wrong than right.
Which Side Gets the Bar
The dominant or stronger side. If someone has had a left hip replacement the right side is their stronger push side — that’s where the bar goes. If someone has had a stroke with left side weakness the right wall gets the bar.
This sounds obvious until the stronger side wall is 24 inches from the toilet centerline instead of 18. At that point install on the correct side at a slightly non-ideal distance rather than the ideal distance on the weaker side. Reach is adjustable. Strength isn’t.
The Reach Zone
Before I drill a single hole I have the user sit on the toilet and let their arm drop naturally to their side. Where their hand falls is the primary reference point. The bar should be within 6 inches of that natural hand position — not a stretch away from it.
If you have to reach for the bar your center of gravity is already shifting before your legs are ready to support it. That’s exactly when a fall happens.
Placement and Height
Following ADA guidelines the bar runs parallel to the toilet starting within 12 inches of the rear wall and extending to at least 54 inches forward, mounted at 33 to 36 inches from the finished floor.
For shorter elderly users install closer to 33 inches — at 36 inches their elbow is above the shoulder when seated which reduces leverage rather than improving it. For taller users 36 inches keeps the elbow at a natural angle.
In practice I position the bar so the front end extends slightly past the front edge of the toilet bowl — giving the user something to grip through the full forward lean of the standing motion not just while seated.
A Note on Bar Angle
Horizontal bars are the ADA standard and work well for most users. For elderly seniors with arthritis or wrist pain an angled bar at 30 to 45 degrees allows a more natural wrist position through the sit-to-stand motion. The physics of grip angle matter more than most people realize when hand strength is compromised.
The No Side Wall Scenario: Stander Poles and Floor-to-Ceiling Options
Not every toilet has a side wall within reach. In smaller bathrooms, powder rooms, or open layouts the toilet sits out in the middle of a wall with nothing nearby to mount a bar into. This is one of the most common obstacles I run into on aging in place jobs.
The solution is a stander pole.
What a Stander Pole Actually Is
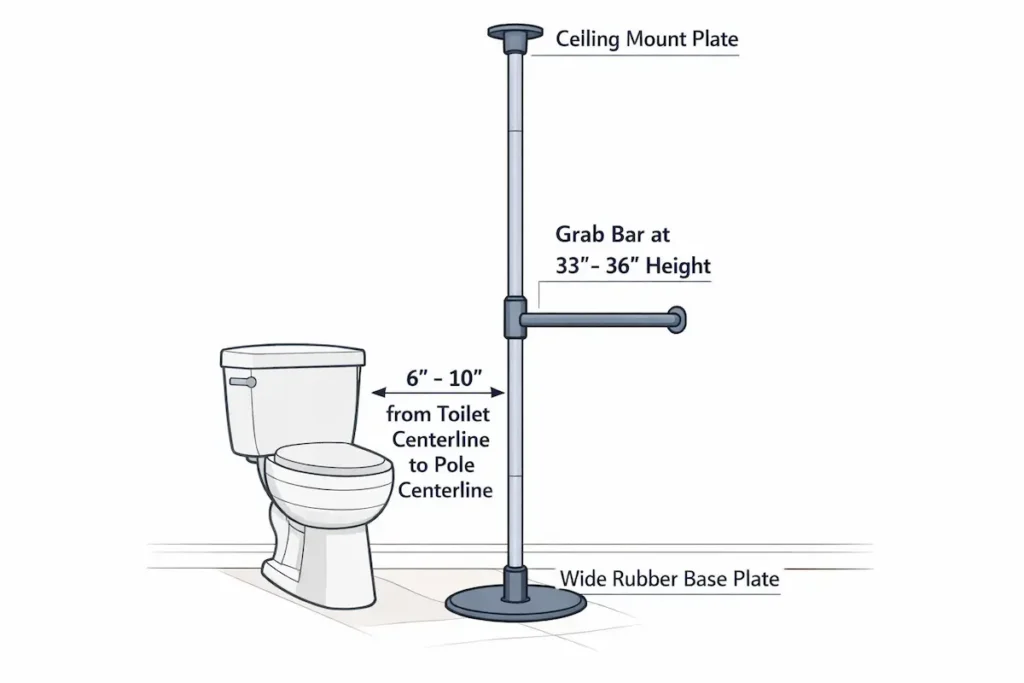
A stander pole — sometimes called a floor-to-ceiling safety pole — is a vertical support that runs from floor to ceiling and is tensioned into place without wall anchoring. It gives the user a vertical handhold anywhere in the room regardless of wall location.
For elderly seniors aging in place with no accessible side wall a properly installed stander pole is often the best toilet grab bar placement solution available. It can be positioned exactly at the natural reach zone without being limited by stud location or wall proximity.
Tension Mount vs Permanent Mount
Tension mounted poles press against the floor and ceiling without permanent fastening. They are adjustable and removable but over time the tension can loosen — especially on smooth tile floors and ceilings. I always check tension mounted poles for movement before trusting them. If the pole shifts even a fraction of an inch under lateral force the tension needs to be reset.
Permanently mounted poles bolt directly into floor framing and the ceiling joist above. Significantly more stable and my preference for any primary aging in place installation. The tradeoff is finding a ceiling joist directly above the installation point — the same two-mark stud finding principle applies to the ceiling.
What to Look for
Weight capacity — never below 300 lbs for primary toilet support.
Base plate size — wider is better. A small hard plastic base plate on smooth tile will skate under lateral load. Look for wide rubber base plates that use the user’s weight to grip the floor.
Grab bar attachments — the best stander poles include integrated horizontal grab bar arms that can be positioned at the exact height needed for sit-to-stand leverage. A vertical pole alone is harder to use than one with a horizontal arm at the right height.
Placement
Position the pole so the grab bar arm is within natural arm drop distance from the seated position — 6 to 10 inches to the side of the toilet centerline on the dominant or stronger side. One advantage of a stander pole over a wall mounted bar is adjustability — you can reposition it as mobility changes without opening a single wall.
If the bathroom layout is creating these constraints a wider doorway may be part of the longer-term solution — my Doorway Widening Guide covers what’s inside that wall and why load bearing status changes the entire cost picture.
The Floating Toilet Problem: When the Toilet Isn’t Near a Wall
Wall mounted toilets — sometimes called floating toilets — are becoming more common in modern bathroom design and aging in place renovations. The bowl mounts directly to the wall with no floor contact, the height is fully adjustable during installation, and they’re genuinely a good aging in place choice when installed correctly.
But they create a specific toilet grab bar placement problem that catches contractors off guard.
The Wall Cavity Problem
A standard toilet sits on the floor and the wall behind it is just a wall. A wall mounted toilet bolts into a heavy steel carrier frame built inside the wall cavity. That carrier frame takes up significant wall space and depending on how it was installed may leave very little room for the wood blocking a grab bar needs.
I always probe the wall cavity before committing to a bar location on a floating toilet installation. Drilling into a carrier frame unexpectedly with a standard lag screw is a problem. Some frames have designated anchor points — but you need to know what you’re working with before you drill.
Assessing the Wall
I run through three checks before any toilet grab bar placement work on a floating toilet:
First I locate the carrier frame boundaries using a deep scan stud finder — dense metal reads differently than wood framing.
Second, I check wall access from the other side. If I can get in through a closet or hallway, I can add blocking without touching the bathroom wall at all.
Third I assess wall thickness. Some floating toilet installations use a thicker wall to house the carrier frame and in-wall tank — more material to anchor into which is actually an advantage.
When the Wall Can’t Support a Bar
If the wall cavity is compromised a stander pole is the solution — same principles as the previous section. For elderly seniors aging in place with a wall mounted toilet I often combine a stander pole on the dominant side with a shorter rear wall bar for secondary balance during the seated position.
The Height Advantage You Shouldn’t Waste
Wall mounted toilet height is set during rough-in before the carrier frame goes into the wall. If you are installing one as part of an aging in place renovation set the finished seat height at 17 to 19 inches from the finished floor rather than the standard 14 to 15 inches. Once that frame is in the wall changing the height means opening the wall and starting over. It costs nothing extra to get it right the first time. My Comfort Height Toilet Guide covers every measurement that needs to be right before installation — including the flange height and rough-in distance that determine whether the finished toilet actually sits where you need it.
Blocking: The Invisible Work That Determines Whether Your Toilet Grab Bar Actually Holds
Everything we’ve covered assumes one thing: that when you drive a lag screw into that wall it has something solid to bite into.
Most walls don’t. Not where you need them to.
Standard residential framing puts studs every 16 inches on center. The odds that a stud lands exactly where your toilet grab bar placement requires it are not in your favor. And as we covered in the introduction drywall anchors — no matter what the packaging claims — are not an acceptable solution for a life safety device.
The answer is blocking.
What Blocking Actually Is
Blocking is horizontal lumber installed between the vertical studs inside your wall before the drywall goes up. It gives your lag screws a solid wood target anywhere along that wall — not just at the 16-inch stud intervals. For toilet grab bar placement, I install 2×10 blocking across the entire side wall of the toilet zone from 30 to 38 inches above the finished floor. That covers the full ADA height range plus adjustment room above and below.
The result is a wall where a bar can go anywhere along that surface anchored into solid wood. No stud hunting, no anchors, no guessing.
Retrofitting Blocking Without Opening the Tile
In a new construction or full remodel blocking goes in before any wall surface goes up — straightforward and clean. In a retrofit the cleanest approach is accessing the wall from the other side through a closet, hallway, or adjacent room. If that access exists, I can install blocking from the back, patch and paint that wall, and never touch the tile side at all.
If back wall access isn’t available, the only option is removing and replacing tile in the grab bar zone. Some claim you can use toggle bolts; I personally will not use them and do not recommend them.
Why the Toilet Zone Needs Just as Much Blocking as the Shower
In a shower grab bar forces are primarily lateral — someone steadying themselves or catching a slip. My Shower Zone Grab Bar Placement Guide covers the entry, transit, and bench zone placement decisions that happen in the shower before any of this blocking goes in. At the toilet the sit-to-stand motion combined with a near-fall grab creates a sudden downward and outward force simultaneously. An elderly senior putting full body weight on a toilet grab bar during a near-fall is loading that bar in multiple directions at once.
That’s why I run blocking across the entire toilet side wall rather than just at the anticipated bar location. Where someone actually grabs during a real fall is rarely exactly where you planned.
Put the wood everywhere. It costs almost nothing during a remodel and an enormous amount after the wall is up. For a deeper look at what should be happening behind your shower walls during any renovation my Shower Backerboard and Waterproofing Guide covers the full wall system from studs to tile.
Common Mistakes in Toilet Grab Bar Placement: What I See on the Job
After walking through hundreds of bathrooms I’ve seen toilet grab bar placement done wrong in almost every way imaginable. These are the four mistakes I see most consistently.
Bar Installed on the Wrong Side
The most common mistake and the one with the most immediate safety consequences. A bar on the non-dominant or weaker side forces the user to rely on their compromised limb during the most demanding moment of their bathroom routine.
I always ask before I drill — which hip was replaced, which side is weaker, which hand do you reach with instinctively when you feel yourself losing balance. That last question is the most useful because instinct under stress is more reliable than conscious preference.
Bar Too Far Back and Too Short
These two mistakes usually happen together. A bar that starts more than 12 inches from the rear wall is only useful for someone already halfway up — it does nothing for the initial push when the user is still fully seated and needs the most support. A 24 inch bar compounds the problem by running out of bar before the standing motion is complete.
I specify 42 inches as my minimum and 48 inches whenever the wall allows it. And I always measure from the rear wall before marking a single hole.
Wrong Height for the Specific User
Installing at ADA standard without adjusting for the specific user is a mistake I see constantly. A 5’1″ elderly woman and a 6’2″ man do not need the same bar height. I measure the user not the wall — sit them down, find their natural elbow angle, and work from there. The ADA range is a starting point not a prescription.
Clamp-On Toilet Safety Frames as a Primary Solution
These U-shaped frames clamp onto the sides of the toilet bowl and are sold at every big box store. They’re cheap, they install in five minutes, and they look like they solve the problem.
They don’t.
A clamp-on frame is only as strong as the porcelain it’s clamped to. Toilet bowls are not designed to handle lateral and downward force simultaneously. I’ve seen clamp-on frames shift, rock, and in one case pull the entire toilet off its flange when a user put full weight on it during a fall. For a temporary solution while permanent bars are being installed, they’re acceptable. As a primary aging in place safety solution for an elderly senior, they are not. For a full breakdown of the modifications that actually prevent falls without creating new hazards my guide to aging in place bathroom safety without a full remodel covers the high impact changes that leave your tile intact.
FAQ: Toilet Grab Bar Placement
How far from the toilet should a grab bar be?
The bar should start within 12 inches of the rear wall and extend to at least 54 inches forward. The centerline should sit approximately 18 inches from the toilet centerline. These measurements ensure the bar is reachable from a fully seated position and remains useful through the entire sit-to-stand motion.
What length grab bar do I need for a toilet?
42 inches is the ADA minimum. In my aging in place installations I specify 48 inches whenever the wall allows it. The extra 6 inches costs almost nothing and covers a significantly wider range of body positions through the full standing motion — especially important for elderly seniors with limited mobility or anyone recovering from hip or knee surgery.
What side should a toilet grab bar be on?
The dominant or stronger side. When in doubt ask the user which hand they instinctively reach with when they feel themselves losing balance. That instinctive reach tells you more than any stated preference.
How high should toilet grab bars be for elderly users?
33 to 36 inches from the finished floor per ADA guidelines. For shorter elderly users install closer to 33 inches. Taller users 36 inches is more natural. For anyone using a raised toilet seat or comfort height toilet recalculate from the actual finished seat height — the bar height relative to the seat matters more than the bar height relative to the floor.
More Toilet Grab Bar Placement Questions
Can I install a toilet grab bar myself?
Yes — if your walls are drywall, you have a reliable deep scan stud finder, and you’re comfortable performing a zero deflection pull test when finished. If your walls are tile, stone, or plaster and lath — or if you need blocking added — call a professional. The cost of a cracked tile or a missed stud in a plaster wall significantly exceeds the cost of professional installation.
What is the difference between a grab bar and a toilet safety frame?
A grab bar is permanently anchored into wall framing or blocking and engineered to handle sudden full body weight force. A clamp-on safety frame attaches to the porcelain bowl itself which is not designed for that load. Safety frames are acceptable temporarily — they are not an appropriate primary solution for an elderly senior who depends on that support daily.
How do I know if my wall can support a toilet grab bar?
Use the two-mark stud finding method from the introduction to locate your framing. If there’s no stud where you need it you need blocking before you need a bar. Never trust a drywall anchor for a life safety device regardless of its weight rating on the packaging.
Final Thoughts on Toilet Grab Bar Placement
Toilet grab bar placement comes down to two things done right — structure and position. Get the blocking in before the wall closes. Put the bar where the user’s hand actually goes, not where it looks symmetrical on the tile.
For elderly seniors aging in place those two things together turn a bathroom fixture into genuine independence.
Field Tested Products
Moen Home Care 42 Inch Grab Bar — Peened Finish My standard specification for toilet side wall installations. The peened finish provides genuine grip when wet and soapy. Moen’s SecureMount system tolerates minor stud misalignment better than most competitors — which matters in retrofit situations. Weight rating 500 lbs, diameter 1.25 inches.
Moen Home Care Angled Grab Bar For elderly seniors with arthritis or wrist weakness. The 30-degree angle allows a more natural wrist position through the sit-to-stand arc and reduces grip strain significantly. Same SecureMount system and weight rating as the standard bar.
Stander EZ Fold-N-Go Toilet Safety Rail My recommendation for bathrooms with no accessible side wall. Floor mounted fold-down design, wide base plate for tile stability, folds out of the way when not in use. Specify the permanent floor mount version for any primary aging in place installation. Weight rating 300 lbs.
If you’re ready to evaluate the rest of your bathroom using the same framework I use on job sites my Free Home Safety Checklist walks you through every major transition zone room by room.
For the full picture of bathroom grab bar strategy beyond the toilet my Grab Bar Placement Guide covers shower entry, side wall, and bathtub placement in the same depth we covered here. For the technical installation side — drill bits, stud finding through tile, and the pull test — my Grab Bar Installation Guide covers the how-to from start to finish.