
- What Is a Comfort Height Toilet and Why Does It Matter for Aging in Place
- Standard vs Comfort Height Toilet: Which One Does Your Bathroom Actually Need
- The Rough-In Measurement: The Number Most Homeowners Don't Know They Need
- The Flange: The Most Important Part of Your Toilet Installation Nobody Talks About
- Flooring and Toilet Height: Why the Order of Operations Matters
- Adding a Bidet to a Comfort Height Toilet: What Elderly Seniors Actually Need to Know
- Common Mistakes in Comfort Height Toilet Installation
- FAQ: Comfort Height Toilet for Aging in Place
- Final Thoughts
- Field Tested Products
I’ve been called to fix a lot of expensive problems that started as cheap shortcuts. But the one that comes up most consistently when installing a comfort height toilet isn’t a structural failure or a bad tile job — it’s a $13 wax ring.
A toilet flange that isn’t sitting flush with the finished floor won’t seal correctly. It doesn’t matter how carefully you set the toilet or how tight you run the closet bolts — if that flange is sitting below the finished floor surface the gasket can’t do its job. The toilet might look fine for months. Then one morning there’s water under the baseboard and by the time you find it the subfloor is rotting.
I’ve seen a $13 flange situation turn into a $3,000 subfloor repair. More than once.
For elderly seniors aging in place a toilet that looks solid but has a slow leak at the flange is a hidden disaster waiting to happen — not just structurally but from a fall risk standpoint too. A compromised subfloor flexes underfoot. A floor that moves is a floor that causes falls.
Getting a comfort height toilet installation right starts at the flange — before the toilet ever gets set, before the flooring goes down, before anything else happens in that bathroom.
What Is a Comfort Height Toilet and Why Does It Matter for Aging in Place
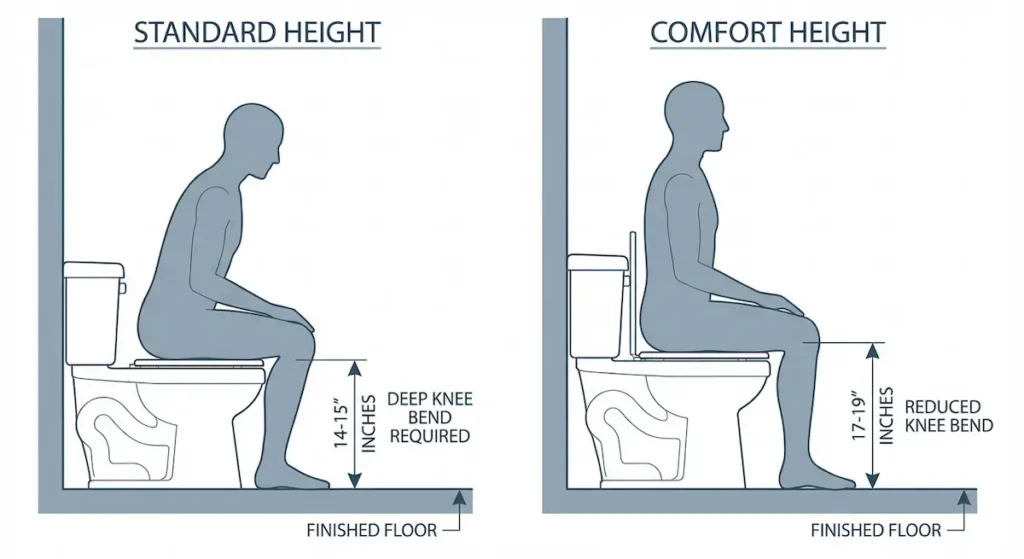
A standard toilet sits at 14 to 15 inches from the finished floor to the top of the seat. A comfort height toilet — sometimes called an ADA height toilet or right height toilet depending on the manufacturer — sits at 17 to 19 inches. That 2-to-4-inch difference sounds minor until you’re watching an elderly senior struggle through the sit to stand motion on a standard height toilet every single day.
The physics are the same ones we covered in the toilet grab bar placement guide — your center of gravity is behind your feet when seated and your body has to shift that weight forward before your legs can push upward. A lower seat increases the range of motion required to complete that shift. For a healthy adult in their thirties that’s not a problem. For an elderly senior with hip weakness, knee pain, or any degree of balance impairment that extra 3 inches of travel is the difference between independent bathroom use and needing assistance.
The ADA specifies 17 to 19 inches as the accessible toilet height range for exactly this reason. For the complete bathroom safety picture beyond the toilet my Senior Bathroom Safety Guide maps out every element of a safe bathroom renovation from floor to fixtures. It’s not an arbitrary number — it’s based on research into how human bodies actually perform the sit to stand movement under physical stress.
Who Benefits Most
Comfort height toilets benefit virtually every aging in place bathroom user but they matter most for:
Elderly seniors with hip or knee replacement history — the reduced range of motion required at a higher seat directly reduces stress on the replaced joint.
Anyone with balance impairment — less distance to travel means less time in the vulnerable mid-transition zone where falls happen.
Taller users of any age — standard height toilets are genuinely uncomfortable for anyone over 6 feet regardless of mobility status.
One Honest Caveat
For shorter elderly users — 5’2″ and under — a comfort height toilet can actually create a problem rather than solving one. At 17 to 19 inches a shorter user’s feet may not reach the floor when seated which destabilizes the base of support and makes the sit to stand motion harder not easier. For shorter users a 16 to 17 inch toilet is often the better specification. I always confirm the user’s height before speccing toilet height on any aging in place job.
Standard vs Comfort Height Toilet: Which One Does Your Bathroom Actually Need
Most aging in place guides tell you to install a comfort height toilet and move on. The reality is slightly more nuanced — and getting it wrong in either direction creates problems that are expensive to fix after the fact.
Here’s a straightforward comparison:
Standard Height — 14 to 15 Inches Better for shorter users whose feet need to reach the floor for a stable base. Better for households with children who use the same bathroom. More common in older homes which means replacement parts and matching fixtures are easier to source. Less expensive on average than comfort height models.
Comfort Height — 17 to 19 Inches Better for elderly seniors with hip or knee replacement history. Better for taller users. ADA compliant for accessible bathroom design. Required for aging in place bathrooms where the user has documented mobility limitations. More grab bar friendly because the sit to stand arc is shorter and the bar height relative to the seat works out more naturally.
The Measurement That Actually Matters
The height listed on a toilet’s spec sheet is the rough height — bowl rim to floor. The finished seat height adds another inch to inch and a half depending on the seat. So a toilet listed at 17 inches with a standard seat installed sits at roughly 18 to 18.5 inches at the finished seat surface. That’s the number that matters for aging in place specification — not the bowl rim height.
I always confirm finished seat height, not bowl rim height before speccing a toilet for an elderly senior. It’s a small detail that makes a real difference in whether the installation actually achieves what you’re trying to accomplish.
The vanity is the other fixture where height and clearance decisions follow the same logic — my Bathroom Vanity for Seniors Guide covers the knee clearance, hardware, and wall mounted vs floor mounted decisions in the same detail.
The Rough-In Measurement: The Number Most Homeowners Don’t Know They Need
Before you buy a comfort height toilet — before you even look at models — you need one measurement. The rough-in distance.
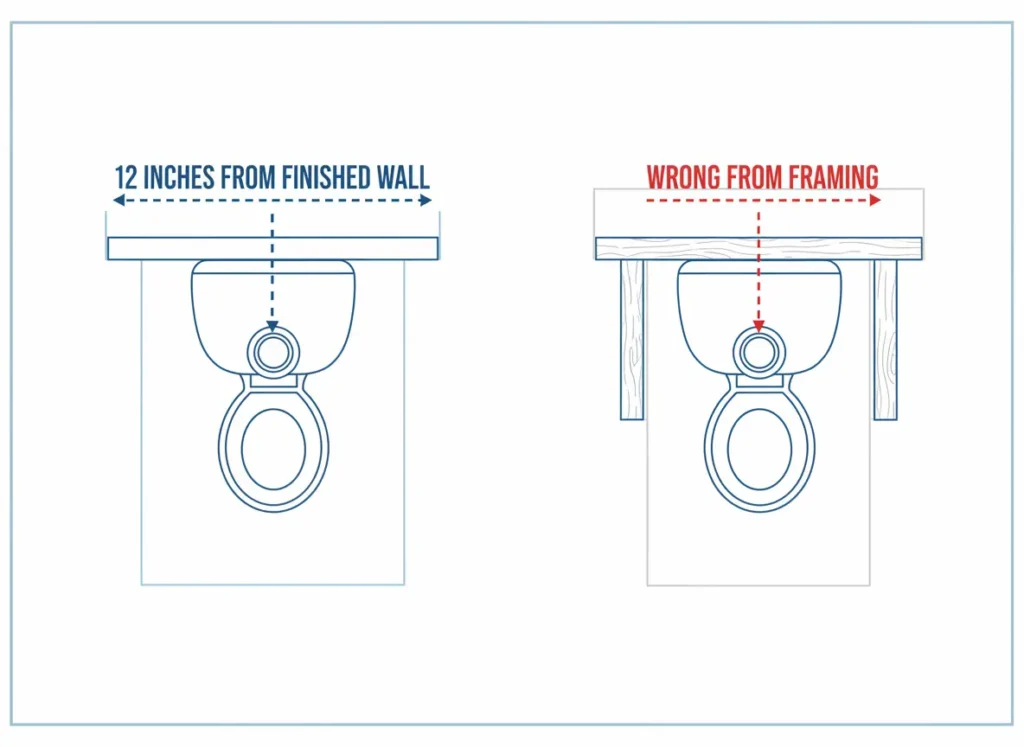
The rough-in is the distance from the finished wall behind the toilet to the center of the drain on the floor. Standard rough-in is 12 inches. That covers the vast majority of toilets on the market and the vast majority of bathrooms built in the last 40 years. But 10 inch and 14 inch rough-ins exist — mostly in older homes and in bathrooms with unusual layouts — and buying the wrong toilet for your rough-in means either moving the drain or returning the toilet.
I’ve seen both scenarios play out on job sites. Neither is fun.
How to Measure Your Rough-In Correctly
Measure from the finished wall — not the framing, not the baseboard, not the tile edge. The finished wall surface. This is the most common measuring mistake I see and it throws off the entire installation.
If you’re measuring off the framing you have to account for every material that will cover that framing before the toilet is installed. Half inch drywall alone adds half an inch — so a 12 inch rough-in measured off framing becomes 12.5 inches off the finished wall. Add tile on top of drywall and you’re adding another 3/8 to 1/2 inch on top of that.
I’ve watched contractors measure off the framing, order a toilet, and end up with a gap between the tank and the wall because they didn’t account for the finished wall materials. That gap isn’t just cosmetic — a tank that isn’t flush against the wall flexes when someone leans on it. Over time that flexing stresses the tank gasket and can crack the tank itself. Remember — it’s only porcelain.
The 10 and 14 Inch Rough-In
If you’re working in an older home — anything built before 1970 — measure before you assume. Older toilets were frequently installed on 10 inch rough-ins. If you pull an old toilet and replace it with a standard 12 inch model without checking the rough-in first you’re moving the drain or buying another toilet.
Some comfort height toilet models accommodate multiple rough-in sizes — typically 10, 12, and 14 inch — which gives you flexibility if you’re not sure what you’re working with or if you’re doing a renovation where the rough-in distance might shift slightly. For aging in place renovations where you’re already opening walls and floors I always check the rough-in distance and confirm it against the toilet spec sheet before anything gets ordered.
The Opposing Wall Clearance
Rough-in distance is only half the measurement picture. The toilet also needs adequate clearance from any adjacent or opposing wall.
The minimum distance from the toilet centerline to any side wall or obstruction is 15 inches — I always shoot for 16 inches minimum on any standard installation. For aging in place bathrooms where grab bars are going in on the side wall I spec a minimum of 18 inches from the toilet centerline to the wall to ensure the bar is within the ADA 18 inch centerline distance we covered in the toilet grab bar placement guide.
If I’m building a bathroom from scratch I spec a minimum 36 inch wide toilet alcove — 18 inches from the centerline to each side wall. That gives you room for grab bars on both sides if needed and caregiver access if assistance becomes necessary down the road.
These clearance measurements have to be confirmed before the toilet is ordered and definitely before any framing goes up. Moving a drain after tile is down is a significant cost. Moving a framed wall after drywall is up is a significant cost. Get the measurements right on paper before anything gets built.
The Flange: The Most Important Part of Your Toilet Installation Nobody Talks About
Everything above the floor is visible. The flange is not. Which is exactly why it’s the most overlooked and most consequential part of any comfort height toilet installation.
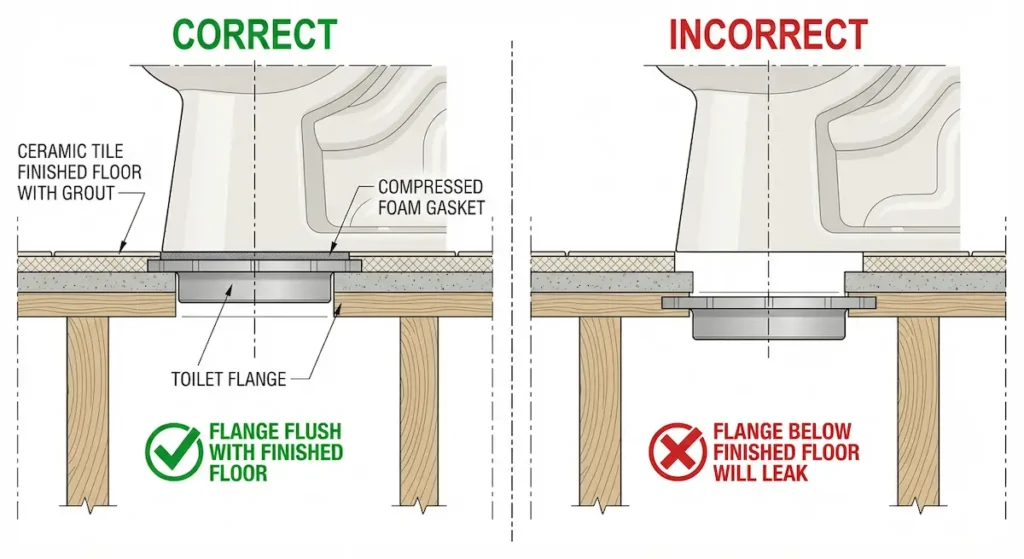
The flange is the fitting that connects your toilet drain to the drain pipe in the floor. It sits on top of the finished floor surface — not flush with it, not below it, on top of it. That distinction is not negotiable. A flange sitting below the finished floor surface cannot create a reliable seal regardless of what gasket you use or how carefully you set the toilet. It will leak. The only question is how long it takes.
Flange Types and What I Actually Install
There are two primary flange sizes — 3 inch and 4 inch — referring to the drain pipe diameter they connect to. I keep universal flanges in stock on my truck because they fit either size and eliminate the guesswork on a job site where you’re not always sure what’s in the floor until you pull the old toilet.
Standard flanges are plastic. They work fine under normal conditions but plastic flanges crack over time — especially if the closet bolts get overtightened during installation. The ears of the flange — the mounting points where the closet bolts sit — are the first thing to fail on a plastic flange. Overtighten those bolts and the bolt pulls right through the ear. Now your toilet isn’t secured and your flange needs to be replaced.
The flanges I install are Oatey stainless steel reinforced — the stainless steel ring around the flange ears prevents that overtightening failure completely. On any aging in place job where I’m already doing significant work I replace plastic flanges with stainless steel reinforced versions automatically. The cost difference is negligible compared to the labor cost of going back in to replace a failed flange later.
Wax Ring vs Foam Gasket
The gasket creates the seal between the toilet horn and the flange. Two options exist — the traditional wax ring and the newer foam gasket.
I prefer the foam gasket. It seats more consistently than wax, it’s reusable if you need to pull the toilet for any reason, and there’s no messy wax to clean up if you have to reset the toilet. Wax rings work fine when installed correctly but they’re unforgiving — if the toilet shifts during setting the wax smears and the seal is compromised. A foam gasket is more forgiving of minor positioning adjustments during installation.
For elderly seniors aging in place where the toilet may need to be pulled and reset at some point — flooring replacement, plumbing access, subfloor repair — a foam gasket makes that process significantly cleaner and easier.
Flange Height and Finished Floor
This is where most toilet installation problems originate. The flange must sit on top of the finished floor — meaning after all flooring materials are installed. If your bathroom is getting new tile the flange height has to account for the tile thickness plus mortar bed. If it’s getting LVT the flange height has to account for the LVT thickness.
I’ve walked into bathrooms where someone tiled around the toilet instead of under it — running the tile up to the toilet base and leaving the original flooring under the toilet itself. It always looks wrong and it is wrong. You’re supposed to remove the toilet, run the flooring all the way to the flange, and reset the toilet on the new finished floor. When you tile around the toilet instead of under it you lose roughly a quarter inch of toilet height — which on a comfort height toilet installation for an elderly senior is exactly the kind of detail that matters.
Flange Shims and Spacers
When the existing flange sits below the finished floor level — which happens when new flooring raises the floor height around an existing flange — flange shims are the solution. I use Oatey flange shims specifically. They stack to achieve the exact height needed to bring the flange flush with or slightly above the new finished floor surface.
For elderly seniors aging in place who want to avoid extensive renovation shims are often the most practical solution. For a full renovation where I’m already replacing subfloor or installing new flooring, I prefer to extend the drainpipe and install a new flange at the correct height rather than shimming. It’s cleaner, more permanent, and eliminates the shimming variable entirely.
Clocking the Flange
A flange has to be clocked correctly — meaning oriented so the closet bolt slots are positioned to align with the toilet bolt holes when the toilet is set. If the flange is clocked wrong the toilet won’t bolt down correctly regardless of how good your rough-in measurement is.
This sounds basic but I’ve seen it done wrong. A misclocked flange means pulling the toilet, resetting the flange, and starting over. On a tile floor that’s already down that’s a problem. Check the clock before you set the flange and definitely before any flooring goes around it.
Flooring and Toilet Height: Why the Order of Operations Matters
Flooring decisions and toilet height are more connected than most homeowners realize — and getting the order of operations wrong creates problems that are expensive to fix after the fact.
The rule is simple: flooring goes under the toilet not around it. Remove the toilet, install the flooring all the way to the flange, reset the toilet on the new finished floor. Every time without exception.
When someone tiles or lays flooring around the toilet instead of under it three things happen — it looks wrong, it’s not done correctly, and the toilet ends up sitting approximately a quarter inch lower than it should. On a comfort height toilet installation for an elderly senior that quarter inch matters.
The Order of Operations for a Full Renovation
If you’re doing a full bathroom renovation the sequence matters:
Rough framing and subfloor first. Flange rough-in confirmed at correct height relative to anticipated finished floor. Flooring installed all the way to the flange. Flange height confirmed against finished floor — shims added if needed. Toilet set last.
The toilet is always the last big fixture set in a bathroom renovation. Not the second to last. Last.
For guidance on choosing the right flooring material for a senior bathroom before the toilet gets set my Non-Slip Bathroom Flooring for Seniors Guide covers DCOF ratings and what to look for before ordering
When You’re Just Swapping the Toilet
For a simple comfort height toilet swap with no flooring change the process is straightforward — pull the old toilet, check the flange height against the existing finished floor, add shims if needed, confirm rough-in distance, set the new toilet on a foam gasket, clock the bolts, level the toilet, done.
The one thing I always check on a simple swap is whether the existing flooring runs under the toilet or around it. If it runs around it the flange may be sitting at the wrong height for the new toilet — which means addressing the flooring situation before setting the new fixture.
Wall Mounted Toilet: The Ultimate Aging in Place Height Solution — And Why You Have One Shot to Get It Right
A wall mounted toilet is the single best height specification tool in an aging in place renovation. The finished seat height is set during rough-in before the carrier frame goes into the wall — meaning you can spec exactly the height the specific user needs rather than whatever a manufacturer decided was comfort height.
The catch is that changing height after installation means opening the wall, repositioning the frame, extending the drain pipe, and retiling. It’s not a minor adjustment. Get it right before that frame goes in because you’re not going back in after.
I have the user sit on a temporary surface at the anticipated finished seat height and confirm it feels right before anything gets framed. Five minutes of confirmation eliminates an extremely expensive mistake.
One aging in place specific note — the carrier frame inside the wall occupies significant wall cavity space that can conflict with grab bar blocking. Plan both simultaneously during rough-in rather than treating them as separate decisions.
Adding a Bidet to a Comfort Height Toilet: What Elderly Seniors Actually Need to Know
A bidet seat is one of the highest value aging in place additions you can make to a comfort height toilet installation — and one of the most frequently overlooked. For elderly seniors with limited mobility, arthritis, or post-surgical restrictions that limit reaching, a bidet eliminates one of the most physically demanding aspects of independent bathroom use.
Here’s the contractor framework for getting it right.
Electric vs Non-Electric
Bidet seats come in two categories — electric and non-electric.
Non-electric bidets are cold water only, no power required, and install on any toilet with a standard supply line. They’re inexpensive and functional but limited — no warm water, no air dry, no heated seat. For elderly seniors aging in place the cold water experience is often a dealbreaker.
Electric bidets offer warm water, adjustable pressure, heated seat, and air dry — all of which matter significantly for elderly users with sensitivity issues or limited drying ability. The tradeoff is they require a GFCI outlet within reach of the toilet. In most bathrooms that outlet doesn’t exist within range of the toilet supply line.
This is the detail most people discover after they’ve already bought the bidet. I always check outlet location before recommending an electric bidet — and if there’s no outlet within range I factor the cost of adding one into the project budget upfront. For the full picture of bathroom safety modifications that don’t require opening walls my Aging in Place Bathroom Safety Without a Full Remodel covers the high impact changes that leave your tile intact.
Toilet Compatibility
Not every bidet seat fits every toilet. Two things to confirm before purchasing:
Bowl shape — bidet seats are designed for either elongated or round bowls. An elongated seat on a round bowl overhangs the front and looks wrong. A round seat on an elongated bowl leaves a gap at the front. Confirm your bowl shape before ordering.
Clearance behind the seat — electric bidet seats have a control housing at the rear of the seat that requires clearance between the seat and the tank. Wall mounted toilets with in-wall tanks have unlimited clearance. Standard floor mounted toilets need at least 2 inches between the back of the seat mounting point and the front of the tank. Measure before ordering.
What to Look for for Elderly Seniors
For aging in place bidet specification I look for these features specifically:
Adjustable water pressure and temperature — elderly users often have skin sensitivity that makes high pressure or cold water uncomfortable.
Wireless remote control — side panel controls require reaching and twisting which is exactly the movement pattern comfort height toilets and grab bars are trying to minimize. A wireless remote mounted on the wall at a comfortable height eliminates that reach entirely.
Heated seat — cold toilet seats cause involuntary muscle tension that makes the sit to stand motion harder. A heated seat reduces that tension and makes the transition smoother for elderly seniors with hip or knee issues.
Soft close lid — a lid that slams is a lid that eventually cracks. On a comfort height toilet being used by an elderly senior daily a soft close lid is a longevity feature not a luxury.
Common Mistakes in Comfort Height Toilet Installation
These are the mistakes I see most consistently on comfort height toilet installations — and the ones most likely to turn a straightforward upgrade into an expensive callback.
Wrong Rough-In Measurement
Measuring off the framing instead of the finished wall is the most common rough-in mistake I see. Half inch drywall plus tile can add a full inch to your rough-in distance — enough to leave a gap between the tank and the wall that causes flexing, gasket stress, and eventually a cracked tank. Measure off the finished wall every time.
Flange Below the Finished Floor
The flange has to sit on top of the finished floor not below it. A flange sitting even a quarter inch below the finished floor surface won’t seal correctly regardless of gasket type. Check flange height after flooring is installed — not before.
Misclocked Flange
A flange clocked in the wrong orientation means the toilet won’t bolt down correctly. Check the clock before any flooring goes around the flange. Fixing a misclocked flange after tile is down is a significantly more expensive problem than catching it during rough-in.
Overtightening the Closet Bolts
Porcelain cracks. Plastic flange ears pull through. I see both regularly from overtightened closet bolts. Snug is sufficient — you’re compressing a gasket not securing structural hardware. This is one of the reasons I install stainless steel reinforced flanges on aging in place jobs specifically — the stainless ring around the ears prevents pull through even if someone goes too tight. For a deeper look at the structural work happening behind your bathroom walls my Shower Backerboard and Waterproofing Guide covers the full wall system from studs to tile.
FAQ: Comfort Height Toilet for Aging in Place
What is the difference between a comfort height toilet and a standard toilet?
A standard toilet sits at 14 to 15 inches from the finished floor to the bowl rim. A comfort height toilet sits at 17 to 19 inches. The finished seat height — which is what actually matters for aging in place specification — adds another inch to inch and a half on top of the bowl rim height depending on the seat. Always confirm finished seat height not bowl rim height when speccing a toilet for an elderly senior.
Is a comfort height toilet ADA compliant?
Yes. Per the ADA’s official accessibility guidelines the accessible toilet height range is 17 to 19 inches from the finished floor. Remember though private residences do not have to strictly follow this. The ADA measurements represent the gold standard for ergonomics based on actual biomechanics research and are always my baseline for aging in place toilet specification.
What is the standard toilet rough-in distance?
Standard rough-in is 12 inches from the finished wall to the center of the drain. Ten inch and 14 inch rough-ins exist primarily in older homes. Always measure from the finished wall — not the framing — before ordering any toilet. Some comfort height toilet models accommodate multiple rough-in sizes which gives you flexibility if you’re working in an older home with a non-standard rough-in.
More Comfort Height Toilet FAQs
Can I add a bidet to a comfort height toilet?
Yes — and for elderly seniors aging in place a bidet seat is one of the highest value additions you can make. Confirm bowl shape — elongated or round — before ordering. For an electric bidet confirm there is a GFCI outlet within reach of the toilet supply line before purchasing. If there isn’t factor the cost of adding one into your project budget.
Is a comfort height toilet good for everyone?
Not for shorter users. For elderly seniors 5’2″ and under a comfort height toilet at 17 to 19 inches may leave their feet dangling which destabilizes their base and makes the sit to stand motion harder not easier. For shorter users a 16 to 17 inch toilet is often the better specification. Always confirm the user’s height before speccing toilet height on any aging in place installation.
Final Thoughts
Comfort height toilet installation comes down to getting three things right before anything else happens — rough-in measurement off the finished wall, flange height relative to the finished floor, and toilet height confirmed against the specific user. Get those three things right and everything else follows.
For elderly seniors aging in place those details together mean the difference between a toilet that works correctly for the next twenty years and one that leaks, rocks, or sits at the wrong height for the person using it every single day.
If you’re ready to evaluate your full bathroom using the same framework I use on job sites my Free Home Safety Checklist walks you through every major transition zone room by room.
For grab bar placement around your new comfort height toilet my Toilet Grab Bar Placement Guide covers side wall bars, stander poles, and ADA measurements in the same depth we covered the toilet installation here.
Field Tested Products
Oatey Universal Toilet Flange — Stainless Steel Reinforced My standard flange specification on every aging in place toilet installation. The stainless steel ring around the flange ears prevents overtightening failure that plastic flanges are vulnerable to. Universal fit covers both 3 inch and 4 inch drain pipes eliminating guesswork on job sites with unknown existing pipe sizes.
Oatey Toilet Flange Shims My go-to solution for raising an existing flange to finished floor height on simple toilet swaps. Stackable to achieve exact height needed, stable enough for permanent installation when the floor is level and the toilet is set correctly.
Wax Free Toilet Gasket — Sani Seal or Equivalent My preference over a traditional wax ring on every installation. Seats consistently, tolerates minor positioning adjustments during setting, and reusable if the toilet needs to be pulled for any reason. No messy wax cleanup if the toilet needs to be reset.
TOTO Drake Comfort Height Toilet My comfort height toilet recommendation for aging in place installations. Available in 10, 12, and 14 inch rough-in sizes which covers virtually every bathroom layout. Elongated bowl for bidet compatibility. Solid construction, widely available replacement parts, and a track record on job sites that cheaper models don’t have.
Bio Bidet Slim TWO Electric Bidet Seat My bidet recommendation for elderly seniors aging in place. Wireless remote control eliminates the reaching and twisting that side panel controls require. Adjustable water pressure and temperature, heated seat, and air dry. Fits elongated bowls — confirm bowl shape before ordering. Requires a GFCI outlet within reach of the toilet.