Keeping It Level
Whether you call it a wheelchair ramp, a handicap ramp, or an accessibility ramp — the requirements are the same. A ramp that doesn’t meet slope requirements is just as dangerous as the steps it replaced. You haven’t solved the problem — you’ve changed the shape of it. A wheelchair ramp in Eastern Kentucky takes more planning than a flat lot somewhere else. Plan the route before you pick up a tool, get below the frost line on your footings, and never use plywood. Everything else flows from those three things.
A wheelchair ramp for a senior or elderly adult is a safety device. Not a favor. Not a box to check so someone can say they helped. A safety device — and like every safety device, it either works correctly or it doesn’t. There is no close enough.
Out here in the mountains, that conversation gets complicated fast. Hollers, hillsides, uneven ground, tight lots. Building a safe aging in place ramp on mountain terrain takes more planning and more honesty than a flat lot anywhere else. But it gets done right every day by people who understand what right actually means.
This is what building a wheelchair ramp in Eastern Kentucky the right way looks like.
- Plan first. Picture it before you pick up a tool.
- Do you own the land?
- Mobile homes
- The slope rule — and we don't negotiate it
- Width and landings
- Handrails
- Building a permanent wheelchair ramp in Eastern Kentucky
- Decking and materials for a wheelchair ramp in Eastern Kentucky
- The mistakes that keep showing up
- Permits for a wheelchair ramp in Eastern Kentucky
- Grants and funding for a wheelchair ramp in Eastern Kentucky
- FAQ: Wheelchair Ramp in Eastern Kentucky
- The bottom line on a wheelchair ramp in Eastern Kentucky
Plan first. Picture it before you pick up a tool.
The most important thing about building a ramp has nothing to do with lumber or concrete. It’s this: know exactly what you’re building and exactly where it’s going before anything else happens.
On flat ground you measure the rise, calculate the run, build it. Out here you might have a hillside dropping away from the front door, a holler lot with no room to run a straight shot, or steps on three sides of the house. The obvious route isn’t always the right one.
Sometimes the answer is building a deck around to a different side of the house where there’s more room, then starting the ramp from there. That’s more work. It is more work. But a longer route that meets slope requirements beats a shorter route that doesn’t. Every time. Always.
Picture the finished ramp in your mind before you ever pick up a tool. Know your rise. Know your run. Know where your landings go. Know how you’re getting from the door to the ground safely. If you can’t picture it clearly before you start building, stop and figure it out first. A ramp built without that clarity is a problem waiting to happen. For an elderly adult or senior who depends on that ramp every single day, getting the planning wrong isn’t just an inconvenience — it’s a safety failure. If you’re new to the specific challenges of aging in place out here, our Eastern Kentucky aging in place guide covers the full regional picture before you get into the specifics. Or if you’re still thinking through the full path from the car to the door, the last fifty feet is where the outdoor picture comes together.
Do you own the land?
Answer this before you design anything.
If you own the land, a permanent wood or concrete aging in place structure makes sense. Build it right, anchor it properly, footer it correctly, and it’ll serve that house for decades.
If you’re on rented land or in a mobile home park, a permanent structure is a problem. Whatever you build needs to be able to move with the home. In that situation a modular aluminum ramp system is the right answer. No permanent footings, meets accessibility requirements, relocates if the home moves.
Aluminum is expensive upfront. It also doesn’t rot and will outlast wood if maintained. One thing to watch — a lot of aluminum systems use steel hardware with aluminum components. The hardware will give out before the aluminum does. Know what you’re buying and what replacement hardware looks like before you commit. For elderly adults and seniors on fixed incomes in Eastern Kentucky, the upfront cost is the hardest part — which is why the grants section at the bottom of this article matters.
A properly built wood ramp on owned land can realistically last for decades. Key word: properly built.
Mobile homes
Many mobile homes in Eastern Kentucky — and there are a lot of them across Letcher, Leslie, Knott, Perry, and surrounding counties — sit on rented land. This means a permanent attached ramp usually isn’t the right answer. A modular aluminum system is typically the better call — it doesn’t require permanent footings and it moves with the home if it ever needs to relocate.
If you are building a permanent wood ramp attached to a mobile home, the attachment approach depends on the foundation. If the home is on a block foundation, you can bolt the ramp into the rim joist or into the blocking between the foundation and the home. If it’s not on a block foundation and you can’t get a solid attachment point, you’ll need to build freestanding posts near the home rather than attaching directly to it. The ramp sits on its own structure and meets the home at the door without being bolted to it.
For a full breakdown of what makes mobile home construction different and what to think through before any modification project, see Aging in Place in a Mobile Home: What Actually Works.
The slope rule — and we don’t negotiate it
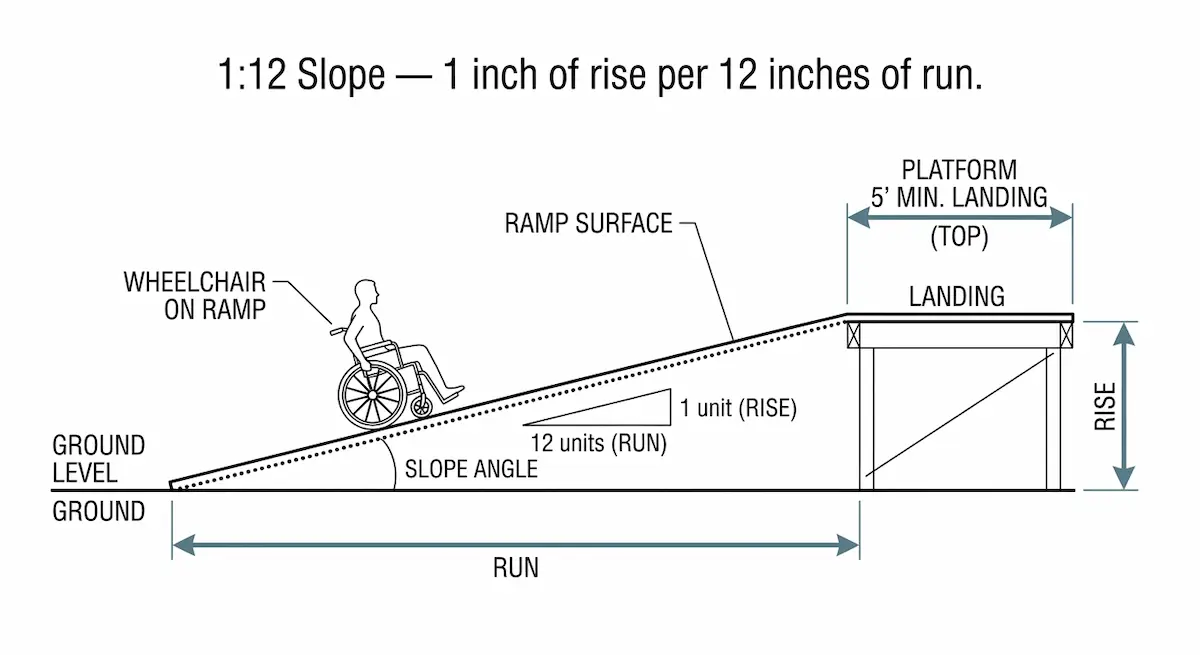
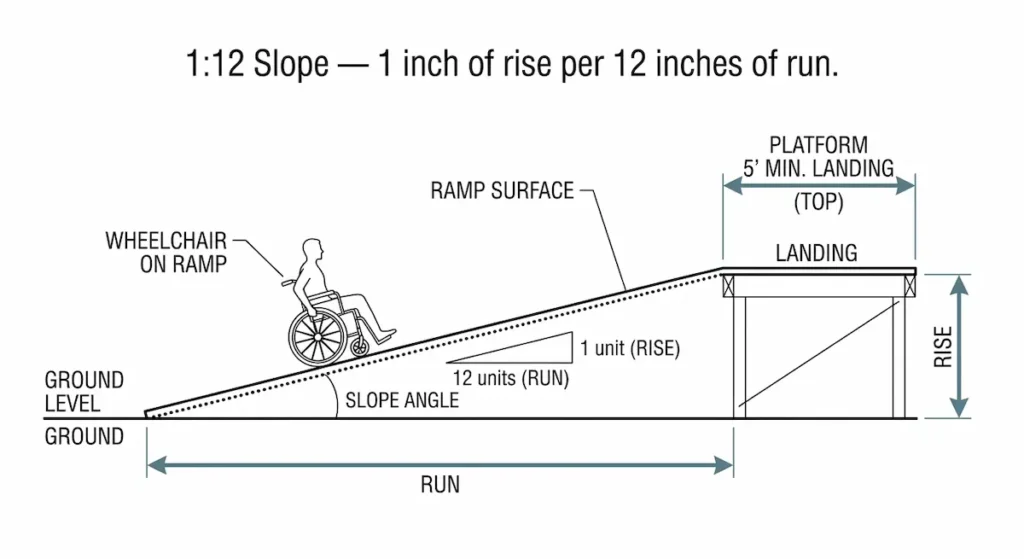
The ADA standard is 1:12. One inch of rise for every twelve inches of run. Rise and run, same as you learned in school.
This is not a suggestion. It is not a starting point for negotiation. It is the number.
If someone tells you a couple extra inches won’t matter, they’re wrong. If a contractor says they can make it work at a steeper pitch, find a different contractor. If a family member says they don’t want to walk all the way around the house — the answer is safety, full stop.
Think about the elderly adult or senior who is using this ramp. They’re already having trouble walking. Asking them to navigate a ramp that’s too steep is like asking someone who can barely walk to climb Mount Everest — you’re just sending them up a different mountain. They may be in a wheelchair, on a walker, using a cane. Limited strength. Limited balance. Limited ability to stop themselves if something goes wrong. A ramp that’s too steep for that person isn’t helping them. It’s putting them on an incline they can’t safely navigate and calling it a solution.
A steep ramp is a false sense of security. A ramp that doesn’t meet slope requirements is as dangerous as the steps it was supposed to replace.
Maybe you need more switchbacks. Maybe it costs a little more. I promise you it’s cheaper than broken bones and hospital stays. That longer walk around the house is a whole lot easier than the fall you’re preventing.
We don’t negotiate the slope.
If the math on your rise is making a 1:12 ramp feel impossible, a vertical lift might be worth considering before you give up. I’m covering that comparison in the next post — ramps versus lifts in mountain terrain, including real cost differences.
Width and landings
Minimum ramp width is 36 inches. That’s not a suggestion either.
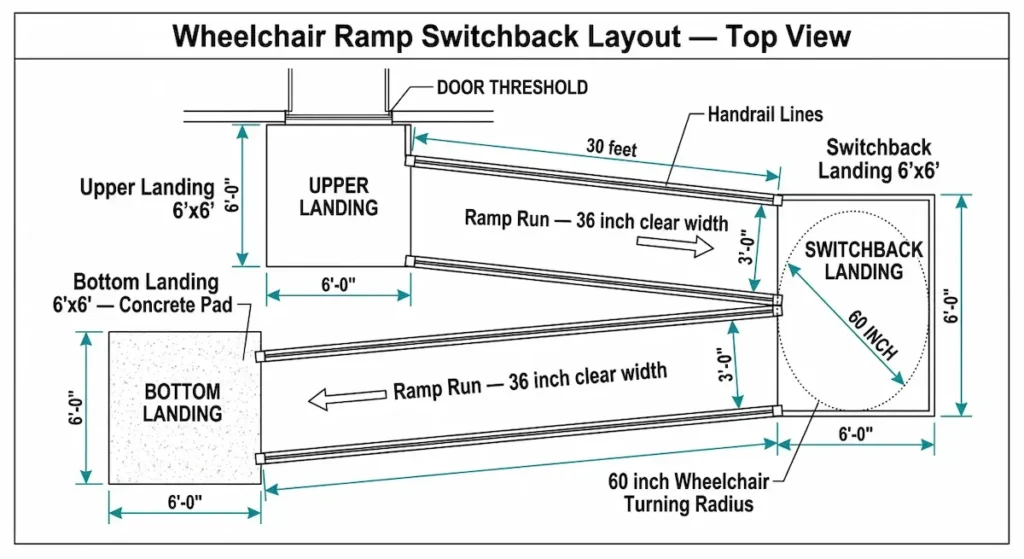
Every time the ramp changes direction, and after every 30 horizontal feet of continuous run, you need a landing. ADA minimum is 5×5 feet. I build them at 6×6. A 36-inch wide ramp coming into a 6×6 landing squares up perfectly, gives you more turning room, and looks intentional instead of like an afterthought. The extra foot costs almost nothing.
Now here’s where people get confused — a turn and a switchback are not the same thing.
- A turn is 90 degrees. The ramp changes direction at a right angle.
- A switchback is 180 degrees. The ramp doubles back on itself.
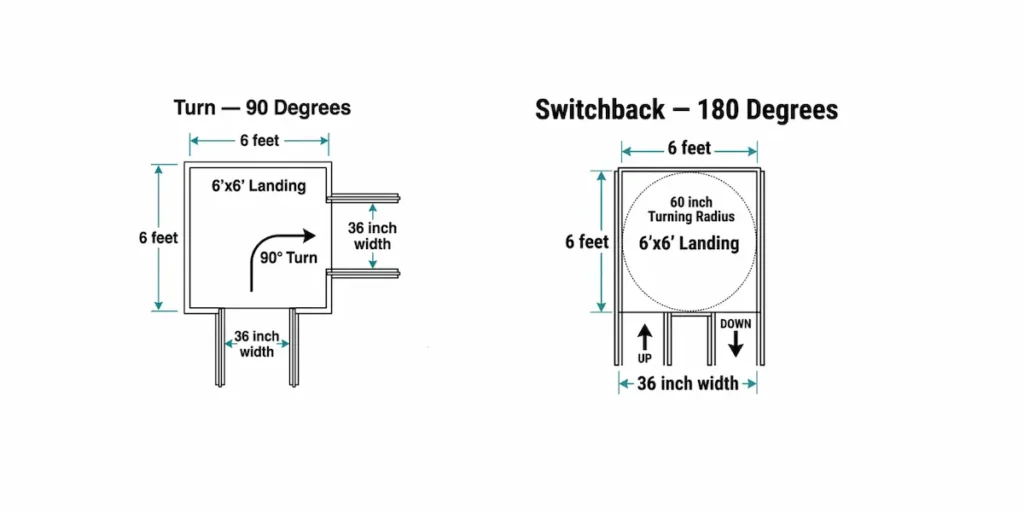
Both need a landing. On a steep mountain lot where a straight 1:12 ramp might run 40 feet or more, you’re probably using switchbacks — and that’s fine, that’s what they’re for. Just make sure you have enough swing room for a wheelchair to actually make that turn. A 5×5 is the minimum. A 6×6 gives you breathing room. Undersize it and you’ve built a bottleneck that defeats everything around it.
Landings go at the top and the bottom. At the top, the landing is your transition from the door — you never start a ramp directly from a doorway. At the bottom, you need a concrete pad where the ramp meets the ground. If the ramp just ends in dirt or grass, the small front caster wheels on a senior or elderly adult’s wheelchair will sink and get stuck the second they leave the wood. Also, having your ramp end on the dirt or grass will eventually rot the wood. Concrete pad at the bottom, same general sizing as the top, unless you’re landing on an existing driveway or sidewalk — then you’re already set.
Handrails
Every aging in place ramp needs handrails on both sides. Handrails deserve their own post — including the difference between guardrails and handrails, which most people don’t know exists. For an in-depth look read my Handrails for Seniors guide. They’re required, and they matter.
Building a permanent wheelchair ramp in Eastern Kentucky
Think of it as a deck built on an angle. Same structural principles. Same margin for cutting corners — which is none.
Footings
This is not where you save money.
The footings are holding the whole thing up. Everything on top of them is only as good as what’s underneath.
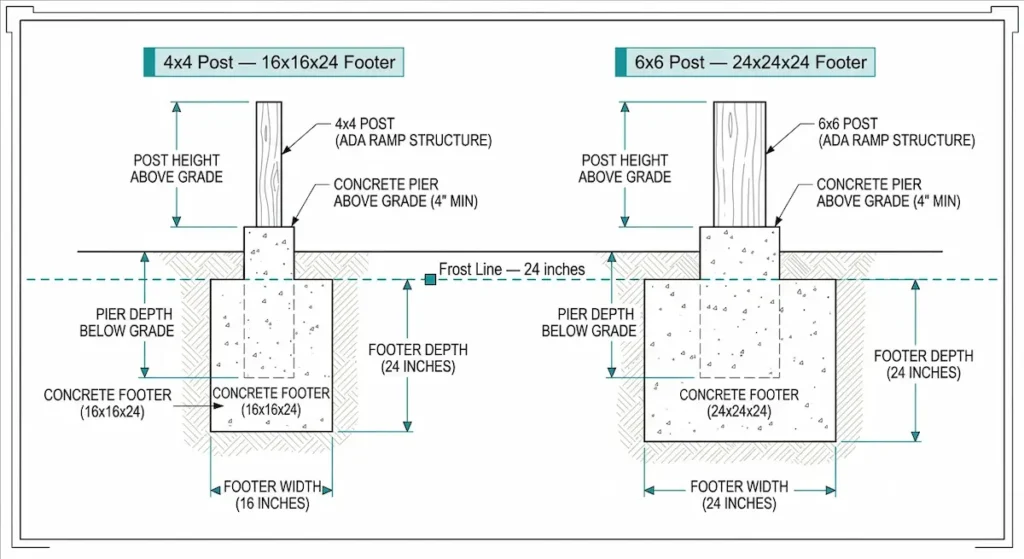
Standard sizing for Eastern Kentucky: 16×16 inches, at least 24 inches deep. Here’s why depth matters out here specifically — our frost line is around 24 inches. If your footings don’t get below it, they can heave in a hard freeze-thaw cycle. When that happens the ramp shifts, the door threshold goes out of alignment, and someone with limited hand strength may not be able to open their own front door. In Eastern Kentucky and anywhere with tough winters specifically, get below the frost line. Non-negotiable.
Now, footing size has to match what it’s carrying — and that changes based on the size of your posts and the load of your ramp. The longer and taller the ramp, the heavier it gets. More height means bigger material. I generally use 6×6 posts instead of 4x4s any time I’m over 4 feet high. You don’t technically have to — but I’m on build it once, build it right. I want my work to outlast me.
The Math
Here’s where the footing size math comes in. A 4×4 post on a 16×16 footer is fine for a standard ramp. But if you’re running 6×6 posts — which you will be on anything substantial — you need a 24x24x24 inch footer. Here’s why: a 6×6 post is a lot heavier than a 4×4. If your footer isn’t adequate for that load, that post is going to go down through it like a nail through cardboard. Size the footer to the post and the load it’s carrying.
You might get away with 12x12x24 on a very small build with 4×4 posts. I’d rather overbuild the footer than find out later I didn’t build it big enough. It’s the foundation of the whole structure — don’t find out the hard way.
Don’t bury your posts directly in the ground. The old way was to cement them in — it works, for a while. Eventually it rots. Use concrete footings that come up slightly above grade. Keep the wood out of direct ground contact and the structure will last significantly longer.
Post spacing and framing
Space your posts no more than 8 feet apart. This is driven by building code — specifically the railing code, which doesn’t allow more than an 8-foot span between railing posts. Beyond that, the closer your posts are together the stronger your structure. Go past 8 feet and you’ll start to feel bounce in the deck surface. Nobody wants that on a ramp.
Set the posts first. I run mine through and through from bottom to top rather than sitting them on top of the framing — fewer cuts means more strength, and every cut is a potential weak point. Once posts are set, come back with your 2×10 crossbraces between them to build out the skeleton. Floor joists — 2×8 or 2×6 — go between the crossbraces. Decking comes last.
Attaching to the house
You need a proper landing at the top before you attach anything. Never start the ramp from the doorway itself — the landing is your transition point and your attachment surface.
To attach the landing to the house you’re going to use a ledger board — typically a 2x material that the floor joists of your landing rest on — or joist hangers, which are metal connectors that support the load of the deck boards and have largely replaced ledger boards on most jobs. Either is adequate. Joist hangers are quicker and easier in most cases.
Whatever you’re bolting into on the house side has to have structural integrity. A trim board is not adequate — it has the load-bearing capacity of a feather. You need to be hitting the actual framing of the house. Think of it this way: if you were hanging off a cliff and had a choice between grabbing a sapling or a giant oak tree, which one are you grabbing? Same principle. Hit the framing or add a ledger board to give yourself something solid.
Lag bolt pattern:
Your lag bolts need to be more than 2 inches in from the top and bottom of the ledger board, and between 2 and 5 inches in from the ends. Don’t go inside 2 inches and don’t go past 5. Generally, you’re running 2 lags every 16 inches. That pattern applies to attaching the landing to the house and to attaching the ramp to the landing.
Bolt types:
Carriage bolts are my preference where wood allows — the square shoulder bites into the wood when you drive it and it is not coming out. Lag bolts work where you’ve got enough material thickness to bite into. Attaching to concrete means properly rated concrete anchors or through bolts. A big lag bolt doesn’t mean anything if it’s going into an inch of wood. Know what’s on the other side of that wall before you drill.
Decking and materials for a wheelchair ramp in Eastern Kentucky
Your options for ramp surface: treated lumber, composite, aluminum, or concrete.
Treated lumber
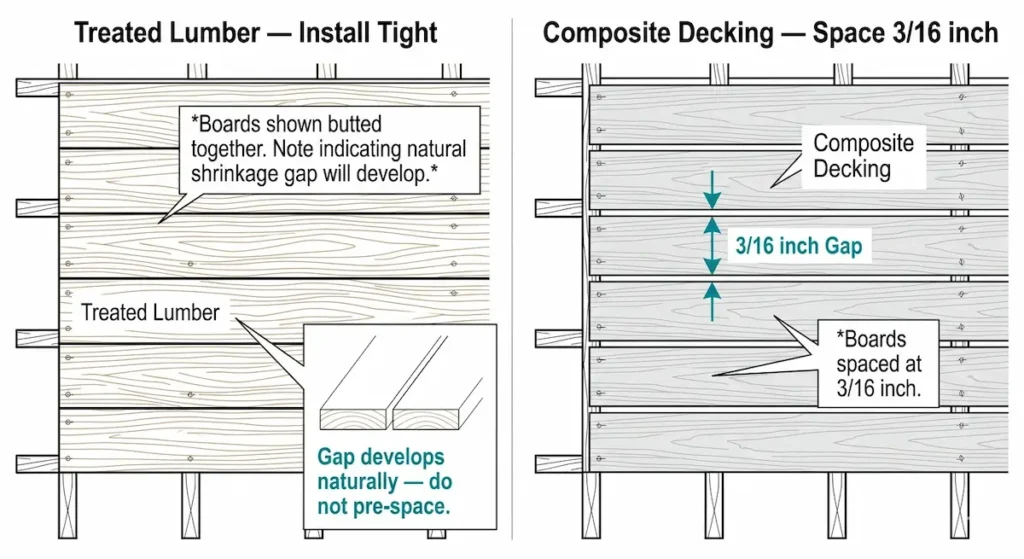
Treated lumber is the most affordable option and lasts for years with proper maintenance. Here’s something that trips people up on installation: do not space treated lumber. Run it tight. The wood will shrink on its own — trust me, I’ve built thousands of decks. As soon as the sun hits it, treated lumber shrinks, and it shrinks a lot. If you put spacers in between boards when you install them, within a month you’ll have a half-inch gap or better between every board. Run it tight and let the wood do what wood does.
Composite decking
Composite costs more upfront and requires less maintenance over time. Unlike treated lumber, composite does need to be spaced — but the approach depends on your fastener system.
The cleanest option is the hidden fastener system, sometimes called the biscuit system. The biscuits clip between boards and pre-space them for you. You run the board tight to the biscuit and the spacing is already built in. No face screws, no visible hardware.
If you’re face screwing composite instead, you need composite decking screws — not regular decking screws — and you need to space the boards. I run about 3/16 of an inch. Too small and they get tight and buckle in summer heat. Too large and it looks bad. Composite expands in heat and contracts in cold — you need that room to move.
What you cannot use on a wheelchair ramp in Eastern Kentucky (or anywhere else)
Plywood. I see it out here and I understand why — it’s cheap and it’s what people have on hand. But plywood rots, doesn’t drain properly, and is dangerously slippery when wet. Don’t use it.
Traction
For elderly adults and seniors aging in place in the mountains, traction is a real issue that flat-lot ramp guides never talk about. It’s easy to overlook. High humidity, moss, morning dew, leaves — even treated lumber gets slippery when it’s damp. Add anti-slip tape, sand-infused paint, or score the wood surface. On a concrete ramp, a broom finish gives you grip. On wood, heavy-grit adhesive strips are the difference between a safe walk and a slide. Don’t skip this step out here.
The mistakes that keep showing up
These show up whether it’s a wheelchair ramp in Eastern Kentucky or on the other side of the country, different regions, same problem.
Too steep. The most common mistake and the most dangerous one for elderly adults and seniors aging in place. A ramp that doesn’t meet slope requirements isn’t a solution.
Wrong materials. Plywood rots. Untreated lumber rots faster than treated. Know what you’re building with.
Undersized or missing landings. Every turn needs one. Every switchback needs one. Every 30 feet of run needs one. Not optional.
Footings not deep enough. Get below the frost line. 24 inches in Eastern Kentucky. The footer is the foundation — don’t scrimp on it.
Footer undersized for the post. 6×6 posts need 24x24x24 footers. Size it to the load.
No bottom landing. The ramp needs somewhere to go at the bottom that isn’t dirt. Concrete pad, or existing hard surface.
Skipping the top landing. The door needs a proper transition. Never start the ramp at the threshold.
Bolting into trim instead of framing. You need to hit structural wood. Trim board has the load-bearing capacity of a feather.
Spacing treated lumber. Run it tight. It will shrink on its own.
Many of these mistakes come from hiring the wrong person. Before anyone picks up a tool, know what to look for in a contractor.
Permits for a wheelchair ramp in Eastern Kentucky
Whether you need one depends on where you live. For a wheelchair ramp in Eastern Kentucky, enforcement on residential construction is inconsistent at best. That doesn’t mean the permits don’t exist.
Modular aluminum ramp systems generally don’t require permits in most jurisdictions — but verify locally before assuming. A permanent attached structure is a different conversation. Check with your local building department before you start.
Grants and funding for a wheelchair ramp in Eastern Kentucky
There are programs specifically designed to help elderly and senior homeowners aging in place in Eastern Kentucky cover the cost of ramp construction. USDA Rural Development, state-level assistance, and local Area Agency on Aging resources exist specifically for this situation and go underutilized because most people don’t know about them. Your local Area Agency on Aging is the best first call. In Eastern Kentucky that’s one of three offices depending on where you live:
Knott, Leslie, Letcher, Perry, Breathitt, Lee, Owsley, or Wolfe County: Kentucky River Area Development District (KRADD) — 606-436-3158 or 1-800-928-5723
Floyd, Johnson, Magoffin, Martin, or Pike County: Big Sandy Area Agency on Aging — 606-886-2375 or 1-800-737-2723
Boyd, Carter, Elliott, Greenup, or Lawrence County: FIVCO Area Development District — 606-929-1366 or 1-800-499-5191
For a full breakdown see my Senior Home Repair Grants in Eastern Kentucky guide. Call your county’s office first and ask specifically about home modification assistance — that’s the program category a ramp falls under.
FAQ: Wheelchair Ramp in Eastern Kentucky
📏 Design & Dimensions
What is the correct slope? 1:12 — one inch of rise for every twelve inches of run. ADA standard. Non-negotiable.
How wide and long does the ramp need to be? At least 36 inches wide. For length, measure your rise in inches and multiply by 12. A 24-inch rise = 24 feet of ramp minimum.
What’s the difference between a turn and a switchback? A turn is 90 degrees. A switchback is 180 — the ramp doubles back on itself. Both require a landing (5×5 minimum, I build 6×6) with enough room for a wheelchair to make the maneuver.
Do I need landings anywhere else? Yes. Top, bottom, every turn, every switchback, and after every 30 horizontal feet of continuous run.
🔨 Construction & Materials
Can I use plywood? No. It rots, doesn’t drain, and is dangerously slippery when wet.
How deep do footings need to be? At least 24 inches — that gets you below the frost line in Eastern Kentucky. Shallow footings heave in freeze-thaw cycles and can shift the ramp enough to jam the door shut.
What size footer do I need? 4×4 posts: 16x16x24. 6×6 posts: 24x24x24. I use 6×6 for anything over 4 feet high.
Should I space my deck boards?
- Treated lumber: run tight, it shrinks on its own
- Composite: space about 3/16 inch for thermal expansion
📋 Logistics & Funding
Do I need a permit? Depends on your county. Enforcement is inconsistent in rural Kentucky but requirements still exist. Always check locally before you start.
Wood or aluminum? Own the land: wood is more affordable and can last decades if built right. Renting or in a mobile home park: modular aluminum — no permanent footings, moves with the home.
How do I attach a ramp to a mobile home? Block foundation: bolt into the rim joist or blocking. No block foundation: build freestanding posts near the home instead of bolting to it.
Are there grants available? Yes. USDA Rural Development and your local Area Agency on Aging both have programs specifically for this. A full breakdown is coming — call your local AAA office first.
The bottom line on a wheelchair ramp in Eastern Kentucky
Wrong is wrong. If you’re going to build it wrong, don’t build it. You’re not making anyone safer — you’re just changing the shape of the problem.
I’ve watched people I love navigate ramps that were built decades ago, too steep, and they just deal with it because it’s what they have. I know what it looks like when someone falls and I know what it looks like when the thing that was supposed to prevent it didn’t.
That’s why wrong is wrong to me. That’s why we don’t negotiate the slope.
I know most of the time people are trying to help an elderly parent or aging family member. They’re doing the right thing with the wrong information. Get the right information first. That’s all I’m asking.
That longer ramp is a whole lot easier on someone than the fall you’re preventing.