Keeping It Level
Door handles for seniors aren’t just about swapping a knob for a lever, though that’s the single biggest win you can make. It’s about the whole system around that handle actually working — the right handing for your door, the right backset, a strike plate anchored into real framing that can take a stumble without splitting, hardware with light enough spring tension for an arthritic hand to actually operate, and, if you go that route, a smart lock that solves a real problem instead of just being a gadget nobody in the house can see or feel their way through. This guide covers all of it: door handing, installation mistakes I see constantly, what’s different about a mobile home door, graspability, operating force, handle height, and where smart locks genuinely help seniors and elderly homeowners aging in place.
- Know Your Door's Handing Before You Buy Anything
- No Pre-Drilled Holes? Here's What That Actually Involves
- Mobile Home Doors Are a Different Animal
- Backset: The Measurement Most People Never Heard Of
- Graspability: Knobs vs. Levers vs. Thumb-Latches
- Door Handles for Seniors Height
- The Keyhole Target Trap
- Strike Plate Installation: Where I See It Done Wrong
- Stiff Lock? It Might Not Be the Lock
- Smart Locks on Door Handles for Seniors
- FAQs: Door Handles for Seniors
- The Bottom Line on Door Handles for Seniors
This is the next piece in my Last Fifty Feet series. Everything else in this series gets someone safely to the door. This one’s about what happens once they’re standing in front of it — and for an elderly person with reduced grip strength, changing vision, or a tremor, that last few seconds at the door can be just as much of a safety issue as anything on the ramp behind them.
Know Your Door’s Handing Before You Buy Anything
Here’s something that trips up more people than you’d think, and it has nothing to do with grip strength or arthritis on its own — but it sets up everything else in this article, so it’s worth getting straight first.
Not every door opens the same way. Doors are “handed.” If the hinges are on the left, you’ve got a left-hand door. Hinges on the right, right-hand door. On top of that, a door can swing in toward you (inswing) or out away from you (outswing). So you end up with four real combinations: left-hand inswing, left-hand outswing, right-hand inswing, right-hand outswing. That handing determines exactly where the striker, the lock cylinder, and the deadbolt end up sitting once everything’s installed.
Most lock sets and handle sets these days are universal, meaning they can be adjusted to match whatever handing your door actually is. But “universal” doesn’t mean “automatic” — you still have to set it up correctly for your door, and that’s exactly where people get tripped up. Get the handing wrong during installation and you can end up with hardware installed upside down. I’ve seen it. My own father-in-law did it on his front door. Here’s the part that makes this sneaky — some sets will still function even when they’re put in upside down. His happened to be one of them, so he just left it that way. It worked, technically, right up until I came to visit and fixed it for him. Other sets won’t function at all until they’re adjusted correctly, and you’ll know immediately.
For an elderly homeowner living alone, this isn’t just a cosmetic annoyance. A lock installed upside down or set up for the wrong handing can throw off how smoothly the deadbolt throws, which turns a simple lock-and-go routine into something that has to be wrestled with every single time someone comes or goes. Knowing your door’s handing before you install anything saves you the hassle, and it saves the person using that door from fighting with it daily.
The good news: most pre-hung doors these days come pre-drilled for a specific handing, so a lot of this gets decided for you the moment you buy the door. The handing conversation matters most when you’re dealing with a slab door, or when you’re double-checking that the lock set you bought actually matches what’s already hung.
No Pre-Drilled Holes? Here’s What That Actually Involves
If you’ve got a pre-hung door, this section doesn’t apply to you — the holes are already there, and you’re just installing hardware into them. This is for anyone working with a slab door that has no holes cut for a handle or deadbolt at all.
I cannot stress this enough: you cannot go all willy nilly drilling holes into a door with a hole saw and hope it lines up. I’ve seen people try it, and I’ve seen what happens. You end up with a hole in the wrong spot, an exit hole blown out on the back side, or a bore that’s not square — and now you’ve ruined an expensive door trying to save yourself thirty minutes. For a family working through an aging-in-place project on a fixed income, that’s not a small mistake. That’s a second door you didn’t budget for.
What you actually need is a door mortise kit, a drill, and a router. The kit acts as a template, so your holes end up exactly where they’re supposed to be, at the right depth, square to the face of the door. I personally use both the Lenox door mortise kit and the Milescraft kit. Both are solid. My honest opinion: the Milescraft kit comes with more, and it’s the one I reach for most often. If you’re doing this once for a single door, you don’t need to spend the money on the more complete kit — a cheaper mortise template will get you through it. But skipping the template entirely and freehanding it with a hole saw is how a $300 exterior door turns into scrap.
Or, honestly, do what most people do and just buy a door that’s already pre-drilled for the handle and deadbolt you want. It costs a little more upfront, but it removes this entire headache.
Mobile Home Doors Are a Different Animal
This is something almost nobody talks about, and it matters a lot if you’re working on a mobile home or trailer for an elderly parent aging in place — and a meaningful share of the seniors I work with are in exactly that kind of home.
A standard exterior door on a stick-built home runs about 1¾ inches thick. Exterior doors on a mobile home or trailer are often thinner — closer to 1⅜ inches. Some newer manufactured homes do use standard 1¾-inch doors, so don’t assume either way. If you’re in an older trailer, though, odds are good the door is the thinner size.
Why does this matter? Because it changes what hardware you can buy. Most lock sets and handle sets on the market are universal and will fit either thickness. But some are built to a specific measurement and simply won’t tighten up properly on a thinner door. Before you order a door handle for a mobile home, double-check the door thickness and confirm the hardware you’re buying will actually work with it. It’s a five-minute check that saves you a return — and for a senior on a fixed income, it saves you from paying twice for the same fix.
If you’re working on a mobile home or trailer for an elderly parent aging in place — a meaningful share of the seniors I work with are in exactly that kind of home. For the fuller picture on what’s different about manufactured housing, see my Aging in Place Mobile Home guide.
Backset: The Measurement Most People Never Heard Of
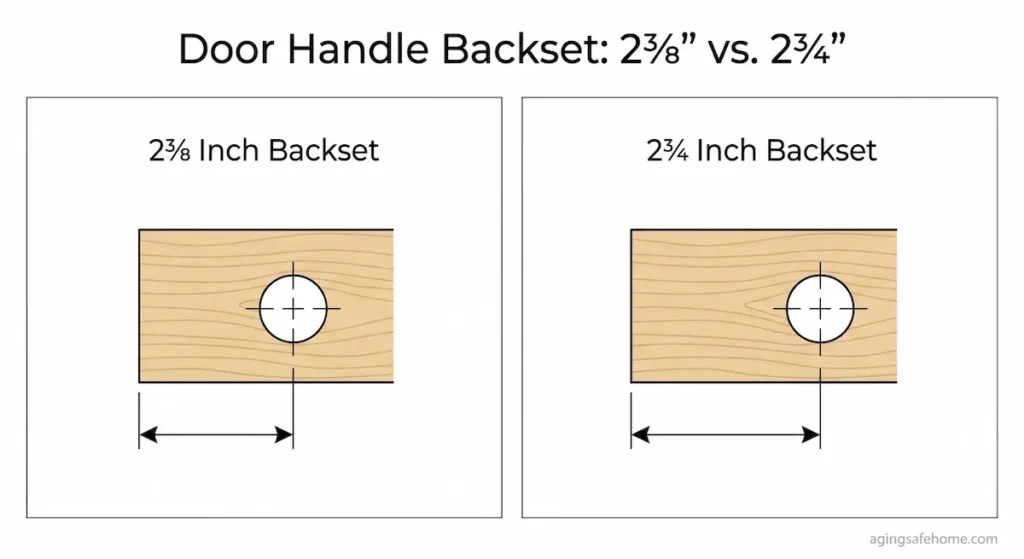
While we’re on measurements — your backset is the distance from the front edge of the door to the center of the hole where the handle goes. Standard backsets are either 2⅜ inches or 2¾ inches, and you need to know which one your door is before you install a lock set.
Same story as door thickness: most handle sets are adjustable and will work with either backset. But not all of them are, so it’s worth confirming before you buy rather than after you’ve already got the box open.
Graspability: Knobs vs. Levers vs. Thumb-Latches
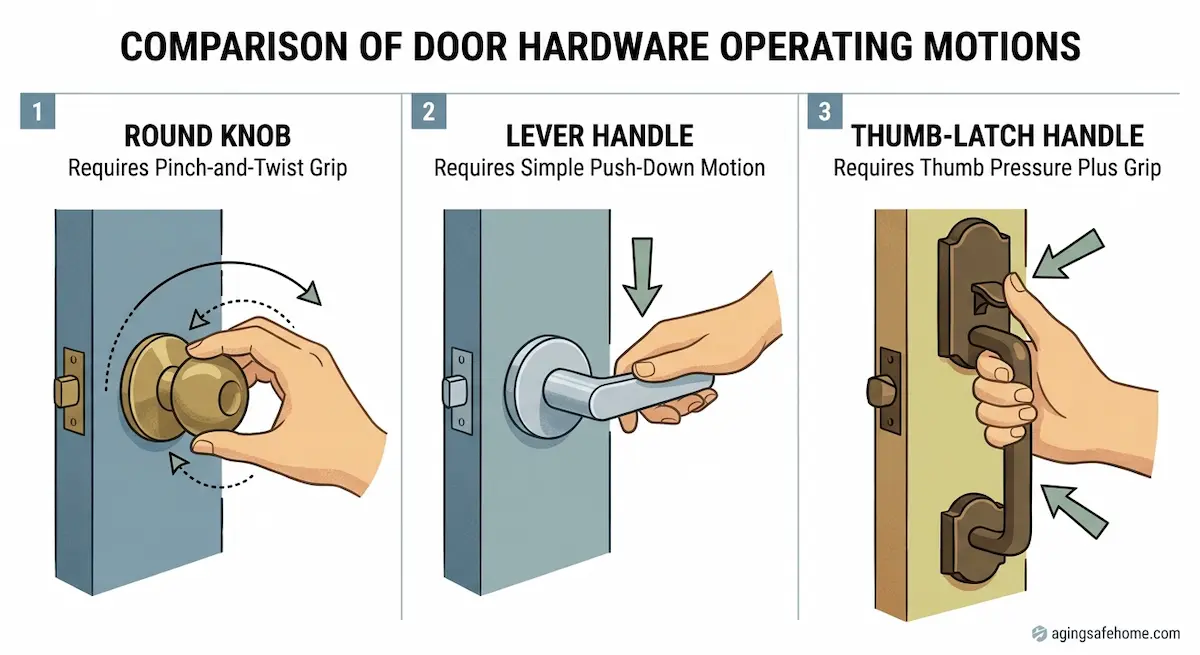
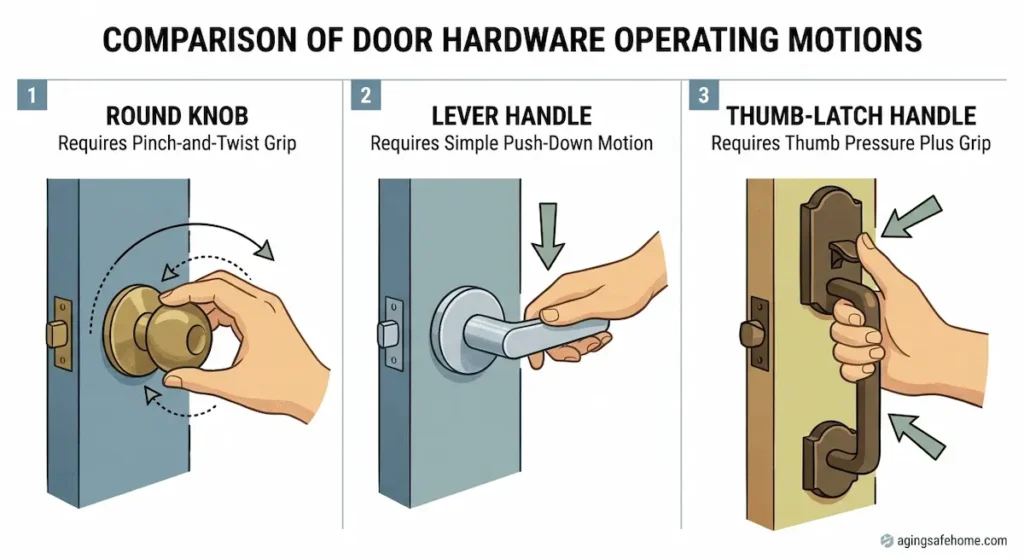
I talked about graspability at length in my handrails article, and the exact same principle applies here. A round knob requires your fingers to pinch and twist at the same time — two separate motions that both get harder with arthritis, reduced grip strength, or general hand weakness that comes with age. A lever only asks for a push down. You can open it with a closed fist, an open palm, or even your elbow if your hands are full. That’s a real difference for an elderly person, not a cosmetic one.
Knobs are still what I see most often on older homes, and changing a knob to a lever is one of the most common single changes I make on an aging-in-place job. It’s a quick swap, and it’s one of the highest-impact things you can do for very little money.
There’s also the thumb-latch style handle — the ones where you press down on a thumb piece at the top while gripping the handle to open the door. I’ll be straight with you: these still create a problem. You’re asking someone to apply real downward force with their thumb while simultaneously gripping and pulling, at the exact same time their balance and hand strength may already be compromised. It’s better than nothing, but it’s not what I’d put on a door for an elderly homeowner if a lever is an option.
For those of you who’ve been following this series long enough to remember my papaw stories — I actually won this one. He’s got a lever on his front door now, even though “he ain’t ever had a problem grabbing anything in his life.” I’ll take the small wins where I can get them.
It’s Not Just Lever vs. Knob — Check the Spring Tension Too
Here’s the part almost nobody tells you when they say “just get a lever.” A lever handle can still be hard on an arthritic hand if the internal spring tension is too stiff. The shape of the handle is only half the equation — how much force it takes to actually push that lever down is the other half, and that’s determined by the lockset’s internal spring, not by whether it’s shaped like a lever or a knob.
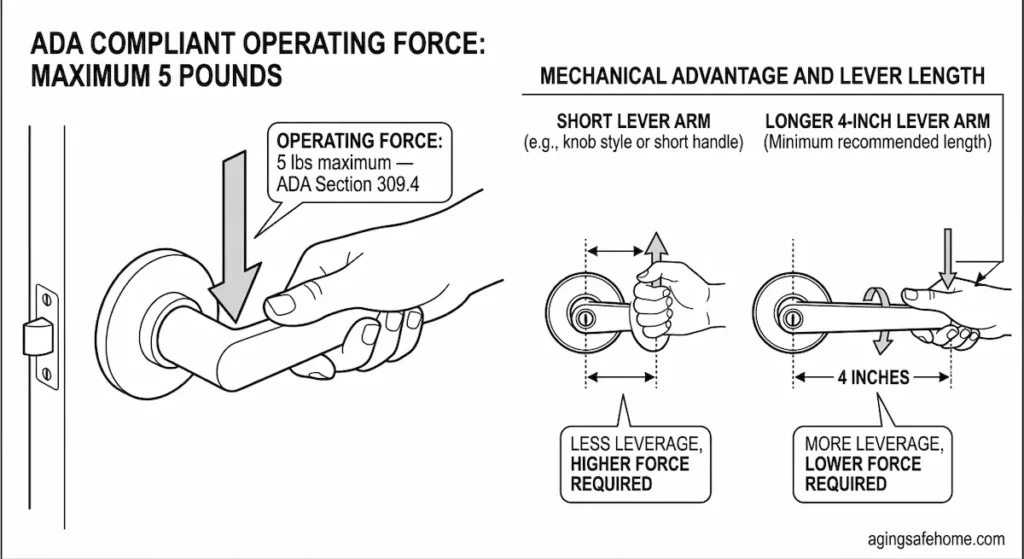
There’s an actual standard for this. Under ADA Section 309.4, operable hardware is required to work with no more than 5 pounds of force, and it has to be operable with one hand, without tight grasping, pinching, or twisting of the wrist. That’s not a suggestion — it’s the benchmark commercial buildings are held to, and it’s a good target to hold your own house to as well.
When you’re shopping, look for Grade 2 or Grade 1 hardware rather than the bargain-bin residential grade. Commercial and heavy-duty residential levers use lighter internal return springs, so they take less force to depress. A longer lever arm — I’d look for at least 4 inches — also gives more mechanical advantage, meaning less effort for the same amount of leverage. Don’t just judge a lever by its shape in the store. Push down on it with one finger. If it takes real effort for you to move it, it’s going to take a lot more for someone with arthritis or reduced grip strength.
Door Handles for Seniors Height
Thirty-six inches is standard, and it’s what I’ve always installed at — that’s how I was taught, and it’s held up over every job I’ve done since. Thirty-four inches is the minimum you’ll see referenced. Either works, but if you’re setting the height yourself on a slab door install, 36 inches is my recommendation.
The Keyhole Target Trap
Here’s one that doesn’t get talked about at all, and it’s got nothing to do with grip strength — it’s about eyesight. As depth perception and hand stability decline with age, targeting a tiny brass keyhole in low light becomes a genuine source of frustration, and on a porch step at night, it becomes a real fall risk. I’ve written before about how aging eyes need significantly more light to see the same detail a younger eye picks up easily — that same problem shows up in miniature every time someone’s standing at their own front door trying to find a small, dark hole in a dark lock, in the dark.
If you’re installing a traditional key-and-cylinder lock rather than going keyless, choose hardware with a high-contrast finish — something like a matte black lock against a light-colored door — so the keyway itself is easier to spot at a glance. Illuminated keyways are also out there and worth looking into if someone in the house is coming home after dark regularly. This ties directly into good porch lighting too, which I cover in a lot more depth in my Outdoor Lighting for Aging in Place guide — a well-lit keyhole and a well-lit path to it solve the same underlying problem from two different angles.
Strike Plate Installation: Where I See It Done Wrong
Strike plate issues almost always come back to the same root cause — the screws never made it into real framing. And for an elderly homeowner who may lean on a door for support while fumbling with a lock, or who could stumble into it, a weak strike plate isn’t just a security issue. It’s a structural one.
Here’s the sequence I actually follow, in order:
First, prepare the structural void. Pull the original strike plate off and take a look at the gap between the finish jamb and the rough stud framing behind it. Drive tapered wood or composite shims into that gap at the strike location so the jamb has solid backing and can’t flex or crush once you start tightening screws into it.
Second, pre-drill your pilot holes deep. Using a long, thin bit — about 1/8 inch — pre-drill through the strike plate screw locations, straight through the finish jamb, through the shims, and at least 2 inches into the 2×4 wall stud behind it. This keeps the wood from splitting when you drive the real screws in.
Third, upgrade your fasteners. Here’s the part most people never think to check: the screws that come standard in most latch kits are only about ¾ inch long. That’s long enough to grab the thin finish jamb and nothing else — it doesn’t come close to reaching your actual framing. Many doors these days are made from PVC or pine, and if your screws stop short of the framing, you’ll end up with cracking right at that mounting point, because the material on its own isn’t strong enough to hold up to daily use. Replace those short screws with a minimum 3-inch hardened stainless steel or coated deck screw, and drive them through the jamb, through the shims, and solidly into the framing stud. Go in flush, but don’t overtighten to the point you pull the jamb out of plumb.
Fourth, use a reinforced strike, not the flimsy stamped one that comes in the box. A heavy-gauge steel box strike that fully encapsulates the deadbolt throw does a lot more than a standard flat strike plate. It spreads force out across the framing instead of concentrating it on one small point, which matters if someone loses their balance and leans or falls into the door. A door a senior depends on every day should be able to take that kind of impact without the jamb splitting out from around the lock.
This is the same anchoring principle I’ve hammered on throughout this whole series — a handle or lock that looks secure but isn’t anchored into something solid is worse than no lock at all, because it gives a false sense of security right up until the moment it actually gets tested.
Stiff Lock? It Might Not Be the Lock
If your door is giving you resistance, pay attention to when you feel it, because that tells you what’s actually wrong. If the stiffness happens while you’re turning the key or the thumb-turn itself — the actual locking mechanism feels tight, gritty, or hard to rotate — that’s a hardware problem. The lock itself needs attention: lubrication, adjustment, or replacement.
But if the lock turns just fine and the resistance shows up when you’re actually pushing or pulling the door open, that’s not a hardware problem at all. That’s almost always the door sticking in the frame, typically from swelling, and no amount of new hardware fixes it. I’ll get into door swelling, weatherstripping, and door force in more depth in my Exterior Doors guide, but it’s worth knowing the difference before you spend money replacing a lock that was never actually broken.
Smart Locks on Door Handles for Seniors
I think smart locks are great — for the right situation. Everyone who ends up using one gets there for a different reason, and I’ve seen a few of them play out with my own family.
I can absolutely see the benefit for a caregiver, a child, or anyone else who needs to get inside without carrying a physical key around. I can also see it for the simple, universal problem of accidentally locking yourself out. Smart locks take the entire “where did I put my keys” ordeal off the table.
My mamaw, bless her heart, is a perfect example of why that matters. She had a pair of pants she decided she didn’t like anymore, so she threw them out. The next day, she started looking for her keys. If you guessed we eventually found them in the trash, in the pocket of those pants, you’d be exactly right. A smart lock doesn’t fix everything, but it does fix that.
Not All Smart Lock Interfaces Are Built for an Aging Hand or Eye
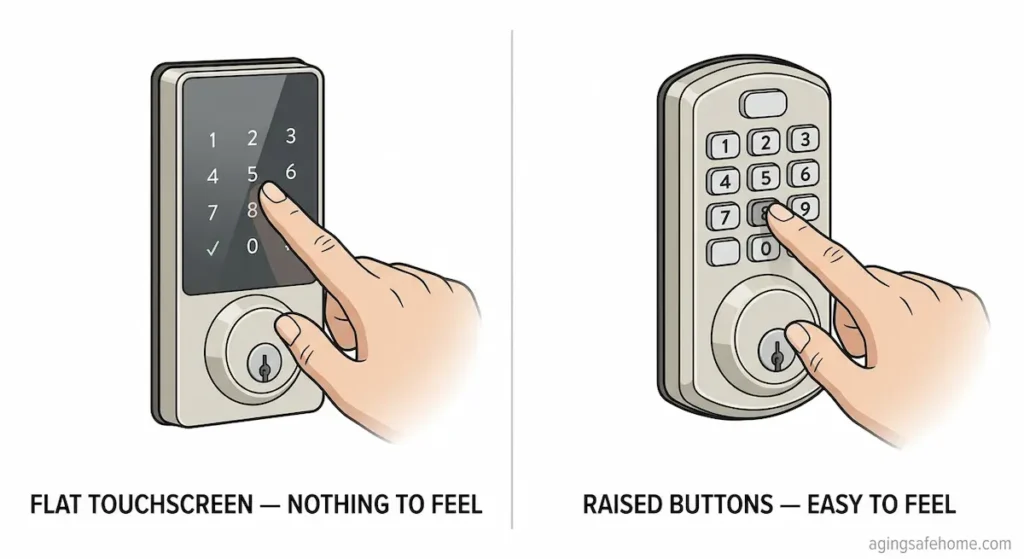
Here’s where I’d slow down before buying one for an elderly parent. A lot of smart locks lean hard on a smooth, flat touchscreen keypad, and that’s genuinely a poor interface for aging in place. There’s zero tactile feedback on flat glass — nothing to feel under your fingertip to confirm you’ve hit the right number — which is a real problem for anyone dealing with macular degeneration, low vision, or a hand tremor that makes precise, repeated taps difficult.
If you’re going this route, I’d look for a smart lock with large, backlit, physical buttons — actual rubber or metal buttons with real travel and feedback, not a touchscreen. Biometric options are worth a look too, since a fingerprint scanner built into the lever itself only requires one natural grip motion, with nothing to memorize and no PIN to punch in correctly in low light. One caveat worth knowing: fingerprint scanners can be less reliable for older skin, since thinner, drier skin with less defined ridges sometimes reads inconsistently. It’s not a dealbreaker, just something to test in person before you commit to it as someone’s only way in the door.
On the other hand, I can also see where someone like my papaw would want nothing to do with any of this — he doesn’t even like using email, let alone punching a code into a keypad or pairing something to an app. So there are real pros and cons here, and it comes down entirely to the person. A smart lock isn’t automatically the right upgrade just because it’s newer technology. It’s the right upgrade when it actually solves a real problem the person is dealing with — lost keys, a caregiver needing access, someone who gets locked out regularly — and when the interface itself is something they can actually see and feel their way through. If none of those are real issues for your situation, a good graspable lever with the right spring tension and a properly anchored deadbolt may be all you need.
FAQs: Door Handles for Seniors
What’s the best type of door handles for seniors?
A lever handle is almost always the better choice over a round knob. A lever only requires a push down and can be operated with a closed fist, an open palm, or even an elbow, which matters a lot for anyone dealing with arthritis, reduced grip strength, or general hand weakness that comes with age. Just as important as the shape, though, is the spring tension — look for Grade 1 or Grade 2 hardware that meets the ADA’s 5-pound operating force standard, not just any lever.
What is door handing, and why does it matter for elderly homeowners?
Door handing refers to which side the hinges are on and which direction the door swings — left-hand or right-hand, inswing or outswing. It determines where the striker, lock cylinder, and deadbolt need to sit. Getting it wrong can mean hardware installed backwards or upside down, and while some lock sets will still function that way, many won’t.
Are mobile home doors different from standard doors?
Yes. A standard exterior door on a stick-built home is about 1¾ inches thick. Many mobile home and trailer doors are thinner, closer to 1⅜ inches, though some newer manufactured homes use standard-thickness doors. Always confirm your door’s thickness before buying hardware, since some lock sets are built to a specific measurement and won’t tighten properly on a thinner door.
What height should door handles for seniors be installed at for aging in place?
Thirty-six inches is standard and what I install at. Thirty-four inches is the minimum. Either is workable, but I’d default to 36 inches.
Why does my door lock feel stiff, and is that a hardware problem?
It depends on when you feel the resistance. If the stiffness happens while you’re actually turning the key or thumb-turn, that’s a hardware problem — the lock mechanism itself needs attention. But if the lock turns fine and the resistance shows up while you’re pushing or pulling the door open, that’s almost always the door sticking or swelling in the frame, not the lock. Replacing the hardware won’t fix a swollen door.
Are smart locks a good option for elderly parents living alone?
It depends on the situation. Smart locks genuinely help with lost or misplaced keys, caregiver access without a physical key, and accidental lockouts. Just be careful with the interface — a flat touchscreen keypad is a poor choice for anyone with vision changes or a tremor. Physical buttons or a biometric lever built for grip are usually a better fit. They’re not automatically the right choice for everyone, either — comfort with technology matters, and some seniors are better served by a simple, properly installed graspable lever and deadbolt.
How much force should it take to operate door handles for seniors?
Under ADA Section 309.4, operable hardware shouldn’t require more than 5 pounds of force to use, and it should be operable with one hand without tight grasping, pinching, or twisting. Grade 1 or Grade 2 levers with lighter internal springs and a longer lever arm (at least 4 inches) make it easier to meet that standard.
The Bottom Line on Door Handles for Seniors
A door handle for seniors isn’t just a hardware swap you make and forget about. Getting it right means knowing your door’s handing before you buy anything, installing into pre-drilled holes the right way or using a real mortise kit if you don’t have them, checking your door thickness and backset if you’re working with a mobile home or an older slab door, choosing a lever with the right spring tension over a knob every time you can, making sure someone can actually see the keyway they’re aiming for, and anchoring your strike plate into real framing with a reinforced strike that can take a real impact instead of hoping the door material holds on its own.
None of this is complicated. It’s just detail work — the same kind of detail work that runs through every article in this series. Get it right, and a door that used to be a daily struggle becomes something an elderly person can see, reach, grip, and open without a second thought, for years to come.
If you’re working through a full aging in place plan for your home, grab our free Home Safety Checklist and walk through it room by room, inside and out.