Keeping It Level
Steps are their own trade, not an afterthought bolted onto a deck build. For exterior steps for seniors, get riser height under the 7-inch code max whenever you’ve got the room, and don’t be afraid to go deeper than the 10-inch minimum on tread depth. Watch for the “trip step,” a single riser off by even a fraction of an inch can cause a fall, because your body expects every step to feel identical. Make sure the stringers are mechanically hung at the top, not just screwed into the rim joist, since that’s where staircases actually fail first. Skip open risers entirely, they’re a foot trap and a disorientation risk. Build in slip resistance, contrast, and lighting positioned so it doesn’t cast a shadow over the steps themselves. Get all of that right, and you’ve got a staircase built to last, not just to pass inspection.
- Getting the Dimensions Right for Aging in Place
- Buyer Beware: Pre-Cut Stair Stringers
- Steps or a Ramp? It's Your Call, Not Mine
- The Trip Step Nobody Talks About
- What's Actually Holding Those Steps Up
- Width and Depth Matter More Than People Think
- Reading the Warning Signs
- Frost Heave and Why Your Footings Matter
- Do You Need a Landing?
- Nosing and Stair Nosing Contrast: The Sweet Spot Between Two Different Hazards
- Kickplates, Open Risers, and Building In Contrast
- Lighting: Position Matters as Much as Brightness
- What Material Can You Actually Trust?
- Maintenance: The Part Nobody Wants to Hear
- Patch It or Replace the Whole Thing?
- Questions to Ask Your Contractor
- No Two Sets of Steps Are the Same
- FAQs on Exterior Steps for Seniors
- What is the ideal riser height for exterior senior steps?
- How deep should stair treads be for elderly safety?
- What is a trip step, and why is it dangerous for seniors?
- Are open riser stairs safe for seniors?
- Should I choose a ramp or steps for aging in place?
- How often do outdoor wood steps need to be resealed?
- When should I replace outdoor steps instead of repairing them?
- Bottom Line
Everybody worries about the handrail. Nobody worries about the steps themselves until something’s already gone wrong. But here’s the truth I’ve learned building custom staircases for a living: the handrail is just something to grab onto when the steps underneath it have already failed you. If the steps aren’t right, the best handrail in the world is just there to catch you on the way down, not stop you from falling in the first place.
Outdoor step safety for elderly homeowners is not a “figure it out as you go” part of a renovation. They’re not something you tack onto a deck build as an afterthought. Steps are their own beast, and I’ve made it my mission in life to conquer them. I can build a set of stairs to fit almost any situation, but I’ll tell you right now, it involves a crap ton of math. If you ain’t a math-er, you ain’t a stair builder. Just because a contractor can frame a deck doesn’t mean they can custom build a safe, code-compliant staircase to go with it. That distinction matters even more when the person using those steps is your mom, your dad, or your papaw.
This is the next piece in our Last Fifty Feet series. We’ve already covered the handrails you hold onto. Now let’s talk about what’s underneath your feet the whole time.
Getting the Dimensions Right for Aging in Place
Code says a wood step can’t have a riser (the vertical part of the step) taller than 7 inches. If you’re working in block or masonry, you get up to 8 inches. Code also sets a minimum tread depth (the part you actually stand on) of 10 inches.
Getting stair riser height right for elderly homeowners means treating code as the floor, not the target. When I’m building exterior steps for seniors, I’m not trying to hit 7 inches, I’m trying to get under it. The first thing I do is make sure I’m inside code parameters, and then I look at what kind of room I’ve got to work with. If there’s room, I’ll add a step or two to spread the height out over more, shorter risers so the whole staircase feels less steep. Less steep means less strain on the knees and hips going up, and less of a lean forward going down, which is exactly where a lot of falls happen.
Tread depth works the same way. Code minimum is 10 inches. I like to go deeper. I’ve built treads 14 inches deep before. It’s not just about looking nice, although it does. A deeper tread gives you a bigger resting spot for your foot, which matters a lot more once balance and stride length start to change with age.
The real key to all of this, though, is space. You can’t wish a staircase into being less steep if you don’t have the horizontal room to spread it out. That’s the first conversation I have with any homeowner before we even talk materials.
Buyer Beware: Pre-Cut Stair Stringers
I know Lowe’s and Home Depot sell pre-cut stair stringers, and I get why they’re tempting. Here’s the problem. You either have to modify those stringers, or you have to modify the ground they’re sitting on, and most people don’t realize that going in.
You can absolutely buy a pre-cut stringer, hang it off the side of your deck, and still fail inspection, because the ground underneath it isn’t level to match. Inspection measures from your deck height down to the ground, and that whole run has to work out evenly across every single step. It’s not just “attach stringer, done.” It’s finding the sweet spot between your deck height and your landing point, because every riser in that staircase has to be identical, top to bottom.
If a set of steps is anything more than the most basic, low-height access point, I’d ask your contractor point blank if they’ve built custom staircases before. Not decks. Staircases. It’s a different skill set, and for aging in place work, it’s not the place to find out the hard way that someone’s guessing.
Steps or a Ramp? It’s Your Call, Not Mine
I get asked this a lot, and here’s my honest answer: it’s homeowner preference. My job is to give you what you want, but I’ll walk you through the tradeoffs so you’re deciding with real information.
A standard staircase runs roughly 7:10, meaning for every 7 inches you go up, you go out about 10 inches. A standard ramp runs 1:12, meaning you only gain an inch of height for every 12 inches of ramp length. To get the same rise a staircase covers in a few feet, a ramp is going to stretch out considerably longer. So a ramp is going to eat up a lot more of your yard or entry space than steps will.
Cost is the other piece. A ramp uses a lot more material to cover that same rise, so it’s going to cost more, plain and simple. I’ll go over the full pros and cons with any homeowner, because this really does come down to lifestyle. Someone using a wheelchair or a walker full-time is a very different conversation than someone who’s just planning ahead. There’s no wrong answer here, just the right answer for your situation. If a ramp ends up being the right call for your property, I’ve got a full breakdown of how to build one properly, slope, footings, materials, all of it. And if you don’t have the room for a 1:12 ramp at all, that’s a real possibility on some properties, it’s worth looking at how a vertical lift compares before you rule it out.
The Trip Step Nobody Talks About
This is the part of stair building most homeowners have never heard of, and it’s the single biggest senior-safety issue hiding in plain sight on a lot of properties.
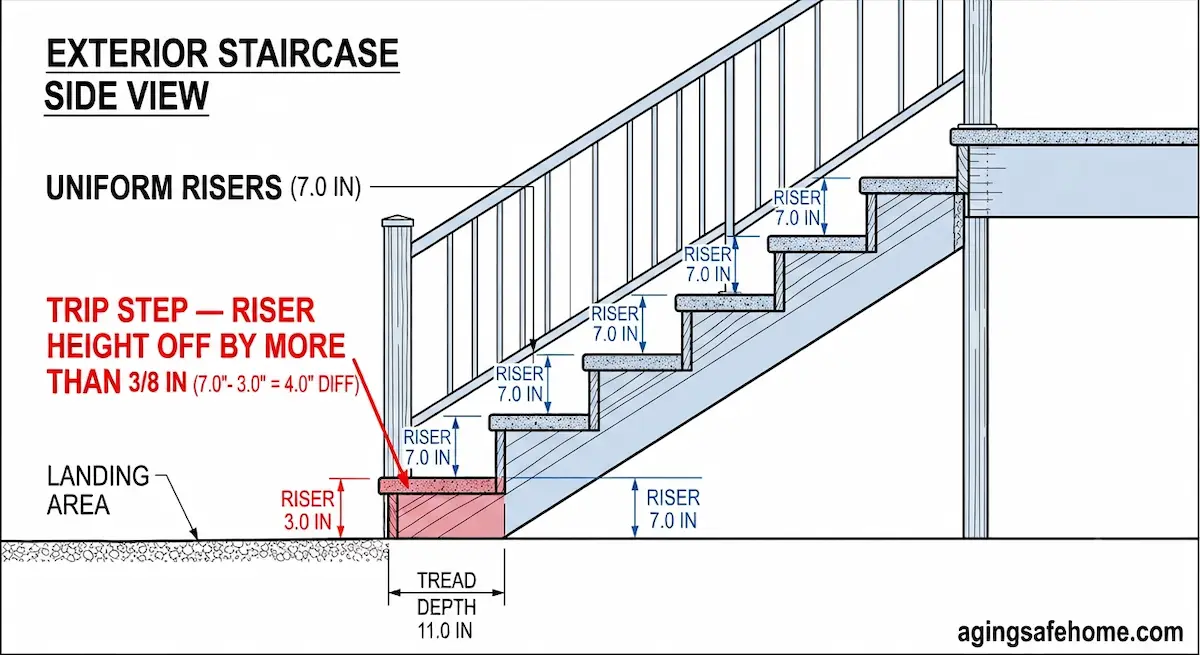
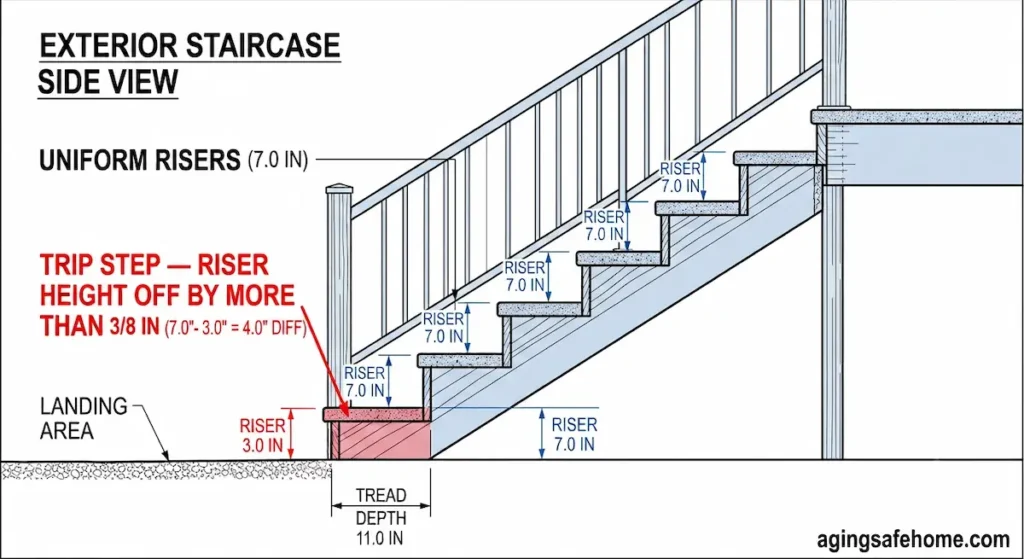
Code allows 3/8 inch of total variance in riser height across your entire staircase, top to bottom. It doesn’t matter if you’ve got 3 steps or 20, you get 3/8 inch total. That sounds forgiving until you realize what it actually means. If just one step is off by 3/8 inch, you’ve failed. If you’ve got several steps that are each off by only 1/8 inch, you’ve also failed, because it adds up across the whole run. The longer the staircase, the smaller your margin per step actually is.
This rule exists because of muscle memory. Once your body learns the rhythm of a staircase, it expects every step to feel the same. When one step breaks that pattern, even by a fraction of an inch, that’s what’s called a trip step, and it’s exactly what it sounds like.
Nine times out of ten, the trip step is either the top step or the bottom step. That’s usually because people forget to account for the finished surface, the decking boards up top or the tread material itself, when they’re calculating riser height. Here’s the simple version: the distance from the finished decking to the finished tread below it has to match the same riser height you’ve used everywhere else on that staircase, without exception, top to bottom.
For exterior steps for seniors, a trip step is one of the most dangerous things you can have on a property, precisely because it’s invisible. Nobody sees it coming.
What’s Actually Holding Those Steps Up
For tread material, I generally use 2×6. I’m not a fan of 5/4 decking on stair treads. It flexes more, it’s thinner, it doesn’t last as long, and it tends to curl over time. All things you don’t want on a staircase somebody’s grandmother is using. If you do go with 5/4, tighten up your on-center spacing to 12 inches instead of the usual amount. On a 3-foot-wide staircase, that means 4 stringers instead of 3.
Code is a minimum here too. Wood moves. The more support you build in, the less deflection you get, and the less deflection you have, the safer and truer that staircase stays over time. I build for a lifetime, not a season. On standard 2×6 wood treads, I run stringers 16 inches on center. On composite decking, I tighten that up to 8 inches on center to keep it stout, even though the manufacturer specs will often say you can get away with 12.
I will not lay stringers directly on dirt. I don’t care what anyone tells you, dirt will eventually rot your wood out. To get around that, I use a piece of 1×2 PVC trim as a stringer shoe, secured across the bottom of the stringer so there’s zero direct contact between the wood and the ground. PVC doesn’t rot. You can use composite for the same purpose, but PVC’s what I reach for.
Where Stairs Fail: The Top, Not the Bottom
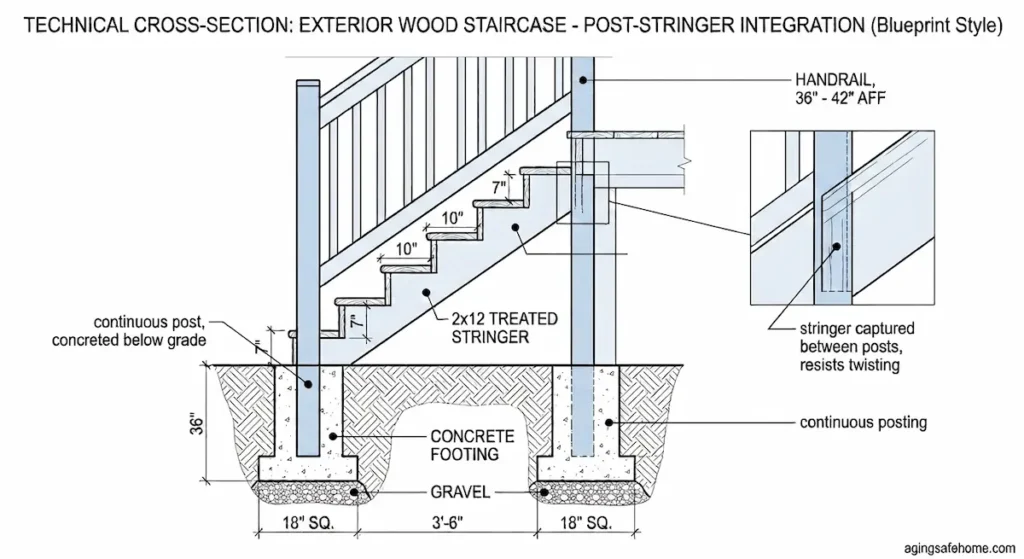
Here’s something most homeowners never think about. Structurally failed stairs usually don’t rot out at the bottom first, they pull away from the deck at the top. That’s the connection nobody looks at, and it’s where corner-cutting shows up the fastest.
A lot of contractors will just toe-nail or screw the stringers straight into the rim joist and call it done. Over time, every single person walking down those stairs is putting stress on that connection, and toe-nailed fasteners work themselves loose. For a senior safety build, I use engineered structural stair stringer hangers, like a Simpson Strong-Tie LCA or equivalent, at that top connection. Or you can box in your stringers and build it all as one unit. This requires more math, more building, but is also much stronger. Both of these options mechanically lock the stringer to the ledger or rim joist so that connection can’t work itself loose and let the whole staircase drop away from the deck. This is not the place to save money. That connection is only as good as what it’s tying into, though. If the deck itself has rot, loose fasteners, or a ledger board pulling away from the house, no hanger in the world fixes that. Worth giving the deck a real look while you’re at it, I cover what to check in my deck and porch safety guide.
Contractor Tip: I always build my stringer in between the handrail posts, not off to the side of them. The posts run continuous, full height, all the way to the ground and get concreted in solid. With the stringer sitting between two posts that can’t move, it physically can’t twist or rack side to side over time. It’s a small layout decision that makes the whole staircase mechanically sound.
Width and Depth Matter More Than People Think
Tread depth can go as deep as you want it to. My own steps at home are 16 inches deep, and there’s nothing stopping you from going deeper if the space allows.
Building walker-safe steps starts with width. Width is where I push people to think bigger than they normally would. I like exterior steps for seniors built wide, wider than the minimum every time. My personal standard is wide enough that one person can comfortably come up one side while another person is comfortably going down the other side at the same time. That matters a lot more once a caregiver, a spouse, or a walker is part of the daily routine.
Reading the Warning Signs
For wood steps, you’re watching for visible rot, softness underfoot, and boards that have started to bow. If wood feels soft when you press on it, that’s not a “keep an eye on it” situation, that’s a “somebody’s foot, cane, or walker could go straight through it” situation.
For masonry and block steps, you’re watching for cracking, uplift, and anything that’s shifted out of level. If a block has heaved or settled unevenly, that step is no longer the same height as the ones around it, and you’re right back to the trip step problem we talked about above, just caused by the ground instead of bad math.
Bottom line for aging in place: any weakness in the structure is a hazard, full stop. There’s no such thing as a minor structural issue on a staircase a senior depends on every day.
If you’re doing this kind of walkthrough on your steps, it’s worth doing the same thing for the rest of the property while you’re at it. I put together a free home safety checklist based on the same room-by-room walkthrough I do when I evaluate a home, it covers the hazards I find most often beyond just the stairs.
Frost Heave and Why Your Footings Matter
The further north you go, the more of a problem frost heave becomes, and I see this trip people up constantly. Homeowners think they can dig a hole a foot deep, throw some concrete in, and call it good. Depending on where you live, that’s nowhere near adequate. A quick search on your local frost line depth will tell you what you actually need. Same principle applies in reverse if you’re somewhere like the coast. Sand moves. You need your footings going down past the sand, because you don’t want a structure that shifts every time the ground underneath it does.
Do You Need a Landing?
Commercial steps require a landing at the bottom. Residential doesn’t technically require one, but I recommend it almost every time. Even if you get your dirt perfectly level the day you build those steps, the odds of it staying that way are slim once rain, freeze-thaw, and everyday weather get involved. A concrete landing gives you a stable, level surface at the bottom that isn’t at the mercy of the ground shifting underneath it, and that stability is exactly what you want at the point where someone’s transitioning from stairs to solid ground.
Two things people miss on that landing, though. First, if it sits even an inch higher than the surrounding grass or walkway, you haven’t solved the trip hazard, you’ve just relocated it from the stairs to the yard. That landing needs to sit flush with the surrounding grade, or transition cleanly into a hardscaped walkway. Second, don’t let anyone trowel that concrete smooth. Smooth concrete gets slick fast, especially wet. I want a medium to heavy broom finish on any landing a senior’s going to be walking or setting a walker tip on, it gives you the mechanical texture you actually need for traction.
Nosing and Stair Nosing Contrast: The Sweet Spot Between Two Different Hazards
The nosing is the lip of the tread that overhangs the riser below it, and I’ve seen it done wrong both directions. Hang it too far out, and it becomes a toe catcher, something a foot snags on going up. Don’t hang it far enough, and you leave the end grain of your stringers exposed to water, which is exactly where rot gets started.
From my experience, the sweet spot sits between 1/2 inch and 3/4 inch of overhang. That’s enough to cover the outer band and protect your end cuts from moisture, without hanging out far enough to catch a foot mid-step. If you are planning on doing lighting on your nosings, you may have to bump that number up to an inch depending on the lighting that was purchased. Yet another reason to vet your contractor and also maintain good communication with them about everything you want done.
Kickplates, Open Risers, and Building In Contrast
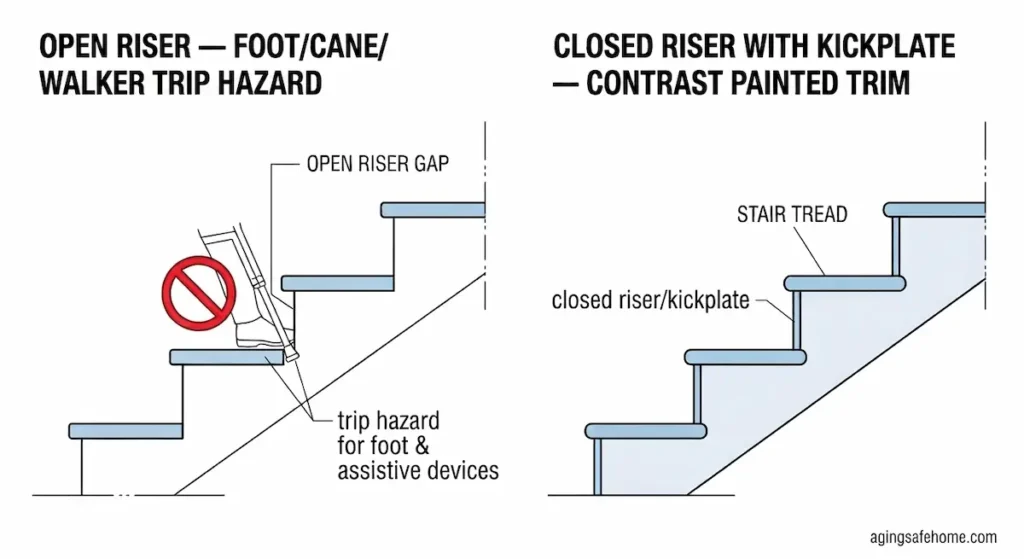
If the gap between your treads, measured from the bottom of one tread to the top of the next, exceeds 4 inches, code requires a kickplate. I put them in regardless of that requirement unless a homeowner specifically asks me not to.
I want to be blunt about this one: no open risers, ever, on a staircase built for seniors. It’s a trend on a lot of modern decks, and it’s a bad idea here. Physically, the toe of a shoe, the tip of a cane, or a walker leg can slip straight through that open gap on the way up, and that traps the foot and sends someone falling forward, which is one of the worst ways to go down. Visually, it’s just as bad. Looking through open risers at the ground moving underneath you causes real spatial disorientation for a lot of seniors, especially anyone with depth perception issues. A kickplate solves both problems at once.
It also does double duty as a safety feature you can see. Paint the kickplate one color and the tread a different color, and you’ve built in visual contrast that makes every step easier to pick out. Commercial code actually requires a 30% difference in Light Reflectance Value, or LRV, between the two colors, and that same standard is a good target to aim for on a residential job too, since a shade too close in tone won’t read as contrast to aging eyes. There are reflective products and grip tape options out there too.
Lighting: Position Matters as Much as Brightness
Like I said in my outdoor lighting article, I will never stop talking about adequate lighting on these projects. But for stairs specifically, there’s a rule that trips people up even when they’ve done everything else right: where the light is coming from matters as much as how bright it is.
If you put a bright fixture behind someone at the top of the stairs, their own body casts a shadow right over the steps they’re trying to walk down. I’ve seen this exact setup on properties where the homeowner swore they had “plenty of light.” The fix is positioning the light source to hit the steps from the front or the side, or better yet, building it into the stairs themselves. Lighting the handrails or running LED strips under the nosings solves this automatically, because the light source is already at step level instead of throwing a shadow down onto it.
What Material Can You Actually Trust?
Treated wood is tried and true. Composite, masonry, and PVC can all get you there too, as long as they’re installed correctly. Every one of those materials can meet the same safety standard. The difference isn’t the material, it’s the install. Composite done right will last forever. Composite done wrong is a nightmare.
Whatever material you land on, don’t stop at picking something durable, non-slip stair treads that stay grippy when wet matter just as much as the material underneath them. That’s really what fails people on a rainy morning, not the material itself but its coefficient of friction once it’s soaked. A senior with an altered gait often isn’t pushing off cleanly, there’s more shuffling, more heel-first contact at a shallow angle, and that’s exactly the moment a slick surface turns into a fall. For composite, skip the smooth profiles and look for boards with a deep, embossed wood-grain texture. Smooth composite in the rain is basically an ice rink. I go into a lot more depth on this, paint versus stain, DIY versus commercial products, and what actually holds up on each material, in my anti-slip deck coatings guide.
Maintenance: The Part Nobody Wants to Hear
Wood is higher maintenance, period. It’s not a one-and-done project. Sealer is generally recommended every 3 to 5 years, but I want you to think about that number differently than most people do. It’s not really about years, it’s about use. Steps take more foot traffic than almost anything else on your property, so they wear down faster than a deck surface ever will. Every time you walk across that sealer, you’re wearing a little bit of it away, and the elements are working on it too if it isn’t covered. Covering your steps and landing, if your setup allows for it, is one of the most effective ways to stretch that maintenance schedule out. I break down awnings versus a full roof extension, and what it takes to do either one right, in my porch awnings guide.
If you’re choosing between stain and paint, know that stain will always outlast paint, because stain soaks into the wood while paint just sits on top of it as a coating that eventually peels or wears through.
My papaw has it on his calendar every single year, without fail, that his deck and steps get re-sealed. That’s not overkill… well it might be a little bit. But that’s exactly the kind of habit that keeps exterior steps for seniors safe for the long haul instead of turning into a slow-motion hazard nobody noticed creeping up on them.
Composite skips this maintenance cycle entirely. Pressure wash it, keep it clean, and you’re done. If you go masonry, you can still seal it, I typically use a standard concrete sealer for that.
Whatever material you choose, keeping the surface clean is the real bottom line across the board. Leaves, algae, pollen, whatever’s built up, it all reduces traction, and any material can accumulate it.
Patch It or Replace the Whole Thing?
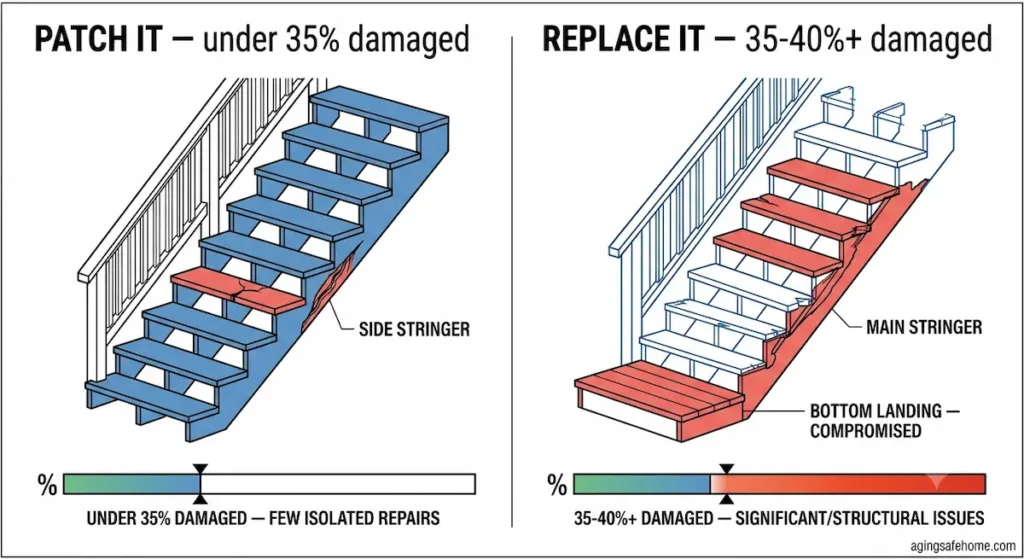
Small stuff is easy. Replace a cracked brick. Swap out a broken stringer. Replace a tread that’s starting to wear. These are normal maintenance items, not red flags.
Once you’re looking at 35 to 40 percent of the staircase compromised, it’s time to seriously consider a full rebuild instead of another round of patches. At that point, the cost difference between “keep patching” and “just build it new” usually isn’t as big as people assume, and you also need to ask whether the original staircase was even built to today’s code in the first place. Older staircases sometimes weren’t, even if they were fine when they went in.
I’ll always be honest about cost, that’s real, and I get it. But if something isn’t safe, it isn’t safe, and it needs to be addressed regardless of budget. If your staircase is otherwise sound, adding a good handrail, contrast, and lighting is usually your quickest, cheapest way to dramatically improve safety without a full rebuild. If cost is the thing holding you back from a rebuild that needs to happen, it’s worth checking whether you qualify for assistance programs before you rule it out.
Questions to Ask Your Contractor
Before you hire anyone to touch your exterior steps for seniors, ask:
- Have you built custom staircases before, not just decks?
- How are you keeping the stringers off the dirt?
- What are you using to attach the stringers to the deck or house at the top?
- Will there be a kickplate, and will the risers stay closed, not open?
- How are you positioning the lighting so it doesn’t cast a shadow over the steps?
- What’s your plan for the footings given our local frost line?
- Are we including a landing at the bottom, and will it sit flush with the surrounding grade?
If a contractor can’t answer these without hesitation, keep looking. Steps are too important to be someone’s first attempt. For the full picture of what separates a contractor who’ll get this right from one who won’t, I’ve laid it all out in The Last Guy.
No Two Sets of Steps Are the Same
I want to leave you with this. In all my years building custom staircases, I have never once built the same set of steps twice. Every property has different ground, different rise, different available space, different homeowner needs. That’s exactly why steps are their own beast, and why I said at the start of this article that if you ain’t a math-er, you ain’t a stair builder. There’s no template to grab off a shelf. Every single staircase gets its own math, worked out fresh, for that specific spot on that specific property.
That’s also exactly why this article ran long. Stairs are technical, and there’s no shortcut to explaining them honestly. If you walked away from this with a better sense of what to ask for and what to watch out for, it did its job.
FAQs on Exterior Steps for Seniors
What is the ideal riser height for exterior senior steps?
Code allows up to 7 inches for wood and 8 inches for masonry, but for aging in place I recommend getting well under that number whenever the available space allows it.
How deep should stair treads be for elderly safety?
Code minimum is 10 inches, but deeper is better. I regularly build treads 12 to 14 inches deep to give a more stable resting spot for the foot.
What is a trip step, and why is it dangerous for seniors?
A trip step is any step in a staircase whose riser height doesn’t match the others, even by a fraction of an inch. Because your body learns a rhythm going up and down stairs, a mismatched step breaks that muscle memory and causes a stumble, most often at the top or bottom step.
Are open riser stairs safe for seniors?
No. Open risers let a cane tip, walker leg, or shoe toe slip through the gap and cause a forward fall, and the open view of the ground below can cause spatial disorientation for seniors with depth perception issues. Closed risers with a kickplate are the safer choice every time.
Should I choose a ramp or steps for aging in place?
It depends on your space, budget, and mobility needs. Ramps take up significantly more room than stairs for the same rise and cost more due to material, but may be necessary for wheelchair or full-time walker use. A good contractor should walk you through both options.
How often do outdoor wood steps need to be resealed?
Every 3 to 5 years is the general guideline, but high-traffic steps wear faster than that number suggests since they see more foot traffic than most other exterior surfaces.
When should I replace outdoor steps instead of repairing them?
Once damage affects roughly 35 to 40 percent of the staircase, a full rebuild is usually more practical than continued patching, and it’s worth checking whether the original structure even meets current code.
Bottom Line
Exterior steps for seniors are not the place to cut corners or hand the job to whoever’s cheapest. The math behind a safe staircase is unforgiving, a difference of fractions of an inch is the line between a safe daily routine and a trip hazard waiting to happen. Get the dimensions right, build in real structural support instead of the bare code minimum, protect your materials from moisture and ground contact, and layer in contrast and lighting wherever you can. Do that, and you’ve built something that will hold up for your family for a lifetime, not just until the next inspection.